WeCom Integration Guide
Connect Sage AI to a WeCom intelligent bot so teammates can chat in DMs or groups—query alerts, inspect hosts, generate reports, and more—without signing in to the ONE console. The bot is bound to the account and resource domain used at setup and follows Command Security and Content Security.
Configure an IM channel to bring Sage AI into team IM for instant Q&A and collaboration. The bot binds to the current resource domain and follows permission controls. To access all-domain data, configure under All Resource Domains. Do not bind the same IM credentials across accounts, environments, or resource domains—doing so may cause lost messages or interrupted conversations.
Prerequisites
| Requirement | Description |
|---|---|
| Menu | AI Studio / Security Operations / IM Channel |
| Permissions | Read-Write to configure, unbind, or enable/disable; Read-Only can view only |
| WeCom account | Permission to create an intelligent bot in API mode (admin or member path below) |
| Network | Long connection: outbound access to WeCom is enough; URL callback: public HTTPS callback URL required |
| Model | At least one inference model available; IM uses Auto routing by default |
Two connection modes (required reading)
WeCom API mode supports two connection modes. WeCom and AI Studio must use the same mode, or the integration will not work.
| Item | WebSocket long connection (recommended) | URL callback (Webhook) |
|---|---|---|
| Best for | Private / intranet, no public ingress, or simpler setup | Existing public domain and HTTPS; WeCom pushes events |
| WeCom side | Use long connection | Use URL callback |
| AI Studio | WebSocket long connection | Use URL callback |
| Credentials | Bot ID, Secret | Token, EncodingAESKey |
| Backfill URL | Not required | After save, generate Webhook and must paste into WeCom URL |
| Save check | Connectivity check → Connected | No connectivity check; save → Connected |
Recommendation: prefer long connection when outbound access to WeCom is available; use URL callback only when public callback is required or you already use Webhooks.
End-to-end flow
1. Create an API-mode WeCom intelligent bot, set visibility, and save
        ↓
2. Choose one mode (both sides must match)
   ┌──────────────────────────────┬────────────────────────────────┐
   │ Long connection              │ URL callback                   │
   │ ① WeCom: Use long connection │ ① WeCom: Use URL callback      │
   │ ② Copy Bot ID, get Secret    │ ② Random Token, EncodingAESKey │
   │ ③ AI Studio: long connection │ ③ AI Studio: URL callback      │
   │ ④ Connectivity check OK      │ ④ Paste Webhook into WeCom URL │
   └──────────────────────────────┴────────────────────────────────┘
        ↓
3. Publish the bot → DM or @bot in a group, send “hello” to verify
1. Create an API bot in WeCom
Complete the shared setup for your role first, then choose mode in section 2 or 3.
1. Admin: create in the admin console
- Open WeCom Admin and sign in as an admin.
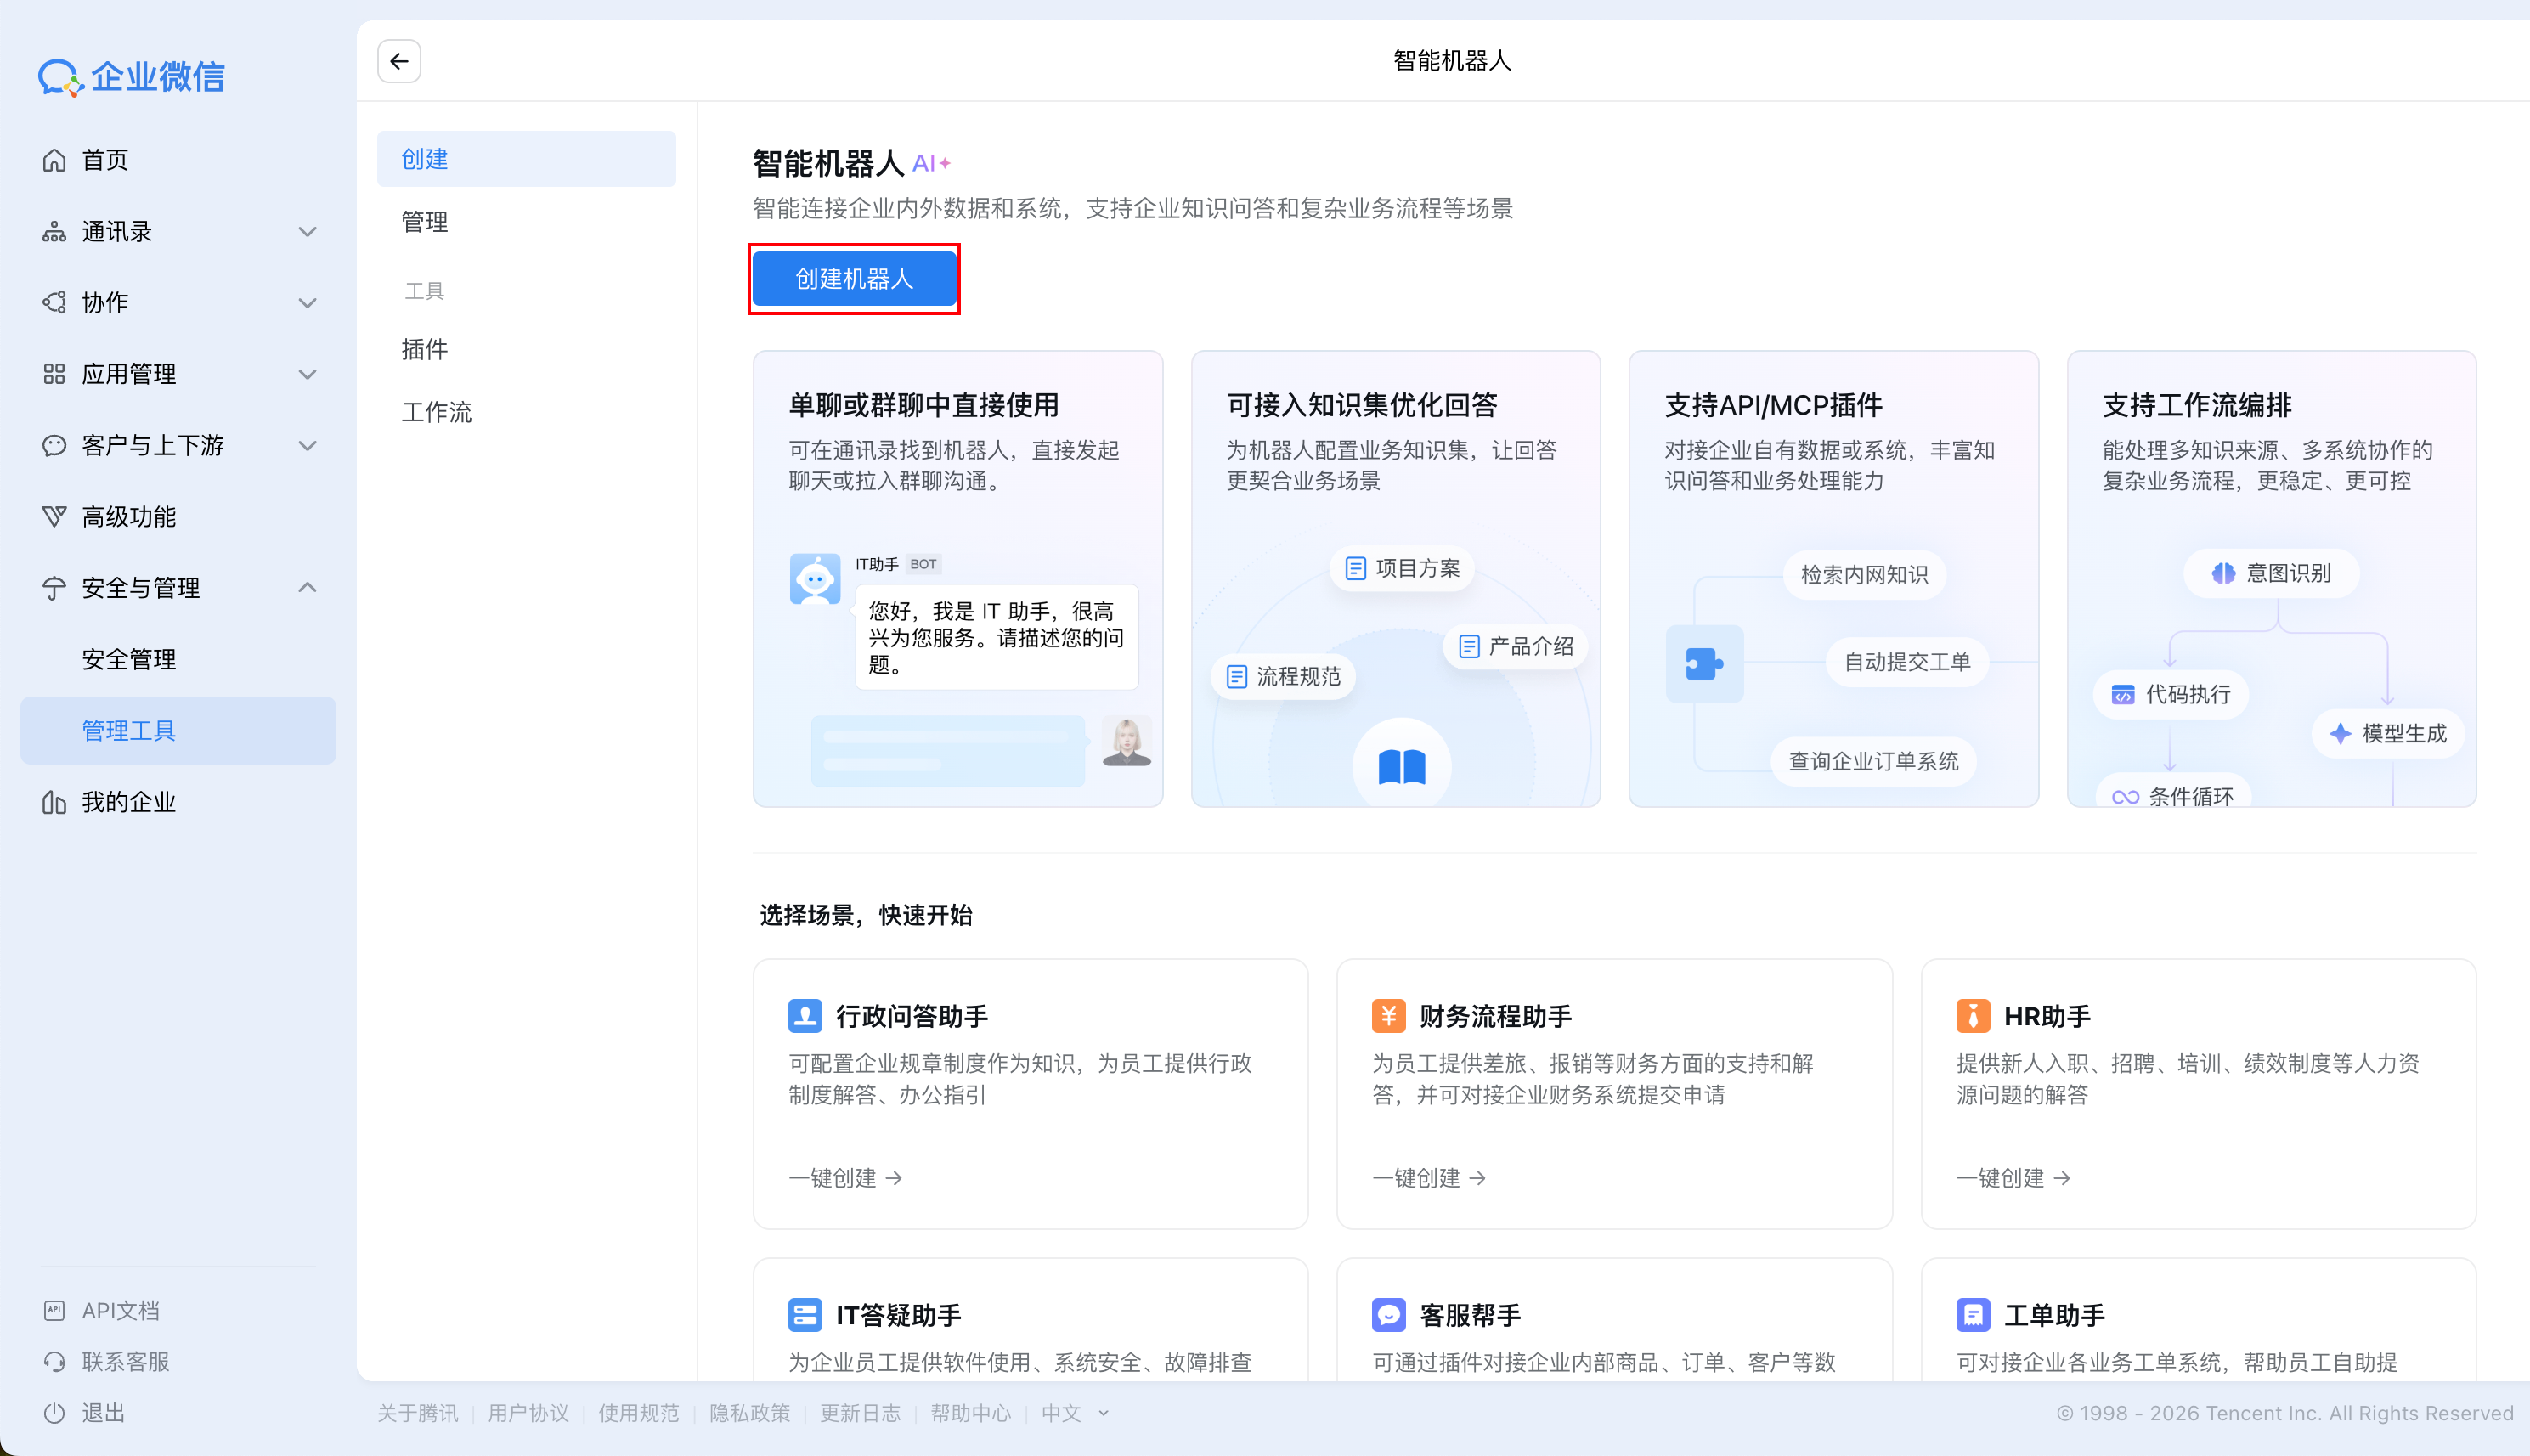
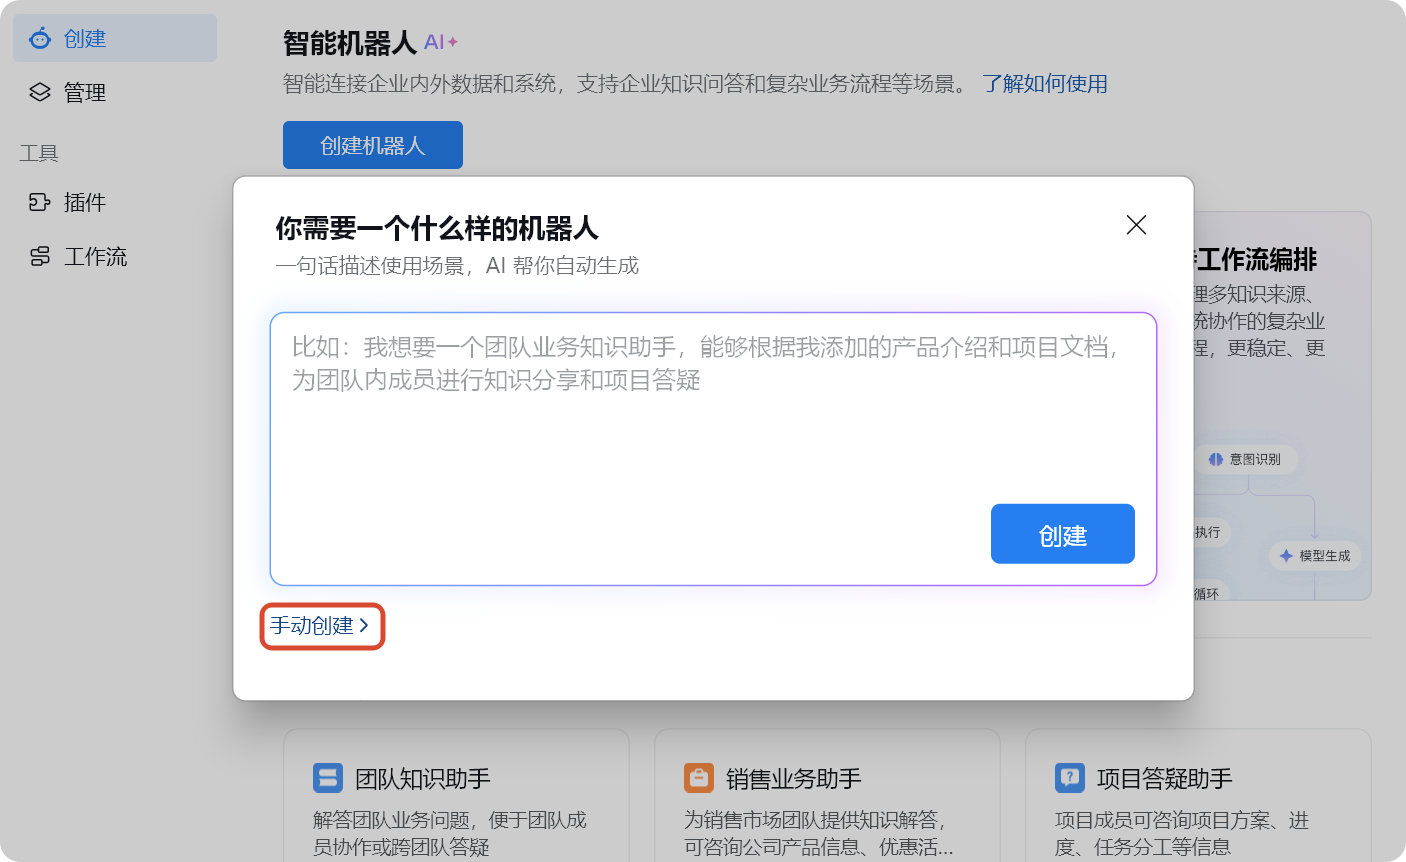
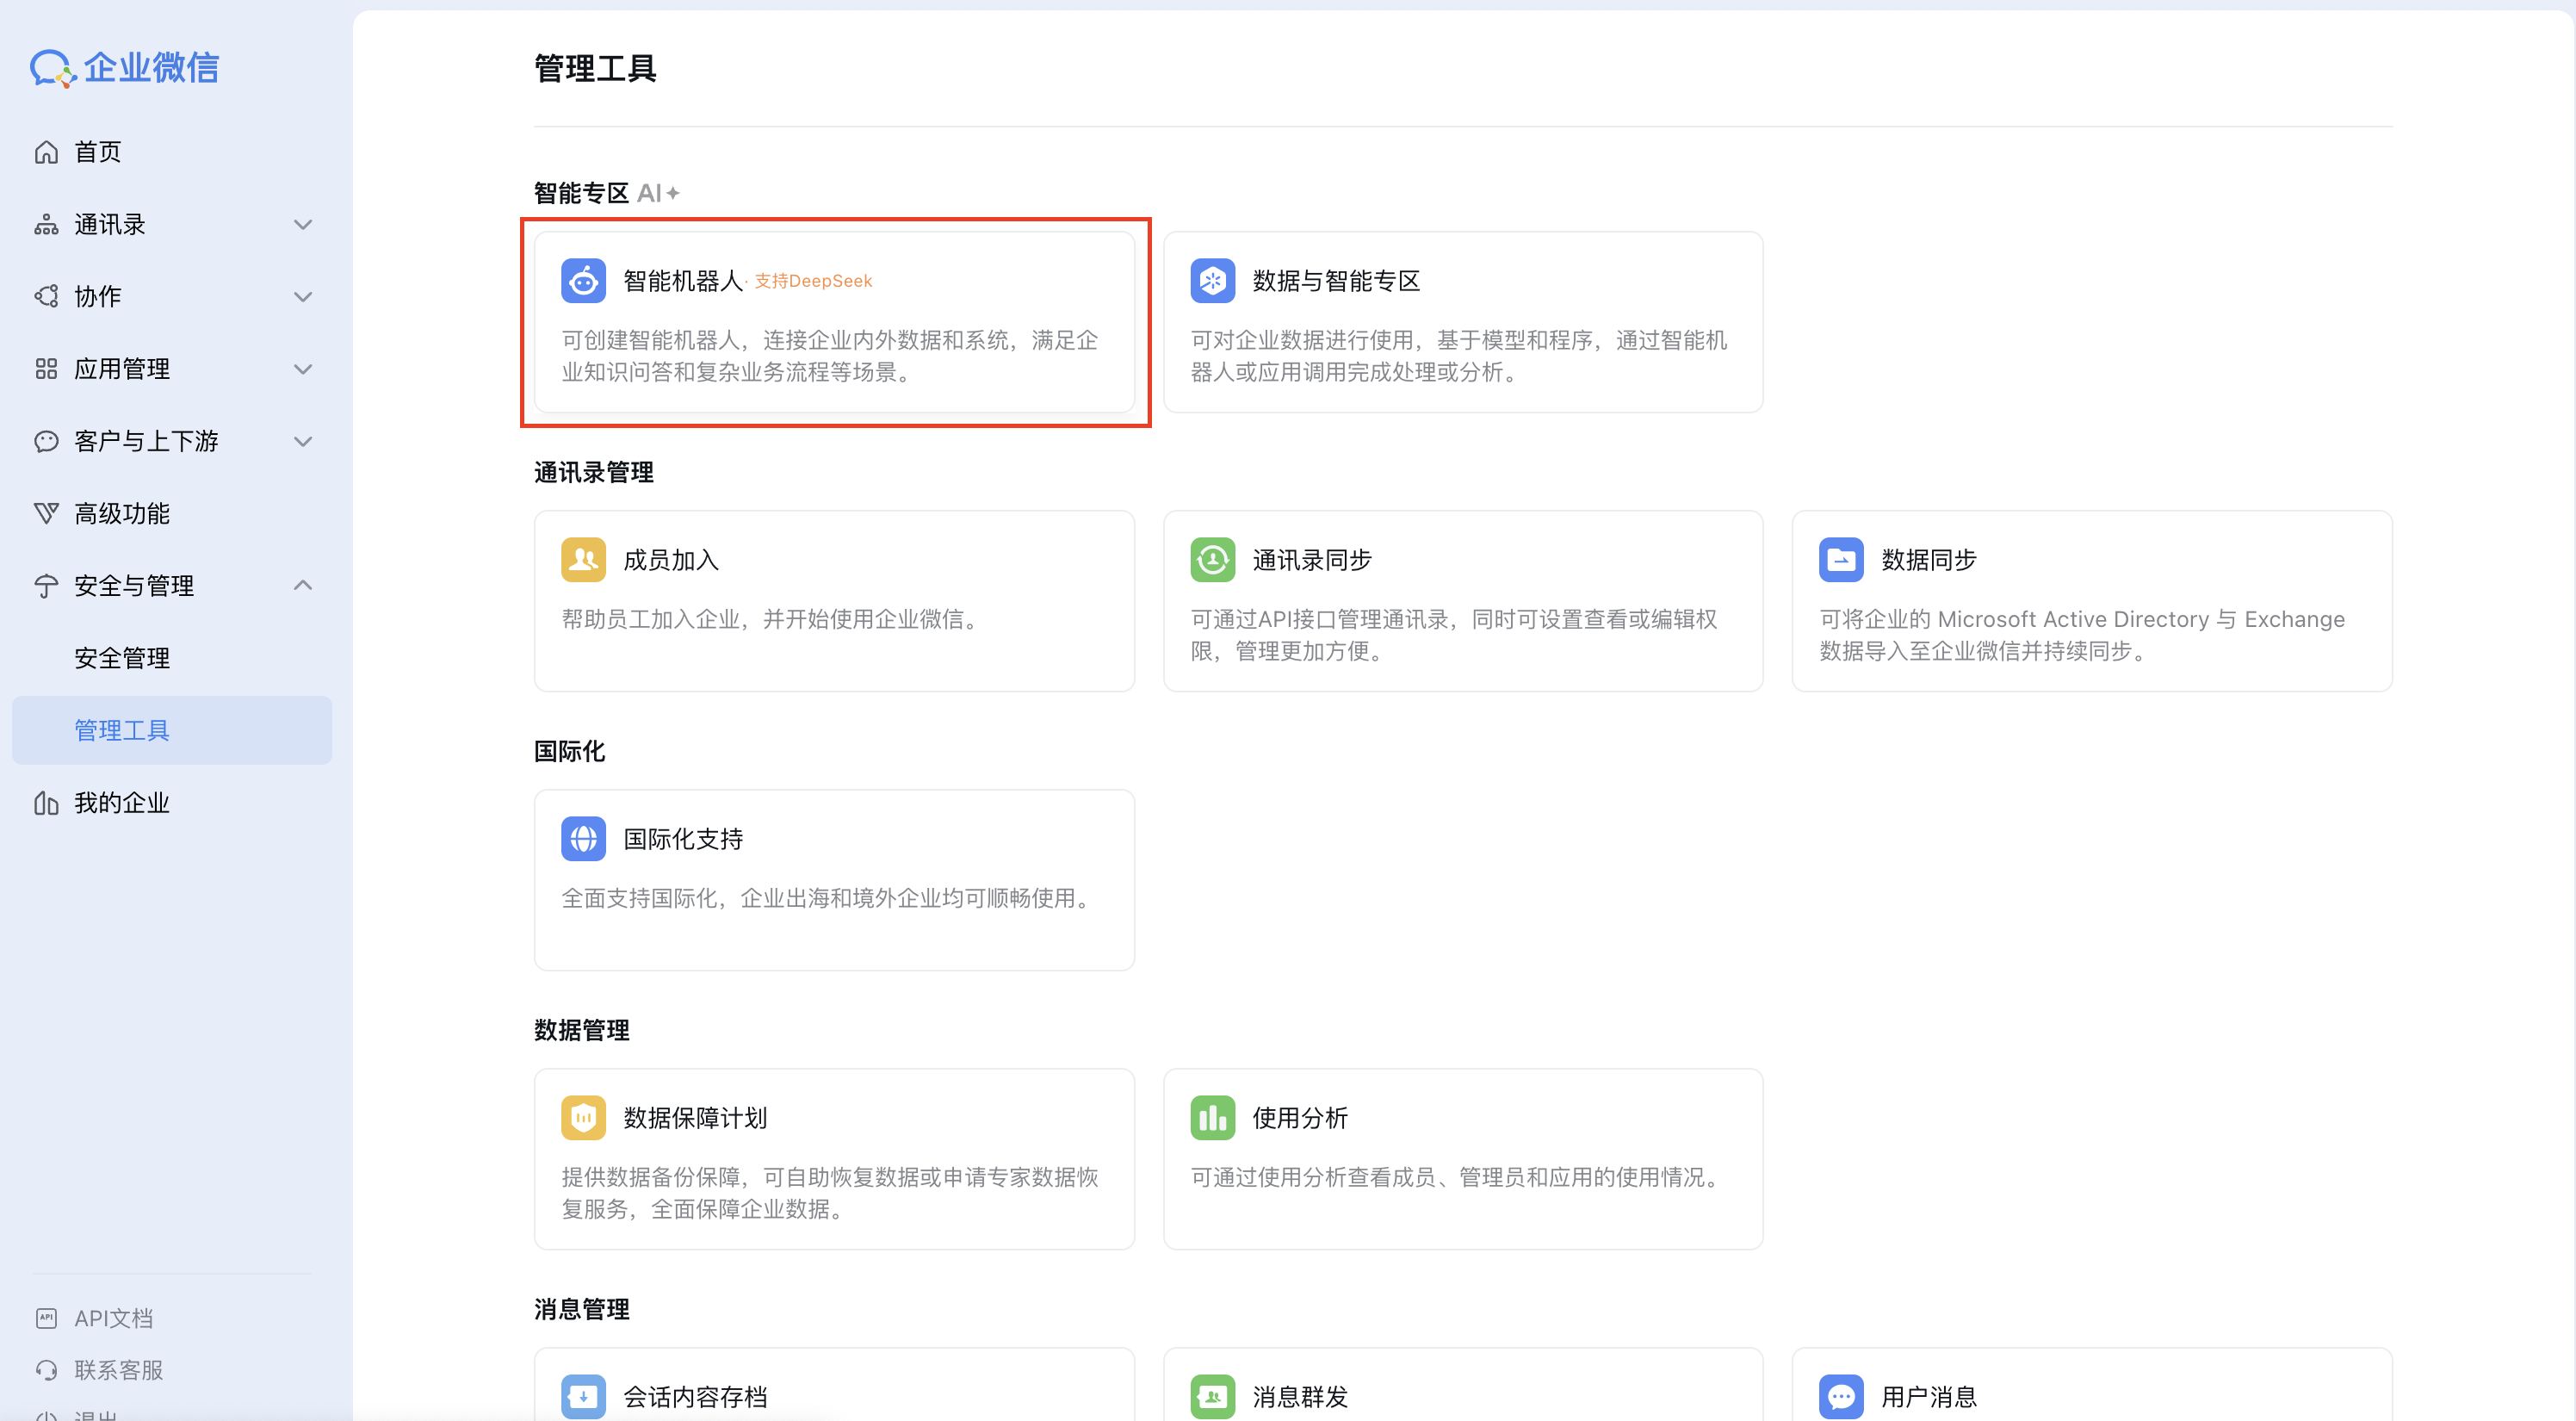
- Go to Security and Management → Management Tools → Intelligent Bot → Create Bot.
If you land on the AI auto-create page, click Manual create at the lower left:
On the create page, choose API mode:
Create entry:
2. Basic info (admin)
| Field | Description |
|---|---|
| Bot name | Use a clear name, e.g. “Sage AI Assistant” |
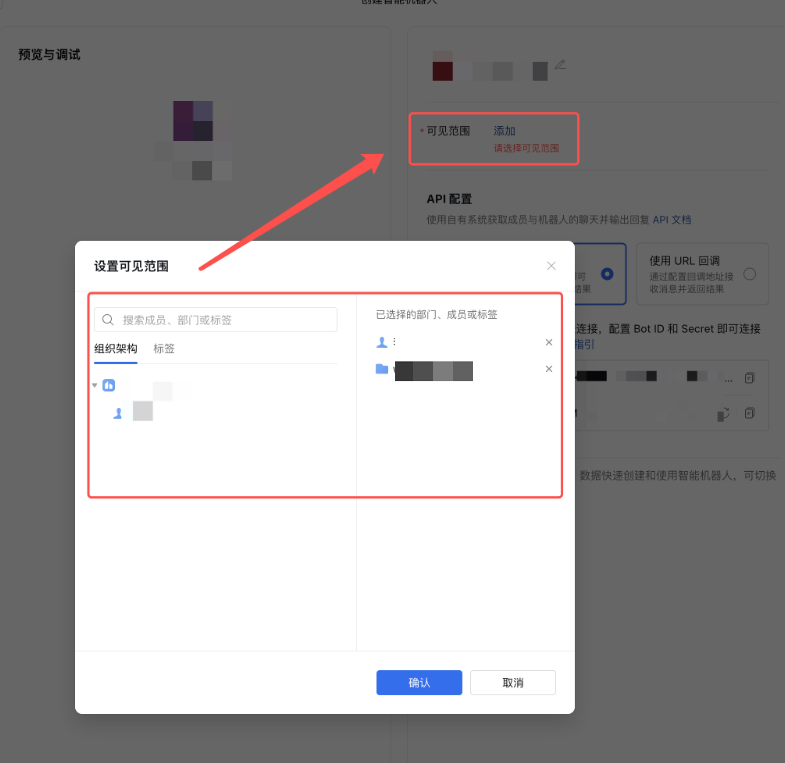
| Visibility | Members, departments, or tags that can use the bot |
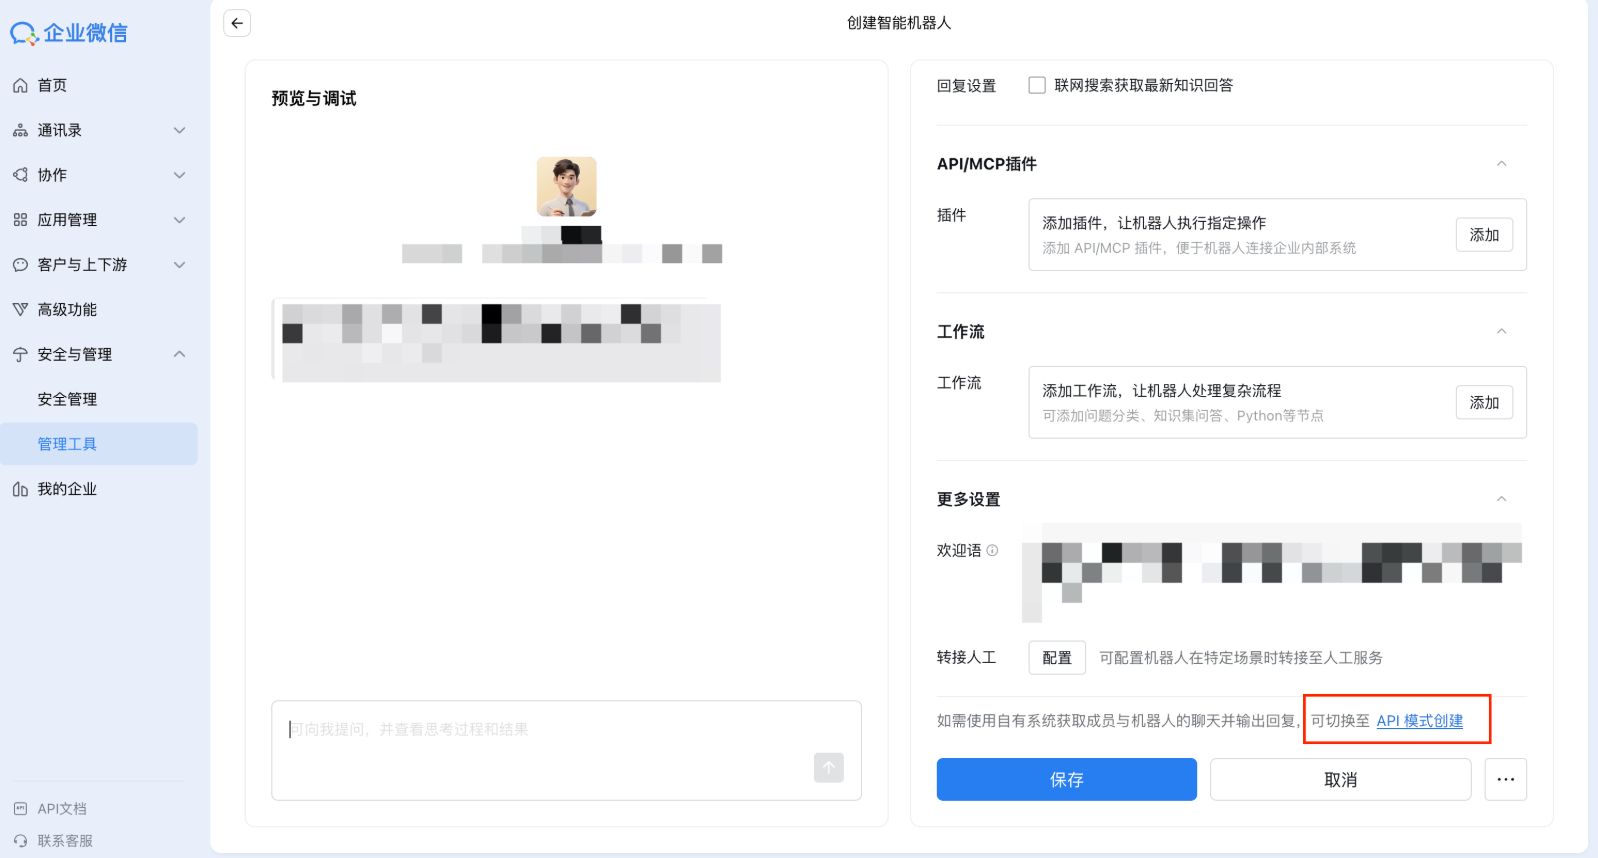
Click Add next to Visibility and select members / departments / tags:
Click Save at the bottom, then choose a connection mode under API configuration on the right (long connection or URL callback).
3. Member: create in the client (optional)
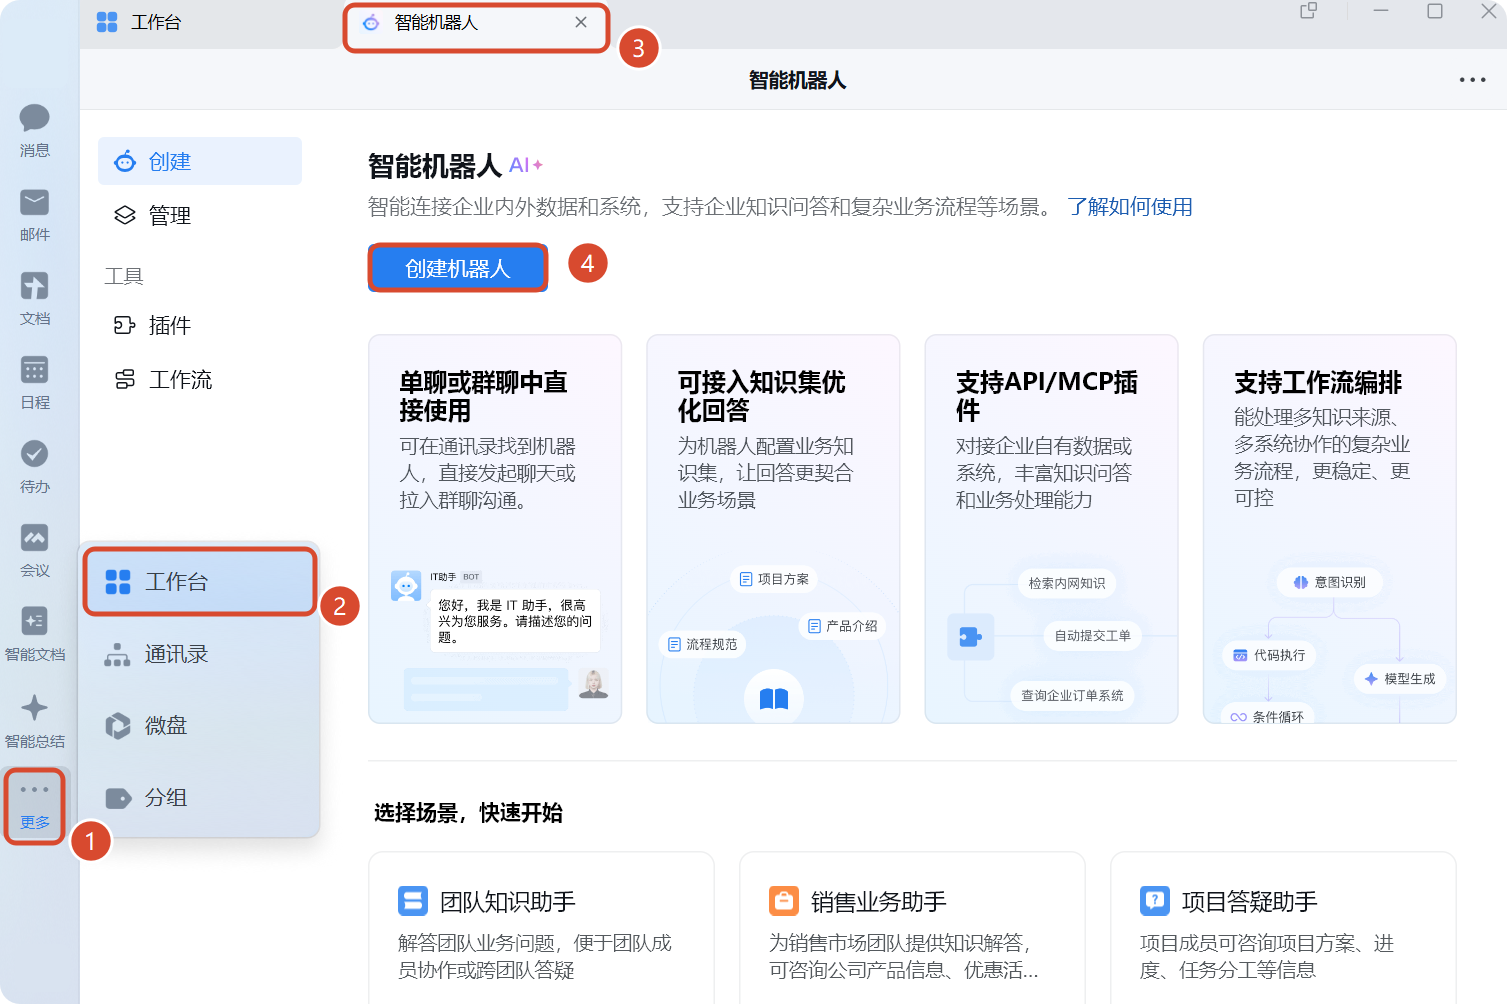
- In the WeCom client: Workbench → Intelligent Bot → Create Bot.
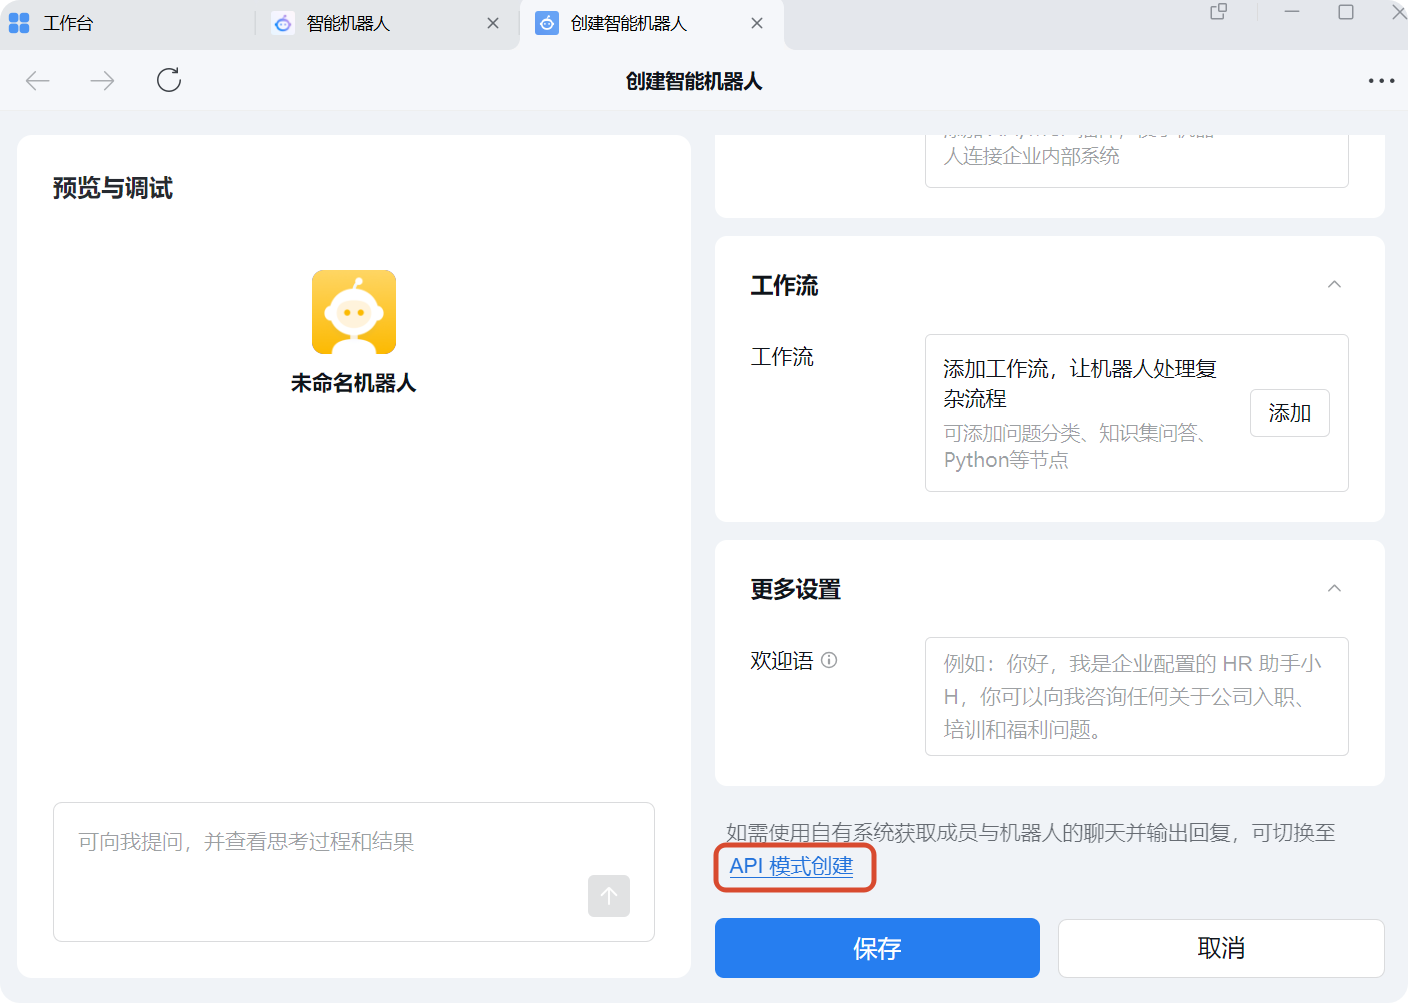
- If you see AI auto-create, click Manual create, then API mode.
| Field | Description |
|---|---|
| Bot name | Use a clear name |
| Allowed members | Same meaning as admin “Visibility” |
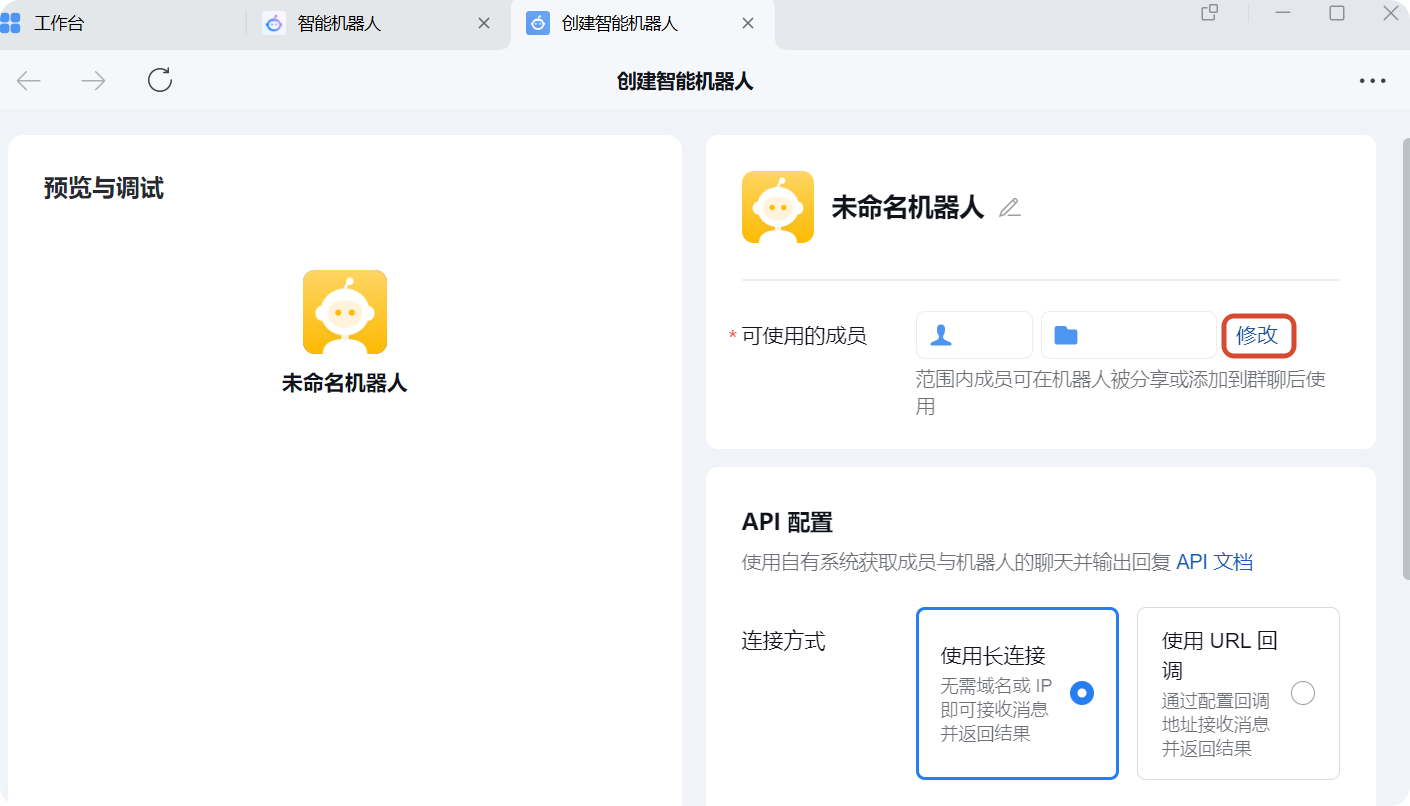
Then choose a connection mode under API configuration.
2. Mode A: Long connection (recommended)
With long connection on both sides, you only need Bot ID and Secret—no URL, Token, or EncodingAESKey.
1. Get Bot ID and Secret in WeCom
- Under API configuration, select Use long connection.
- Copy Bot ID.
- Click Get for Secret and store it safely.
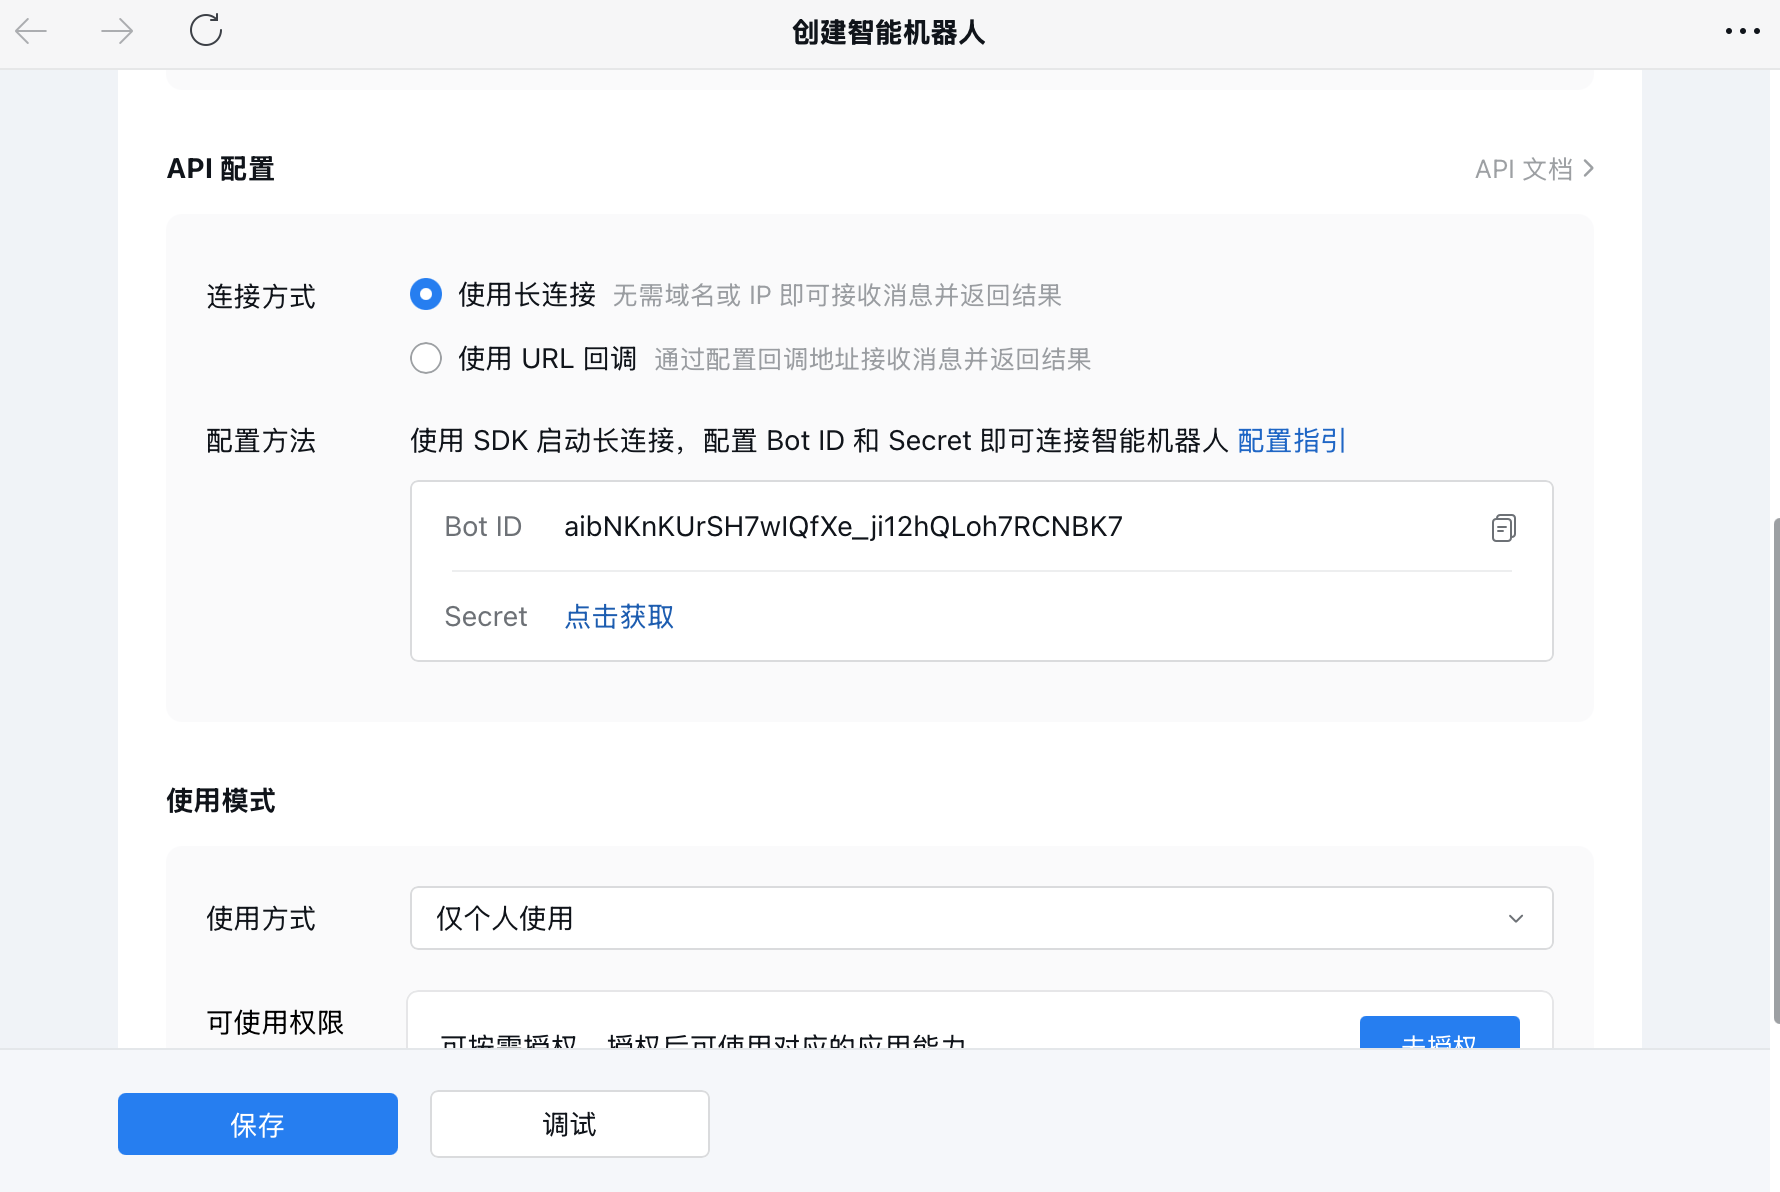
Keep the Secret safe. If it expires, regenerate it in WeCom and save again in AI Studio.
2. Bind in AI Studio (long connection)
- Sign in to Bonree ONE and confirm Environment and Resource Domain at the top right.
- Go to AI Studio → Security Operations → IM Channel.
- On the WeCom card, click Configure.
- Select WebSocket long connection.
- Enter Bot ID and Secret, then click Save.
| Field | Required | Description | Default | Validation |
|---|---|---|---|---|
| Bot ID | Yes | WeCom long-connection Bot ID | — | Non-empty; ≤1000; not masked |
| Secret | Yes | WeCom long-connection secret | — | Non-empty; ≤1000; masked |
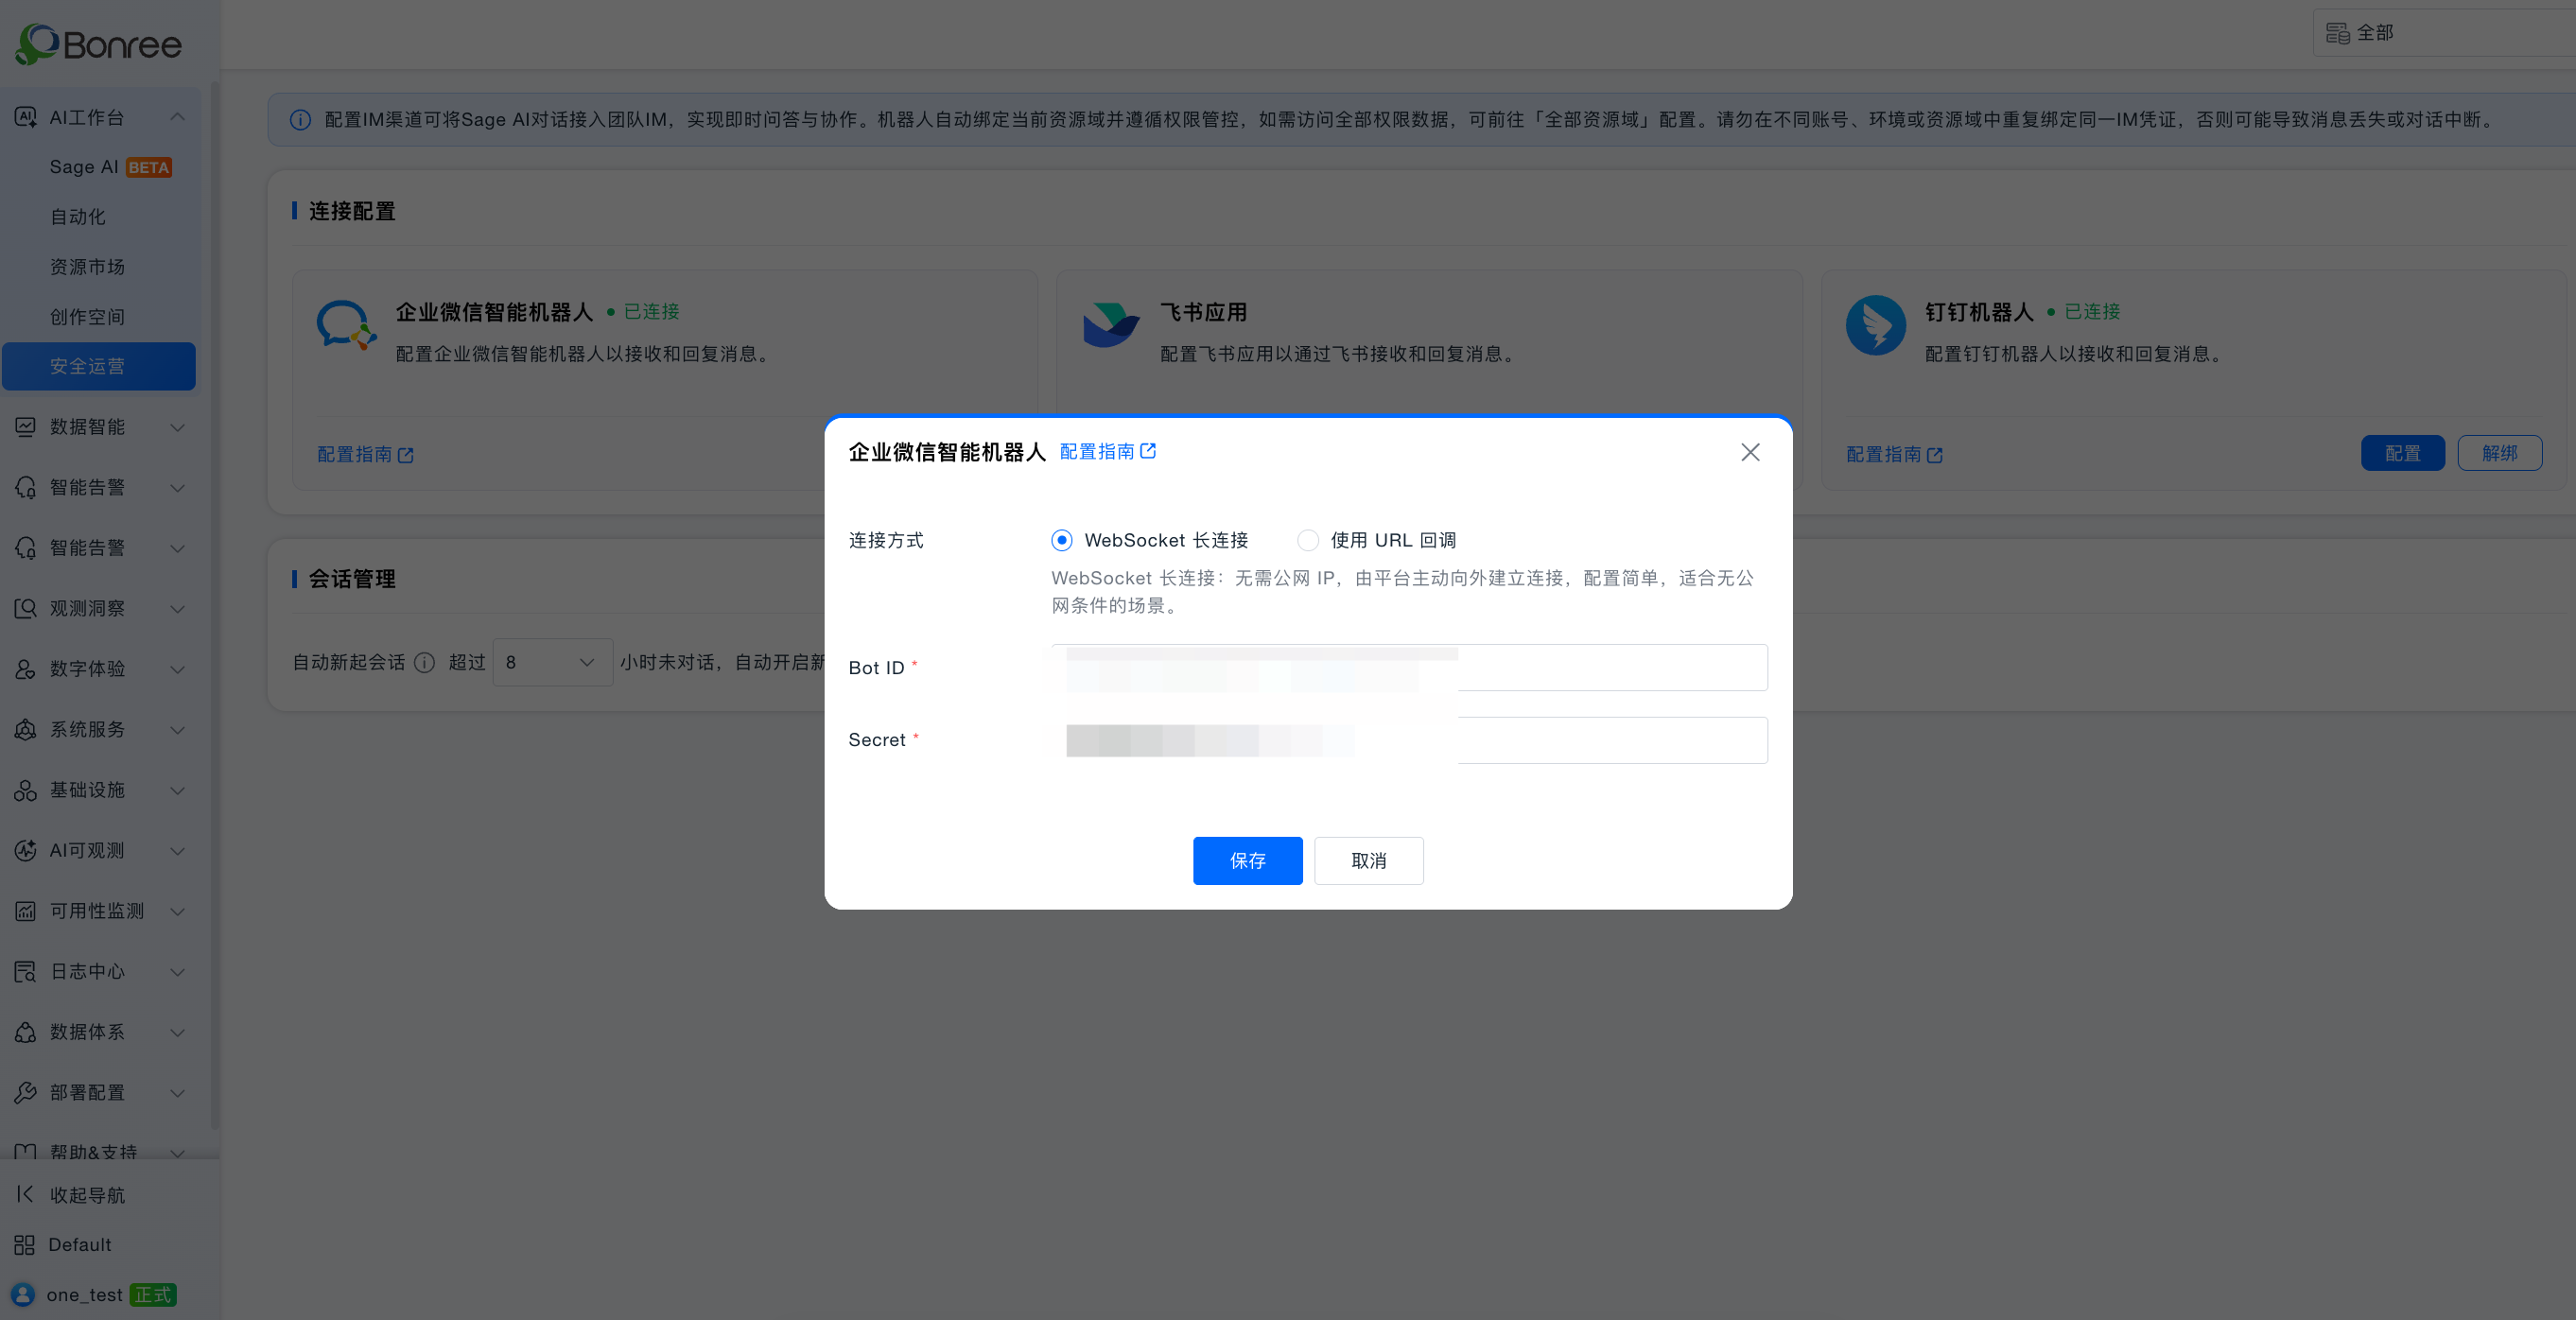
On save, the platform runs a connectivity check. When it passes, status is Connected. Long connection does not generate a Webhook and does not require pasting a URL back to WeCom.
3. Mode B: URL callback
Use this when you already have public HTTPS or must use Webhooks. Both WeCom and AI Studio must select URL callback.
1. Generate callback credentials in WeCom
- Under API configuration, select Use URL callback.
- Click Random next to
TokenandEncodingAESKey. - Save Token and EncodingAESKey. Leave URL empty until AI Studio generates the Webhook.
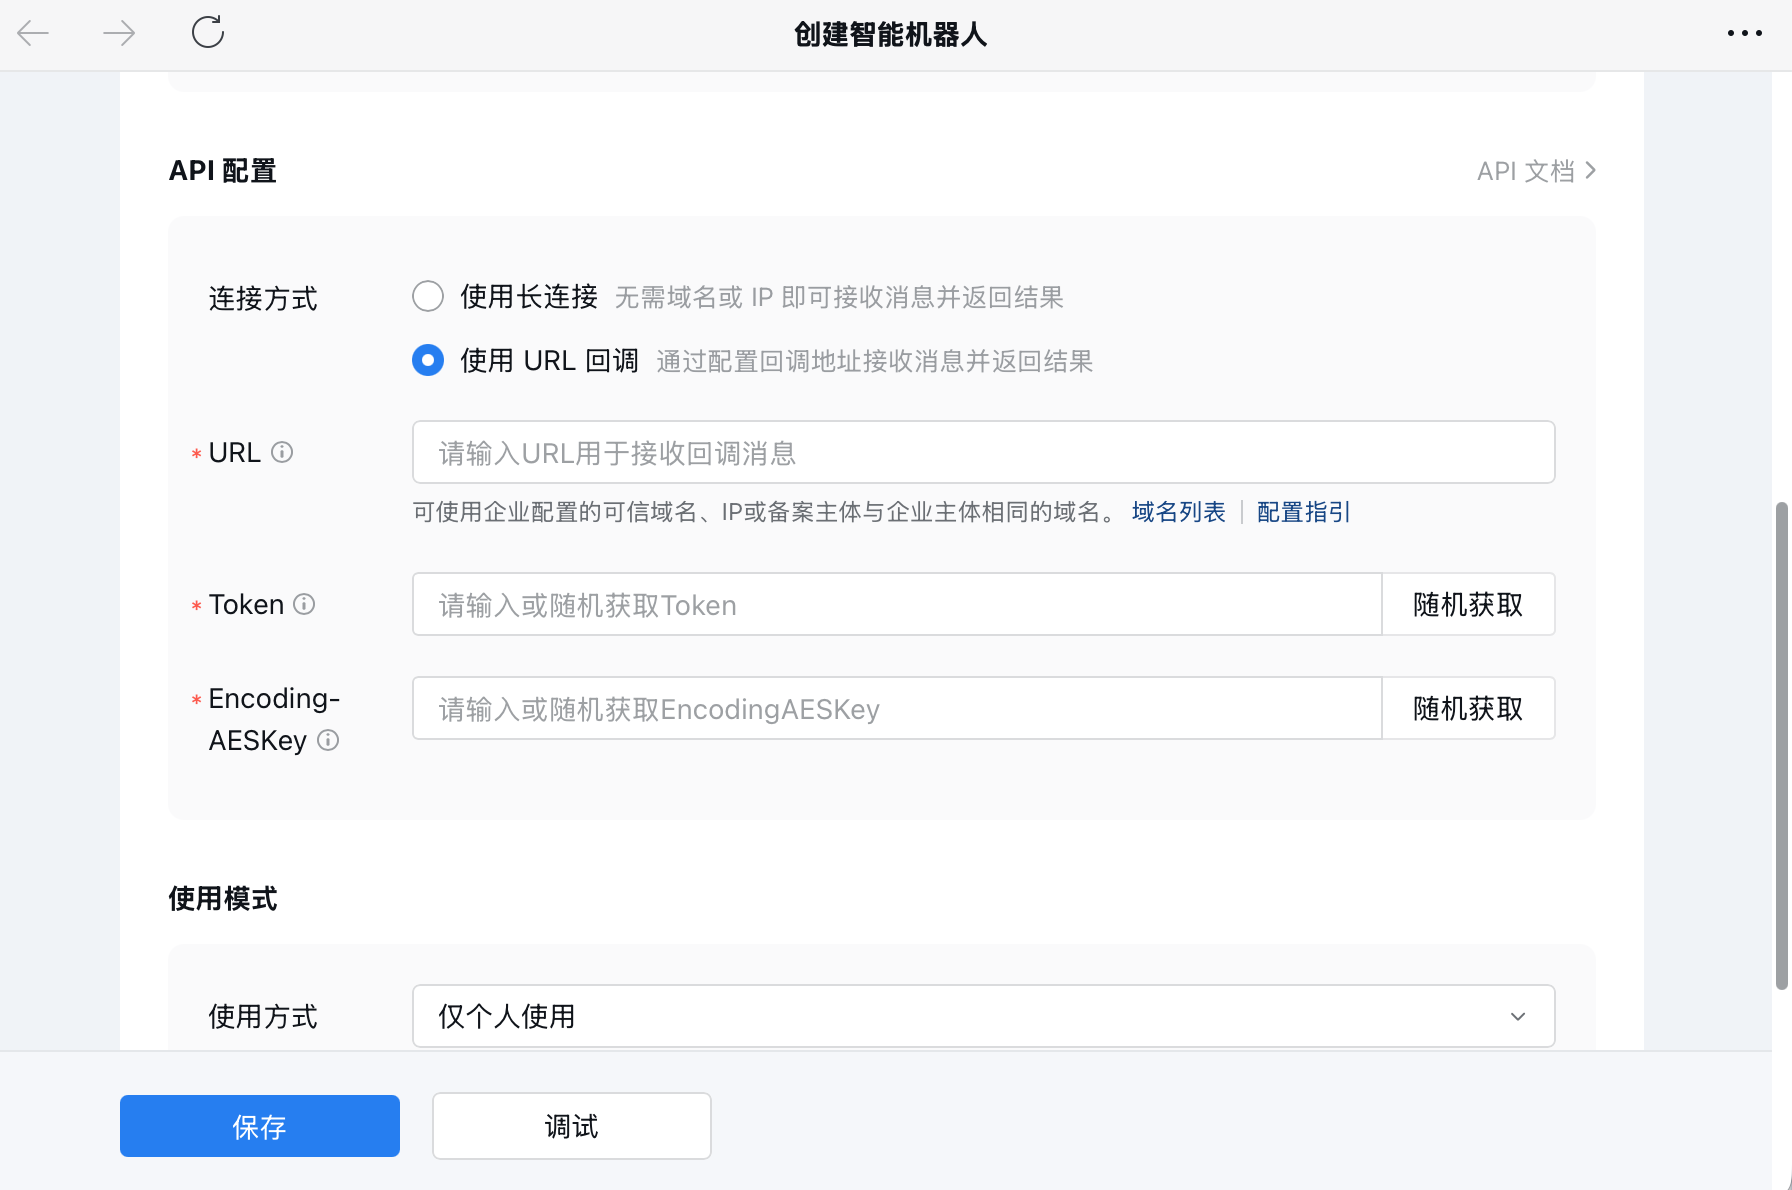
Store Token and EncodingAESKey carefully. If lost, regenerate them and reconfigure AI Studio.
2. Generate the Webhook in AI Studio
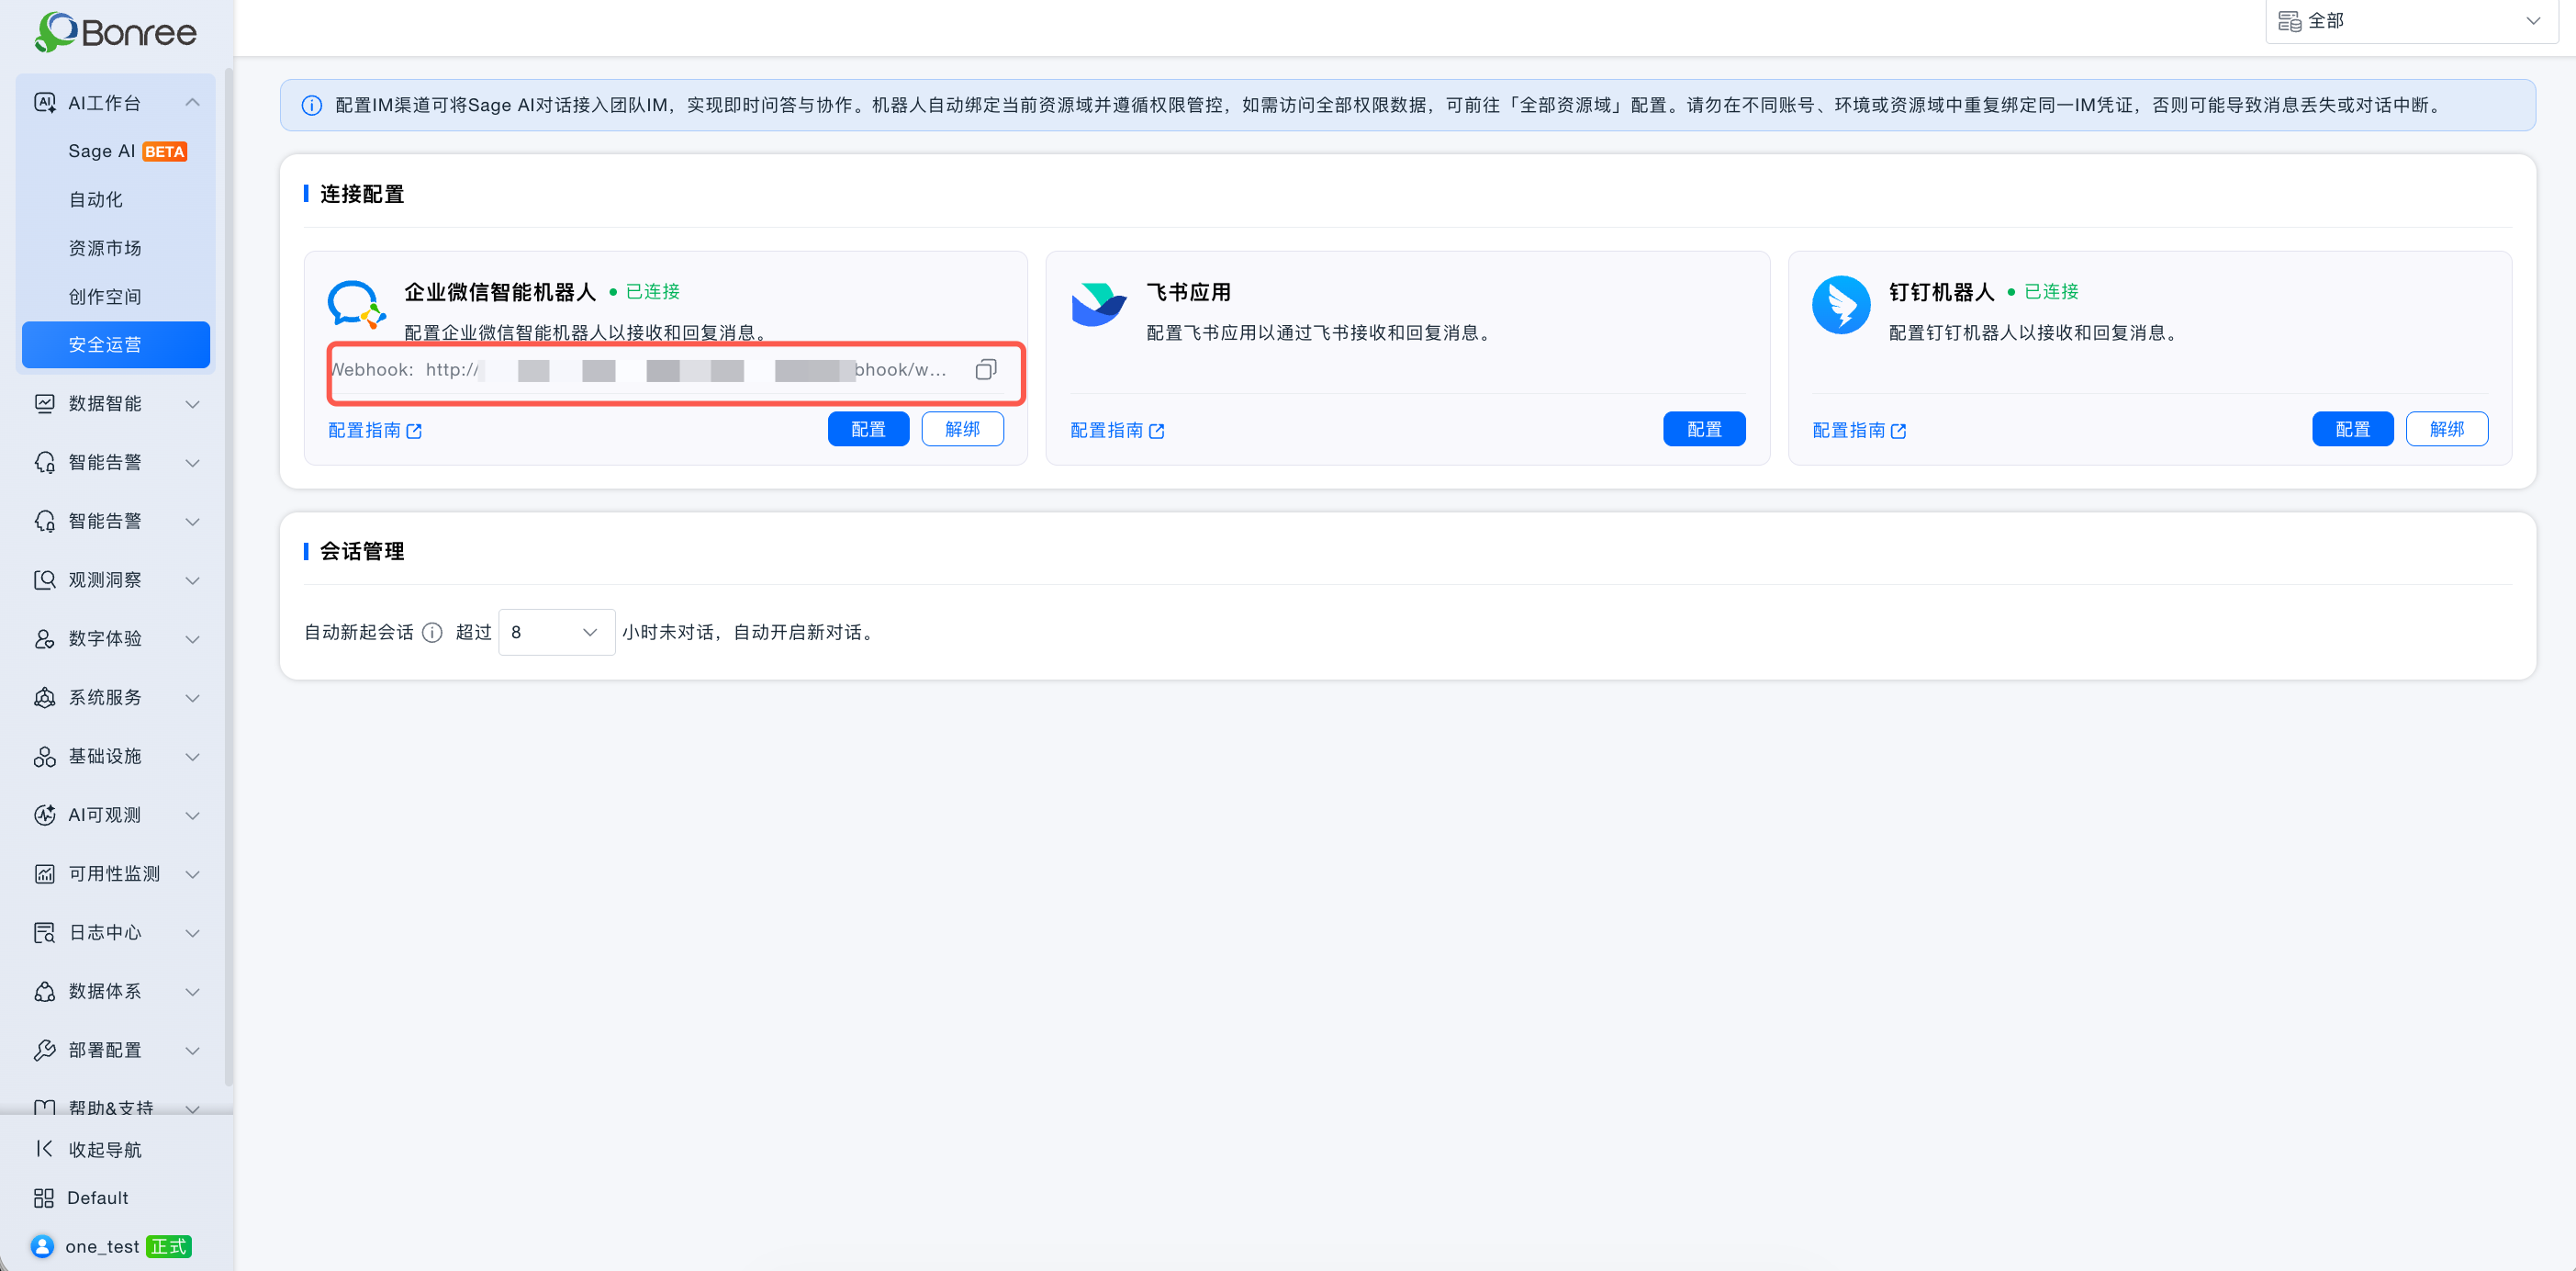
- Go to AI Studio → Security Operations → IM Channel → WeCom → Configure.
- Select Use URL callback.
- Enter Token and EncodingAESKey, then click Save.
- Copy the generated Webhook URL.
| Field | Required | Description | Default | Validation |
|---|---|---|---|---|
| Token | Yes | Must match WeCom API Token | — | Non-empty; ≤1000; masked |
| EncodingAESKey | Yes | Must match WeCom EncodingAESKey | — | Non-empty; ≤1000; masked |
WeCom URL callback does not run a connectivity check on save. After a successful save, status is Connected and a Webhook is generated.
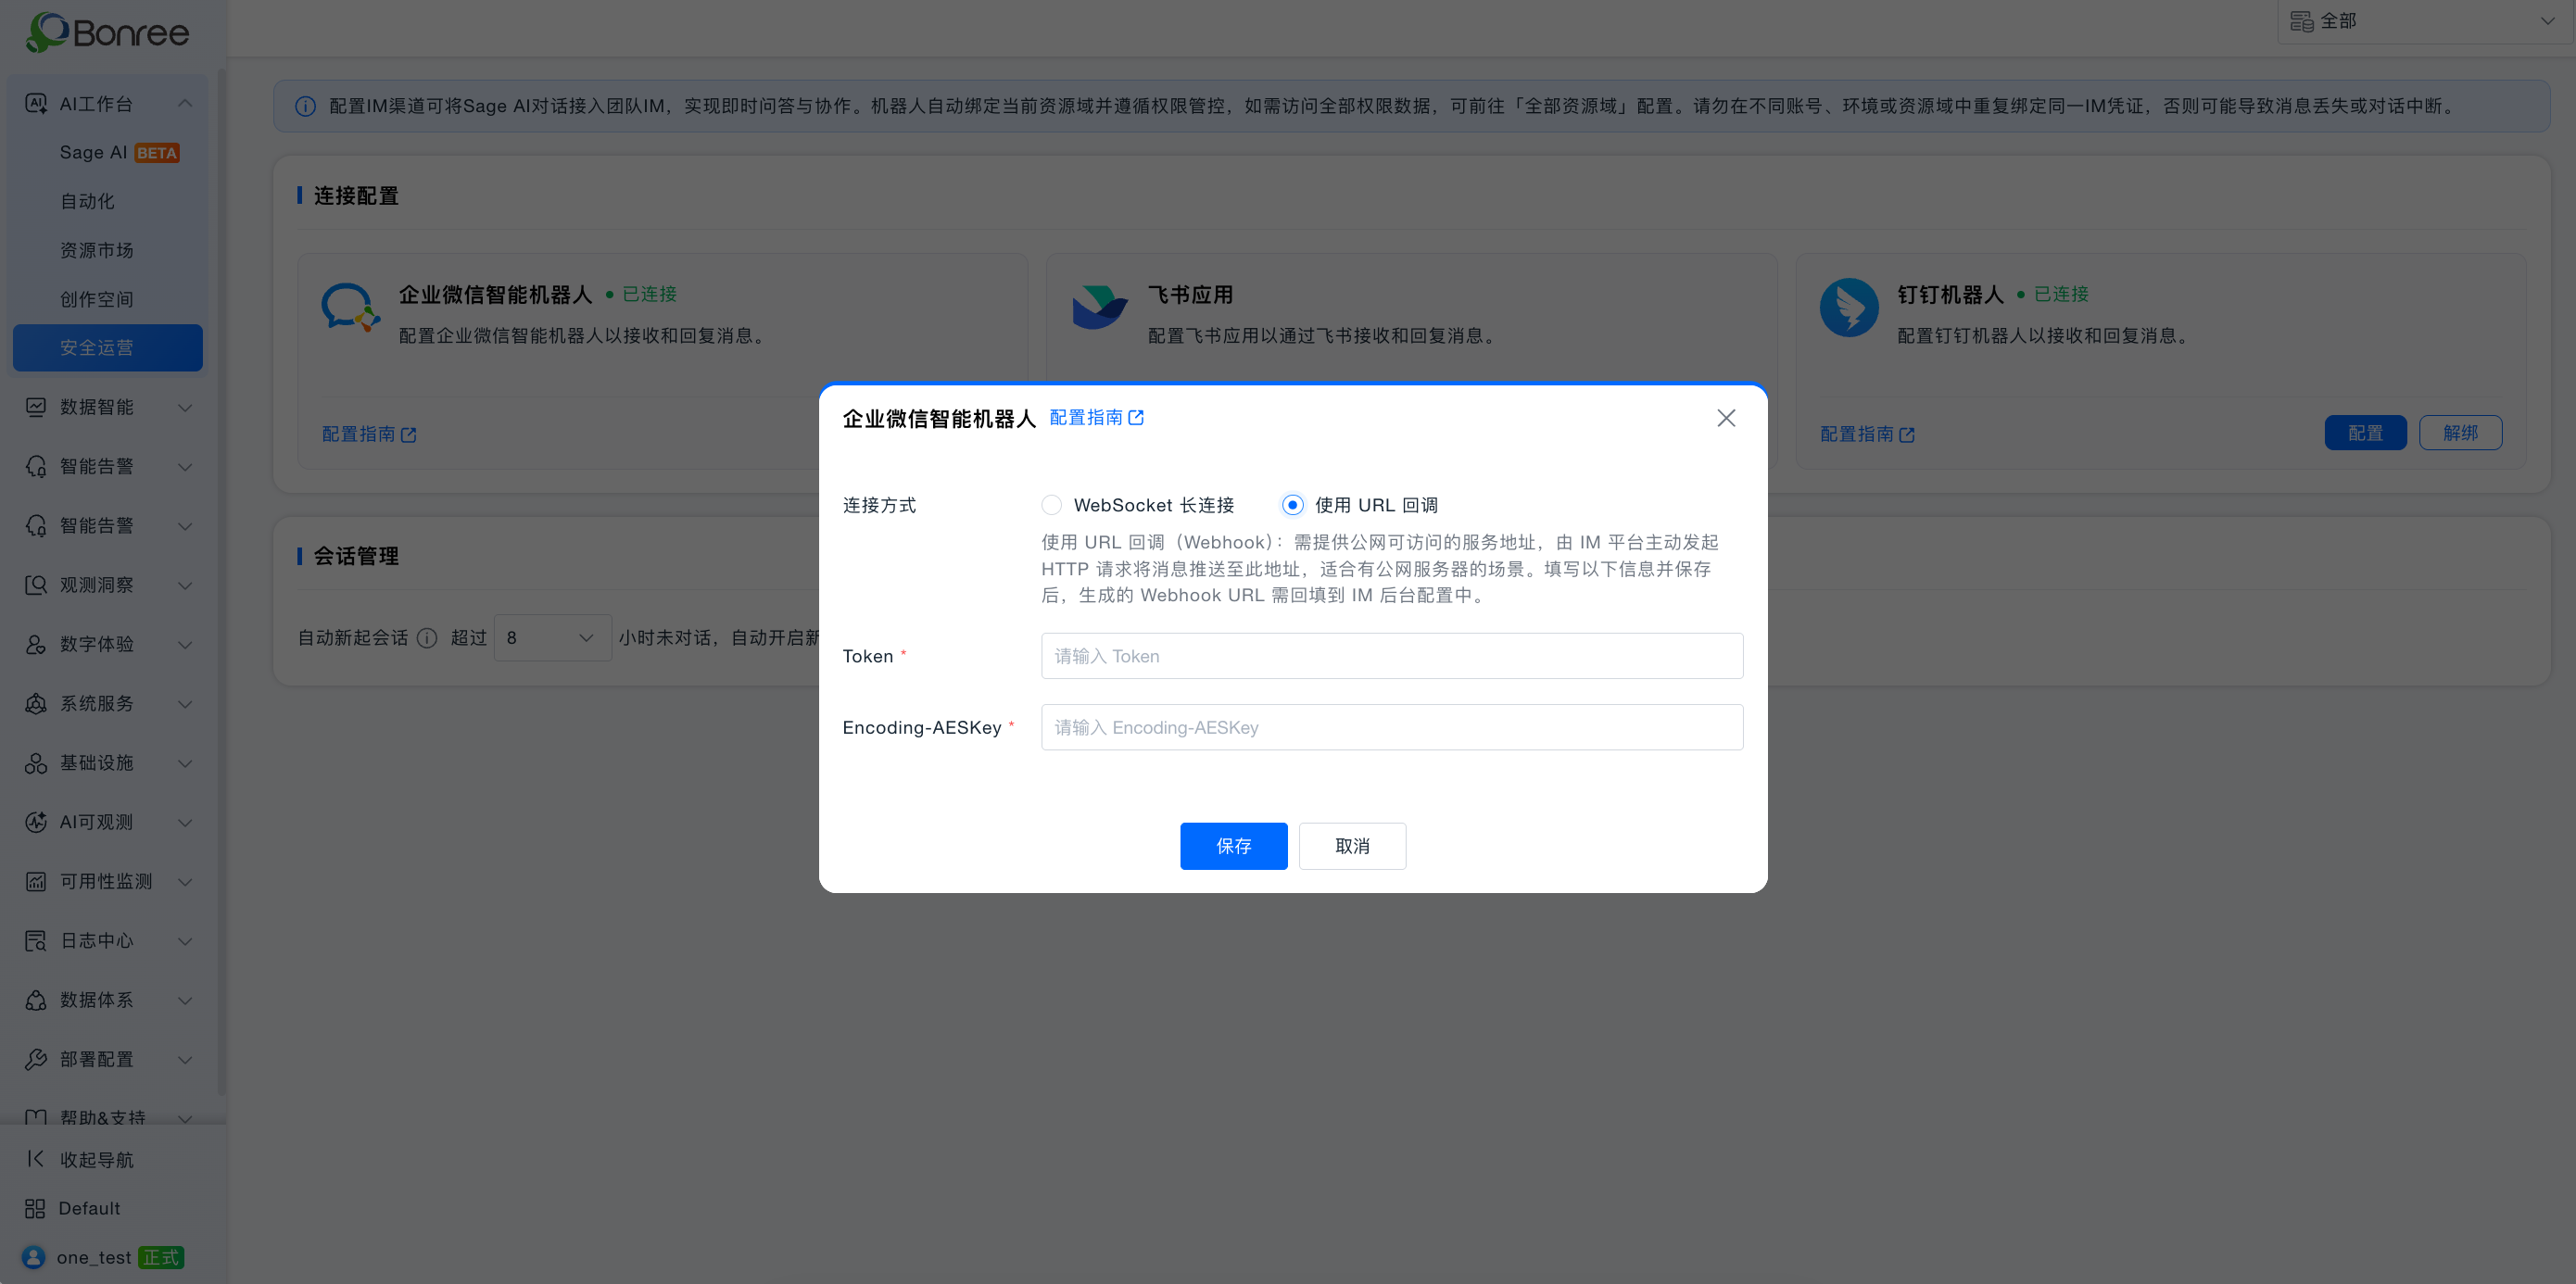
3. Paste the URL and save
Back in the WeCom bot config page:
- Paste the Webhook into the
URLfield. - Confirm Token / EncodingAESKey match AI Studio.
- Click Save, then publish the bot per WeCom flow.
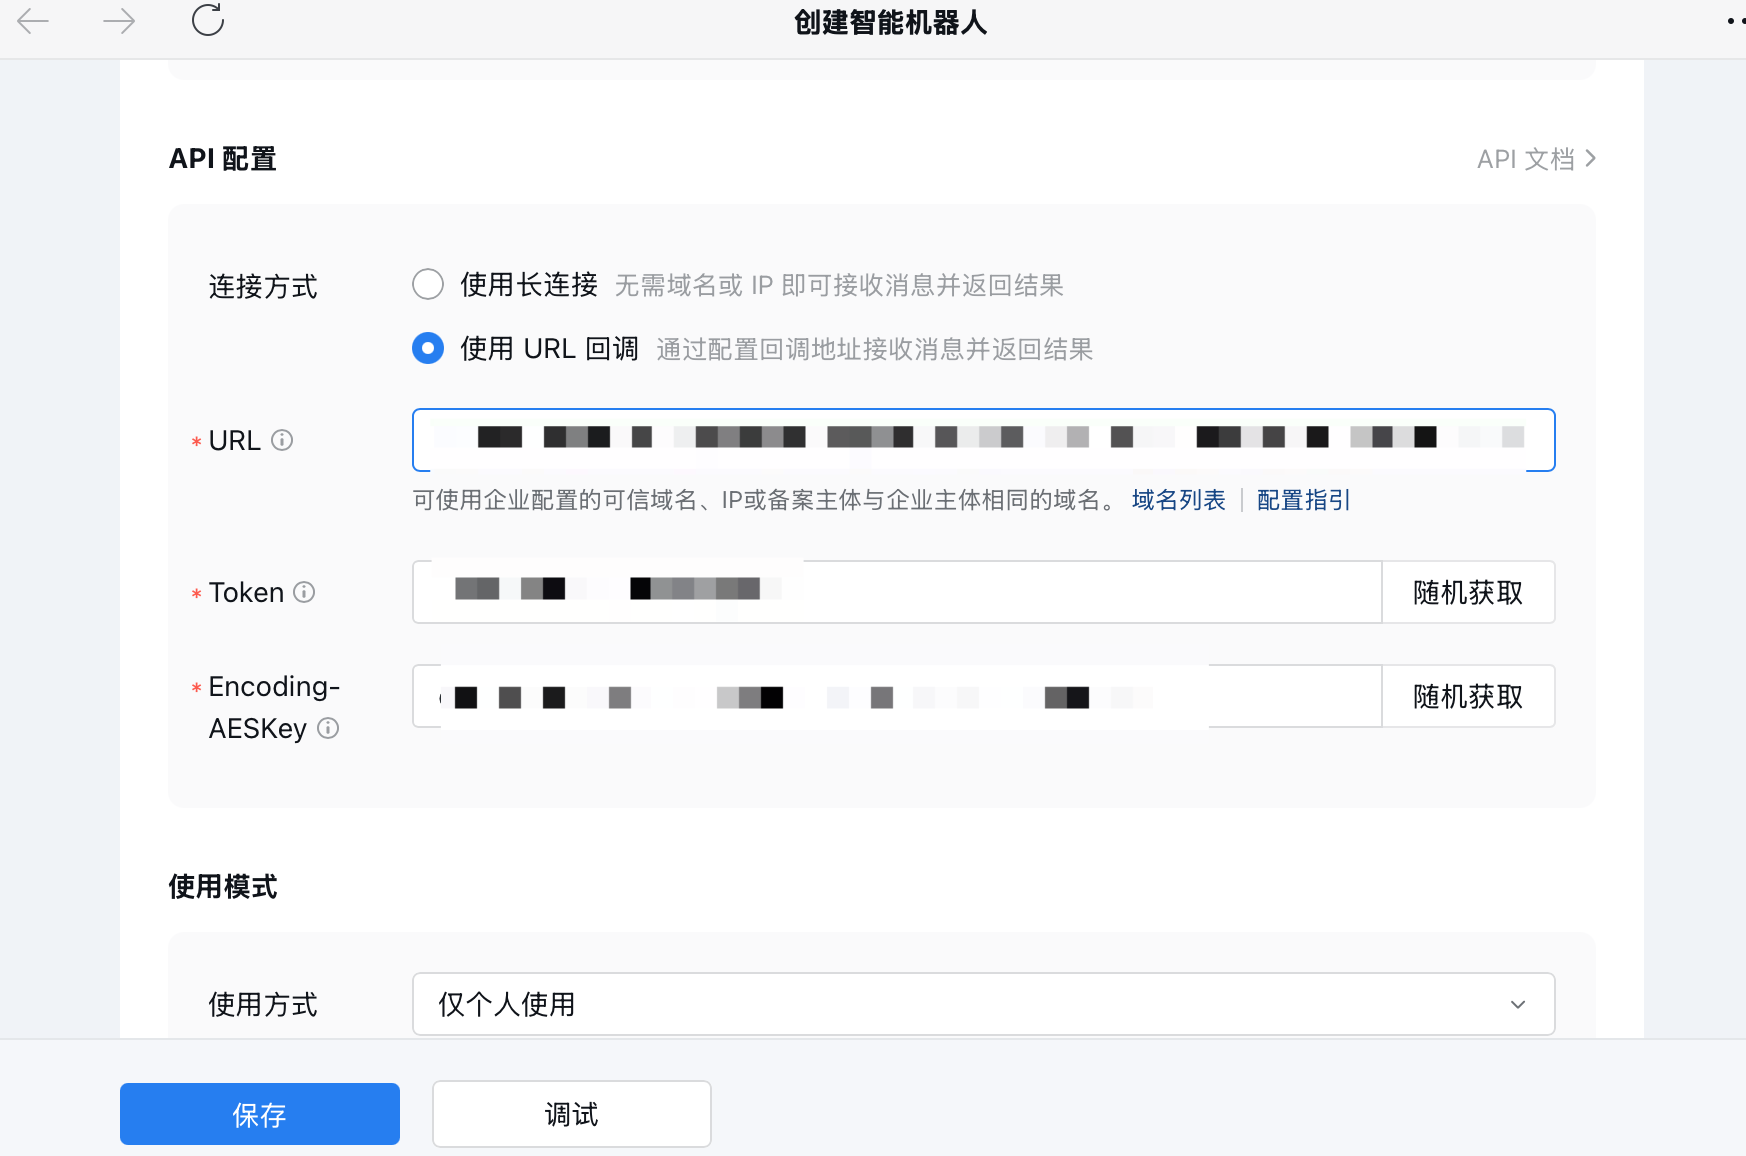
If URL verification fails: confirm public HTTPS reachability, exact secret match, and no extra spaces or truncation.
4. Session management and unbind
| Field | Required | Description | Default | Validation |
|---|---|---|---|---|
| Auto-start new session | Yes | Start a new session after idle timeout | 24 hours | Dropdown 1–24 hours; cannot disable |
Hover tip: Idle history is no longer sent to the model, which reduces token usage and improves response speed.
Click Unbind and confirm. After unbind, WeCom will no longer receive AI replies.
5. Get started
Find the bot under Created by enterprise in Contacts and click Send message, or @bot in a group.
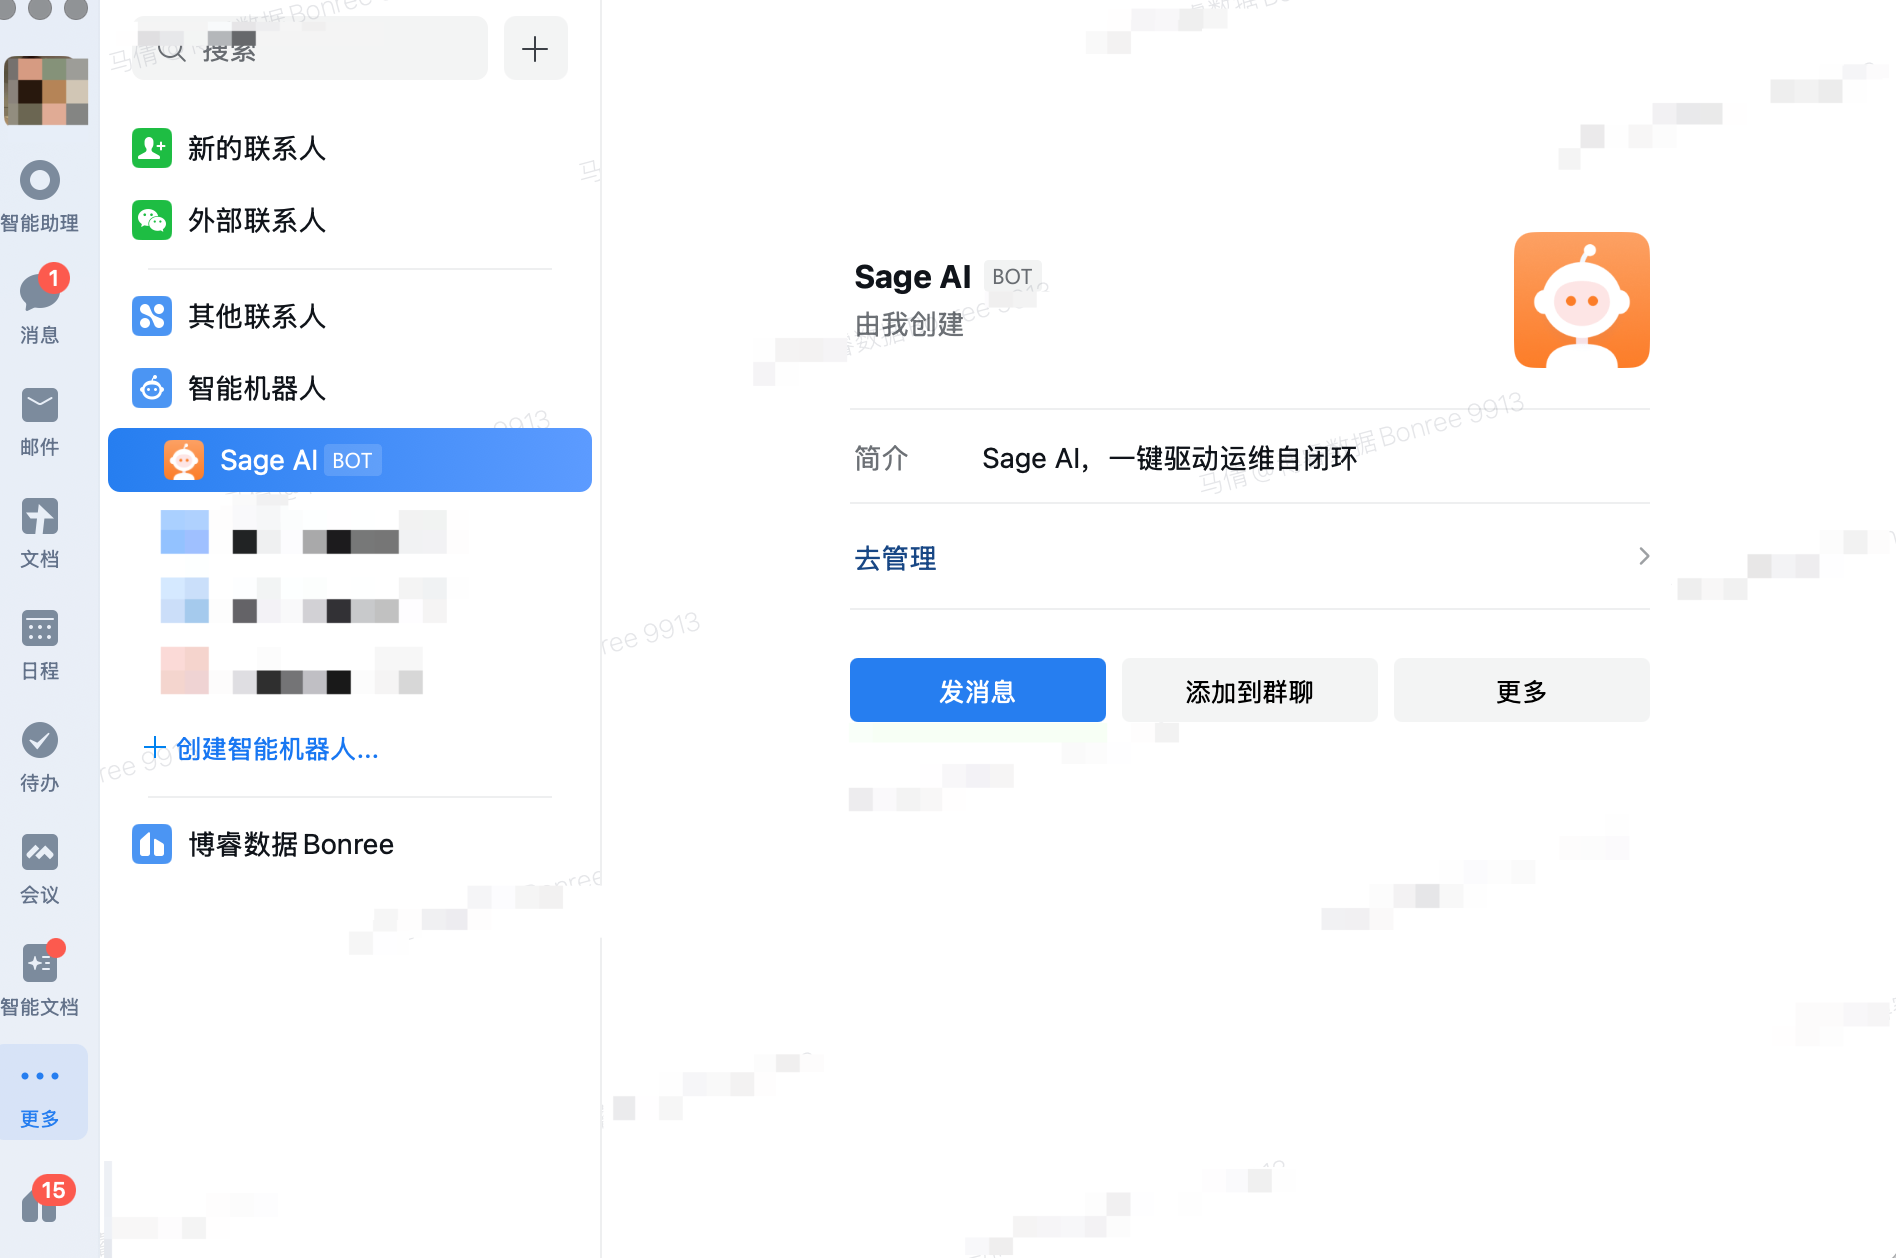
Send “hello” to verify connectivity. When configured correctly, Sage AI replies.
Notes (vs Web)
| Capability | Description |
|---|---|
| Model | Auto routing; cannot switch in IM |
| Agent / Skill | Intent-routed to resources available under the bound account and resource domain |
| Attachments | Mostly text |
| Rate limit | About ≤ 20 questions per minute per bot |
In Sage AI history, you can switch to IM sessions (read-only).
6. FAQ
No reply from the bot?
- Confirm both sides use the same mode (both long connection, or both URL callback).
- Long connection: check Bot ID and Secret; re-sync after regenerating Secret.
- URL callback: check Token and EncodingAESKey, and that the Webhook is pasted and saved.
- Do not reuse the same credentials across account / environment / resource domain.
- Confirm the bot is published and the user is in visibility / allowed members.
Long connection save failed?
- Confirm WeCom selected Use long connection.
- Re-copy Bot ID and Secret without extra spaces.
- Confirm the platform can reach WeCom public endpoints outbound.
URL verification failed?
- Confirm the Webhook is HTTPS and publicly reachable.
- Confirm Token and EncodingAESKey match WeCom exactly.
- Re-copy the URL without truncation or extra characters.