Native
SDK Integration Guide
Cocoapods Integration
-
Add the following to your project's
Podfile:pod 'BonreeSDK' -
Execute
pod installin the directory where yourPodfileis located
Manual Integration
-
Unzip
BonreeSDK_TDEM_iOS.tar.gz. After extraction, you will see two directories:XCFrameworkDynamicandXCFrameworkStatic. TheXCFrameworkDynamicdirectory contains dynamic libraries, and theXCFrameworkStaticdirectory contains static libraries. Choose one for integration based on your requirements. -
Add
BonreeCore.xcframework,BonreeBusiness.xcframework, andBonreeRUM.xcframeworkto your project, as shown in the figure:
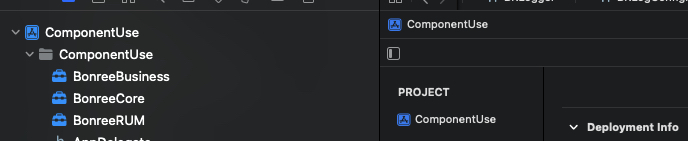
If
BonreeCore.xcframeworkandBonreeBusiness.xcframeworkhave already been integrated, there is no need to add them again.
-
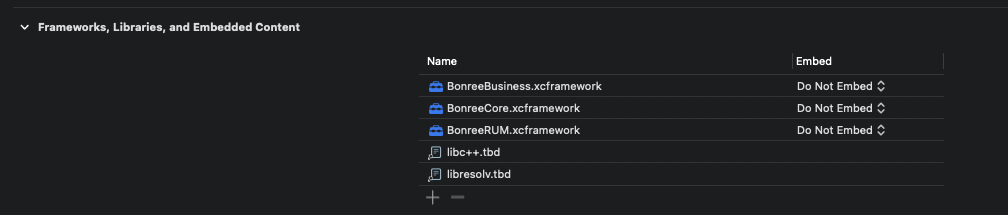
In Build Phases -> Link Binary With Libraries, add
BonreeCore.xcframework,BonreeBusiness.xcframework, andBonreeRUM.xcframework. -
Add the following dependency libraries:
- libresolv.tbd (must be included)
- libc++.tbd (must be included)
- WebKit.framework (required if the project supports versions before iOS 8)
-
Modify the Embed option: If integrating static libraries, select
Do Not Embed. If integrating dynamic libraries, selectEmbed & Sign.
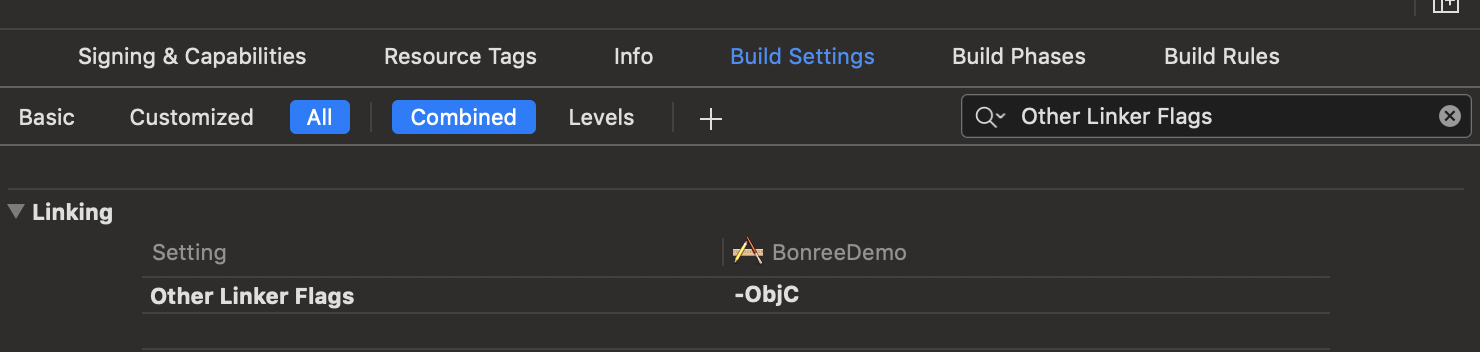
- In Build Settings, search for Other Linker Flags and add the compilation flag -ObjC, as shown in the figure:
SDK Setup
<#Config Address#> and <#AppID#> can be obtained from the platform. For the method to obtain them, please refer to How to Query AppID and Config Address?. If you have any questions, please contact technical support.
Objective-C
- Import the header file: Import the header in
main.morAppDelegate.m:
#import <BonreeRUM/BonreeRUM.h>
- Set the Config Address and AppID in the
mainfunction or the- application:didFinishLaunchingWithOptions:method:
[BRSAgent setConfigAddress:@"<#Config Address#>"];
[BRSAgent startWithAppID:@"<#AppID#>"];
Example:
main.m:
int main(int argc, char * argv[]) {
    NSString * appDelegateClassName;
    @autoreleasepool {

        [BRSAgent setConfigAddress:@"<#Config Address#>"];
        [BRSAgent startWithAppID:@"<#AppID#>"];

        appDelegateClassName = NSStringFromClass([AppDelegate class]);
    }
    return UIApplicationMain(argc, argv, nil, appDelegateClassName);
}
AppDelegate.m:
- (BOOL)application:(UIApplication *)application didFinishLaunchingWithOptions:(NSDictionary *)launchOptions {

    [BRSAgent setConfigAddress:@"<#Config Address#>"];
    [BRSAgent startWithAppID:@"<#AppID#>"];

    return YES;
}
Choose one of the above integration methods based on your project's actual situation. Do not integrate both.
After running, if the console outputs BonreeSDK config succeeded, it indicates successful integration. As shown below:
2020-12-03 16:17:21.391 [BonreeSDK] [CONFIG] BonreeSDK Config Succeeded.
Note: It is recommended to initialize the SDK in the
mainfunction to fully capture the time consumption of the- application:didFinishLaunchingWithOptions:method and its internal related methods during the entire startup performance. Otherwise, capturing can only start from when the Agent initializes, and only the startup time before initialization will be captured without detailed method-level time consumption details.
In a pure Objective-C project (without any Swift files), if the following error occurs after integrating the SDK, it can be resolved using the methods below:
Error as shown in the figure:

Solution 1:
Create an empty Swift file in the project to resolve this error.
Solution 2:
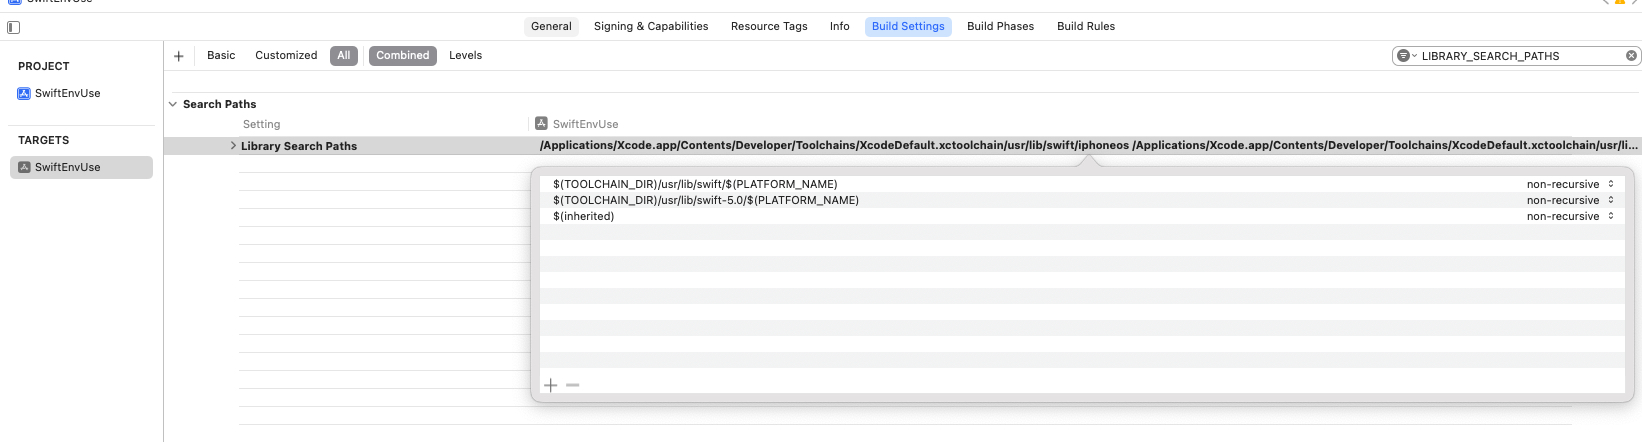
If you prefer not to create a new Swift file, add the following paths under Target -> Build Settings -> LIBRARY_SEARCH_PATHS:
$(TOOLCHAIN_DIR)/usr/lib/swift/$(PLATFORM_NAME)
$(TOOLCHAIN_DIR)/usr/lib/swift-5.0/$(PLATFORM_NAME)
$(inherited)
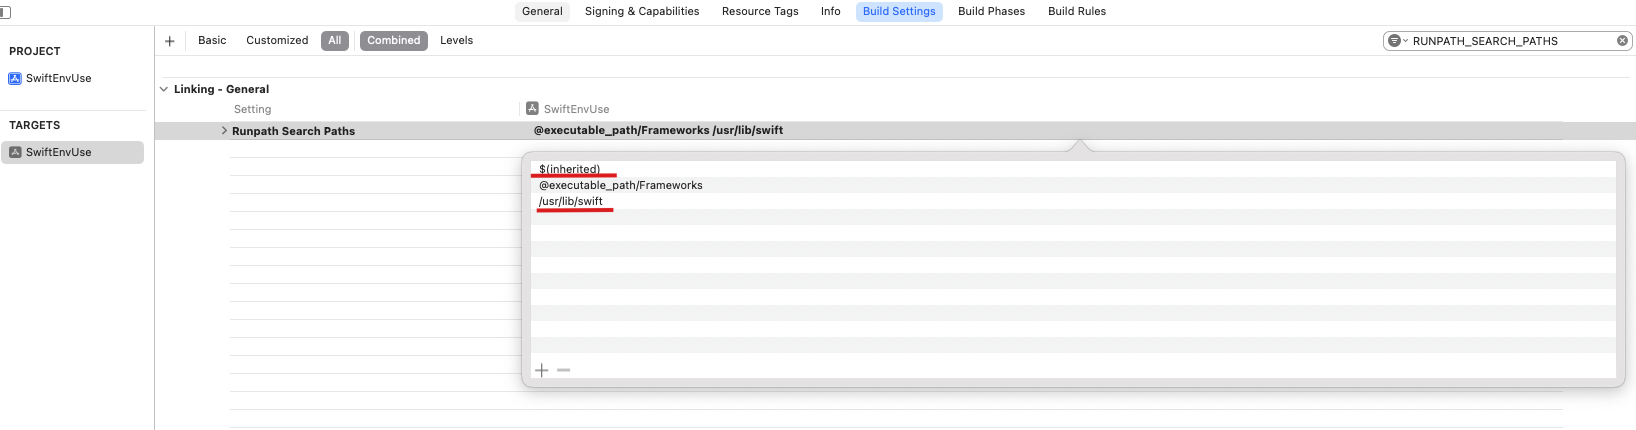
Add the following paths under Target -> Build Settings -> RUNPATH_SEARCH_PATHS:
$(inherited)
/usr/lib/swift
Swift
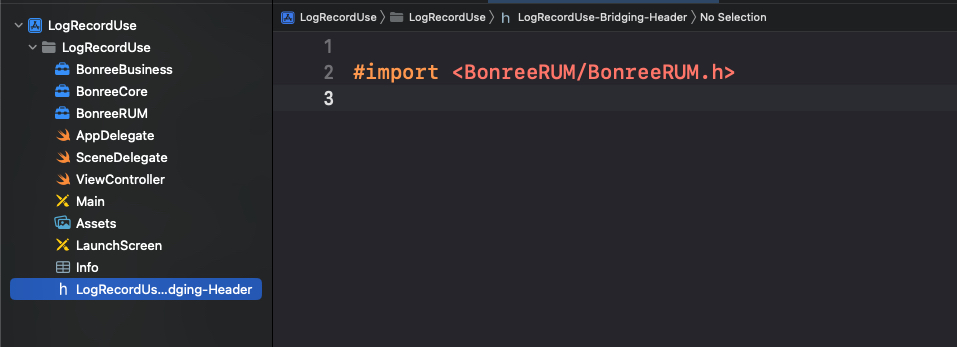
- Import the header file in the corresponding bridging header file
Bridging-Header.h, as shown in the figure:
- Set the Config Address and AppID in the
application(_, didFinishLaunchingWithOptions)function in theAppDelegate.swiftfile:
BRSAgent.setConfigAddress("<#Config Address#>")
BRSAgent.start(withAppID: "<#AppID#>")
Example:
import UIKit
import BonreeRUM

@main
class AppDelegate: UIResponder, UIApplicationDelegate {

    func application(_ application: UIApplication, didFinishLaunchingWithOptions launchOptions: [UIApplication.LaunchOptionsKey: Any]?) -> Bool {

        BRSAgent.setConfigAddress("<#Config Address#>")
        BRSAgent.start(withAppID: "<#AppID#>")

        return true
    }

}
After running, if the console outputs BonreeSDK config succeeded, it indicates successful integration. As shown below:
2020-12-03 16:17:21.391 [BonreeSDK] [CONFIG] BonreeSDK Config Succeeded.
Log Integration Guide
Cocoapods Integration
-
Add the following to your project's
Podfile:pod 'BonreeLog' -
Execute
pod installin the directory where yourPodfileis located
Manual Integration
-
Unzip
BonreeSDK_TDEM_iOS.tar.gz. After extraction, you will see two directories:XCFrameworkDynamicandXCFrameworkStatic. TheXCFrameworkDynamicdirectory contains dynamic libraries, and theXCFrameworkStaticdirectory contains static libraries. Choose one for integration based on your requirements. -
Add
BonreeCore.xcframework,BonreeBusiness.xcframework, andBonreeLog.xcframeworkto your project, as shown in the figure:
-
In Build Phases -> Link Binary With Libraries, add
BonreeCore.xcframework,BonreeBusiness.xcframework, andBonreeLog.xcframework. -
Modify the Embed option: If integrating static libraries, select
Do Not Embed. If integrating dynamic libraries, selectEmbed & Sign.

- In Build Settings, search for Other Linker Flags and add the compilation flag -ObjC, as shown in the figure:
Log Setup
AppID and LogConfig Address can be obtained from the platform or by contacting technical support.
Objective-C
- Import the header file: Import the header in
main.morAppDelegate.m:
#import <BonreeLog/BonreeLog.h>
- Set the log remote configuration address in the
mainfunction or the- application:didFinishLaunchingWithOptions:method:
[BRLogAgent setConfigAddress:@"<#LogConfig Address#>"];
- After setting the remote configuration address, enable the log probe:
// Create custom configuration
BRLogConfiguration *config = [[BRLogConfiguration alloc] init];
config.isTrackingData = YES; // Whether to report data
config.appID = @"<#AppID#>"; // Application appID, can be viewed on the platform

[BRLogAgent startWithConfiguration:config];
For detailed parameter descriptions of the
BRLogConfigurationclass, please refer to the log API documentation.
Example:
main.m:
int main(int argc, char * argv[]) {
    NSString * appDelegateClassName;
    @autoreleasepool {

        [BRLogAgent setConfigAddress:@"<#LogConfig Address#>"];

        // Create custom configuration
        BRLogConfiguration *config = [[BRLogConfiguration alloc] init];
        config.isTrackingData = YES;
        config.appID = @"<#AppID#>"; // Application appID, can be viewed on the platform

        [BRLogAgent startWithConfiguration:config];

        appDelegateClassName = NSStringFromClass([AppDelegate class]);
    }
    return UIApplicationMain(argc, argv, nil, appDelegateClassName);
}
AppDelegate.m:
- (BOOL)application:(UIApplication *)application didFinishLaunchingWithOptions:(NSDictionary *)launchOptions {

    [BRLogAgent setConfigAddress:@"<#LogConfig Address#>"];

    // Create custom configuration
    BRLogConfiguration *config = [[BRLogConfiguration alloc] init];
    config.isTrackingData = YES;
    config.appID = @"<#AppID#>"; // Application appID, can be viewed on the platform

    [BRLogAgent startWithConfiguration:config];

    return YES;
}
Choose one of the above integration methods based on your project's actual situation. Do not integrate both.
After running, if the console outputs BRLogAgent config succeeded, it indicates successful integration. As shown below:
2023-04-12 19:48:21.391 [BRLogAgent] [CONFIG] BonreeSDK Config Succeeded.
Swift
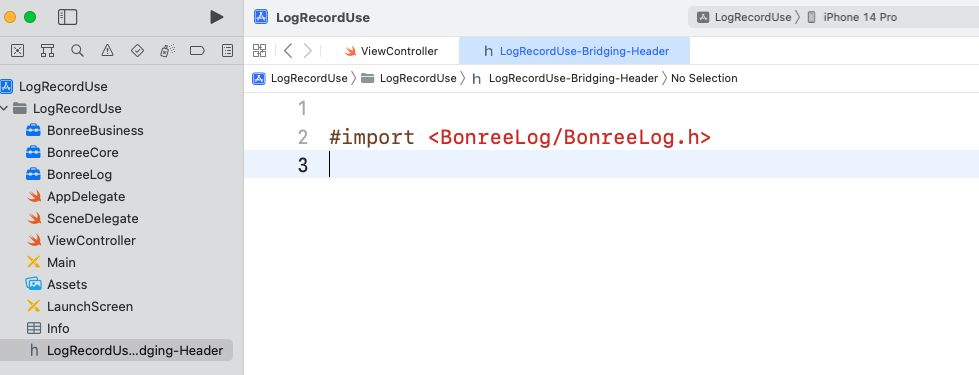
- Import the header file in the corresponding bridging header file
Bridging-Header.h, as shown in the figure:
- Import the header file: Import the header in
AppDelegate.swift:
import BonreeLog
- Set the log remote configuration address in the
application(_, didFinishLaunchingWithOptions)function in theAppDelegate.swiftfile:
BRLogAgent.setConfigAddress("<#LogConfig Address#>")
- After setting the remote configuration address, enable the log probe:
// Create custom configuration
let config = BRLogConfiguration()
config.isTrackingData = true // Whether to report log data
config.appID = "<#AppID#>" // Application appID, can be viewed on the platform

BRLogAgent.start(with: config)
For detailed parameter descriptions of the
BRLogConfigurationclass, please refer to the log API documentation.
Example:
import UIKit
import BonreeLog

@main
class AppDelegate: UIResponder, UIApplicationDelegate {
    func application(_ application: UIApplication, didFinishLaunchingWithOptions launchOptions: [UIApplication.LaunchOptionsKey : Any]?) -> Bool {

        BRLogAgent.setConfigAddress("<#LogConfig Address#>")

        // Create custom configuration
        let config = BRLogConfiguration()
        config.isTrackingData = true
        config.appID = "<#AppID#>" // Application appID, can be viewed on the platform

        BRLogAgent.start(with: config)

        return true
    }
}
After running, if the console outputs BonreeSDK config succeeded, it indicates successful integration. As shown below:
2023-04-12 19:49:10.121 [BRLogAgent] [CONFIG] Config Succeeded
Log Usage
- Use the BRLogger class for log output, allowing custom Logger objects to handle different business scenarios.

### Objective-C

* Import the header file:

```objc
#import <BonreeLog/BonreeLog.h>
- Customize the configuration class
BRLoggerBuilderto generate personalized log objects:
// Custom logger configuration
BRLoggerBuilder *builder = [[BRLoggerBuilder alloc] init];
builder.levelThreshold = BRLogLevelDebug; // Log level threshold
builder.loggerName = @"Home Logger"; // Custom logger name
builder.printConsole = YES; // Whether to print to console
builder.prefix = @"[Bonree]"; // Log message prefix
For detailed parameter descriptions of the
BRLoggerBuilderclass, please refer to the log API documentation.
- Create a
BRLoggerobject using the above configuration and call the log output methods:
// Create logger with configuration
BRLogger *logger = [BRLogger loggerWithBuilder:builder];

// Log output
[logger debug:@"Debug log"];
[logger error:@"Error log"];
BRLoggersupports multiple log level outputs. For detailed descriptions, please refer to the log API documentation.
Example:
- (void)viewDidLoad {
    [super viewDidLoad];

    // Custom logger configuration
    BRLoggerBuilder *builder = [[BRLoggerBuilder alloc] init];
    builder.levelThreshold = BRLogLevelDebug; // Log level threshold
    builder.loggerName = @"Home Logger"; // Custom logger name
    builder.printConsole = YES; // Whether to print to console
    builder.prefix = @"[Bonree]"; // Log message prefix

    // Create logger with configuration
    BRLogger *logger = [BRLogger loggerWithBuilder:builder];

    // Log output
    [logger debug:@"Debug log"];
    [logger error:@"Error log"];
}
Swift
- Import the header file:
import BonreeLog
- Customize the configuration class
BRLoggerBuilderto generate personalized log objects:
// Custom logger configuration
let builder = BRLoggerBuilder()
builder.levelThreshold = .debug // Log level threshold
builder.loggerName = "Home Logger" // Custom logger name
builder.printConsole = true // Whether to print to console
builder.prefix = "[Bonree]" // Log message prefix
For detailed parameter descriptions of the
BRLoggerBuilderclass, please refer to the log API documentation.
- Create a
BRLoggerobject using the above configuration and call the log output methods:
// Create logger with configuration
let logger = BRLogger(builder: builder)

// Log output
logger.debug("Debug log")
logger.error("Error log")
BRLoggersupports multiple log level outputs. For detailed descriptions, please refer to the log API documentation.
Example:
override func viewDidLoad() {
    super.viewDidLoad()

    // Custom logger configuration
    let builder = BRLoggerBuilder()
    builder.levelThreshold = .debug // Log level threshold
    builder.loggerName = "Home Logger" // Custom logger name
    builder.printConsole = true // Whether to print to console
    builder.prefix = "[Bonree]" // Log message prefix

    // Create logger with configuration
    let logger = BRLogger(builder: builder)
    // Log output
    logger.debug("Debug log")
    logger.error("Error log")
}