mPaaS Integration Guide
SDK Integration - Native AAR Method
Local
1. Prepare Bonree SDK Environment
Unzip BonreeSDK_TDEM_Android.v${VERSION_NAME}.zip and store it locally (e.g., E:);Copy the contents of the jniLibs directory to overwrite the jniLibs directory in your packaging module level that stores so dynamic libraries (if there is no jniLibs directory in your project, please create one);
Copy the repo folder to the root directory of all Projects, at the same level as the module directory;
Copy com.bonree.sdk.jar to the libs directory at the module level;
Note: On Mac, it is best to place the unzipped folder path under /Users/xxxx/. Placing it in a system directory may cause unexpected issues due to permissions.
2. Configure Gradle
The mPaaS development framework may have multiple project projects, and the jar package and so library can be flexibly placed in any module of the project according to the project architecture, just ensure that the compiled APK contains the code in com.bonree.sdk.jar and all so libraries.
2.1 For Gradle Versions Below 7.0
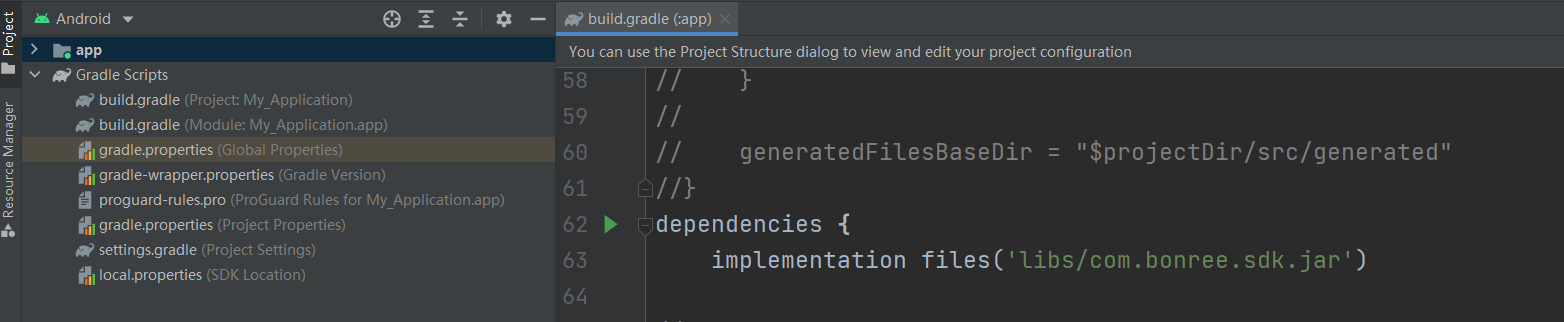
Open the build.gradle file in the module-level directory:
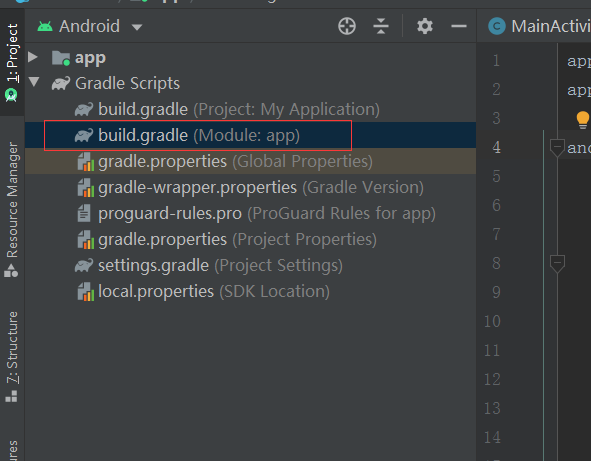
Add the following code in the dependencies block:
implementation files('libs/com.bonree.sdk.jar')
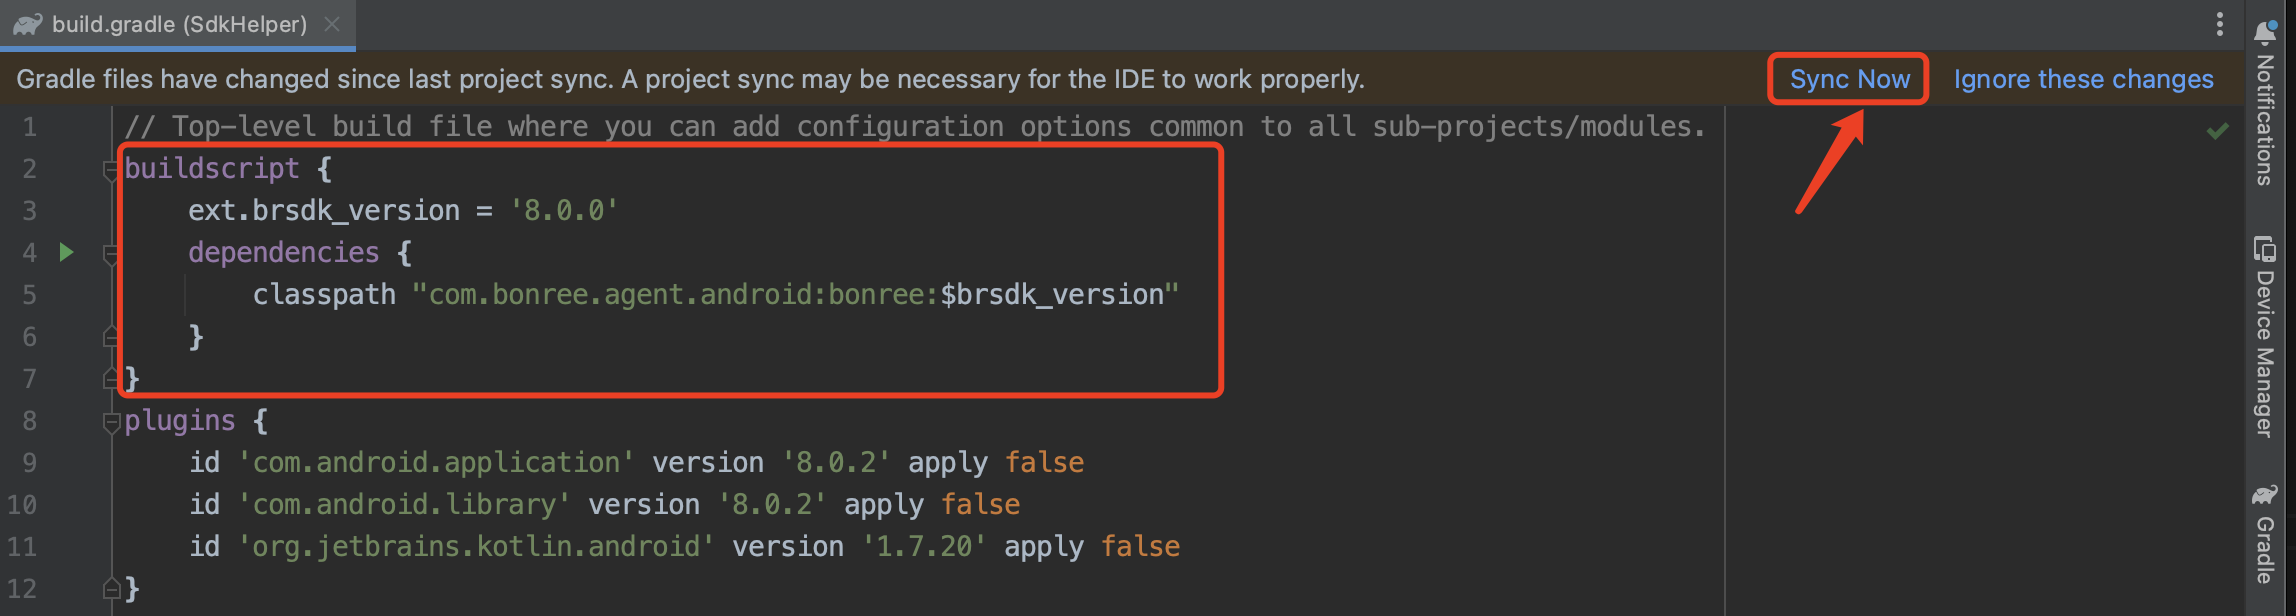
Open the build.gradle file in the root directory of all Project levels:
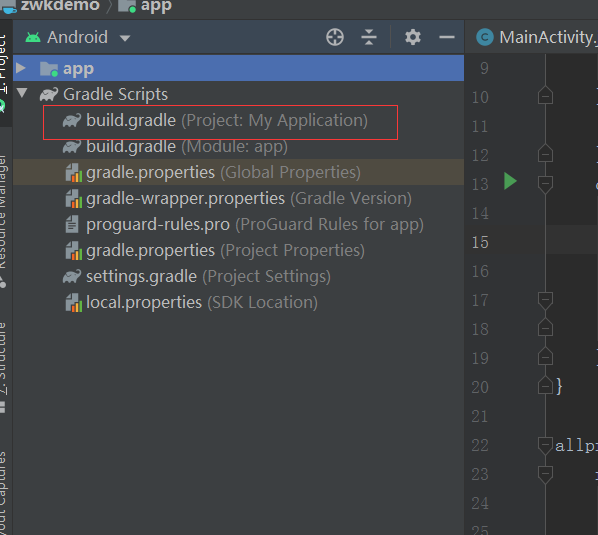
Add the following three configuration scripts (highlighted in red boxes) to the build.gradle file, and click the Sync Now button:
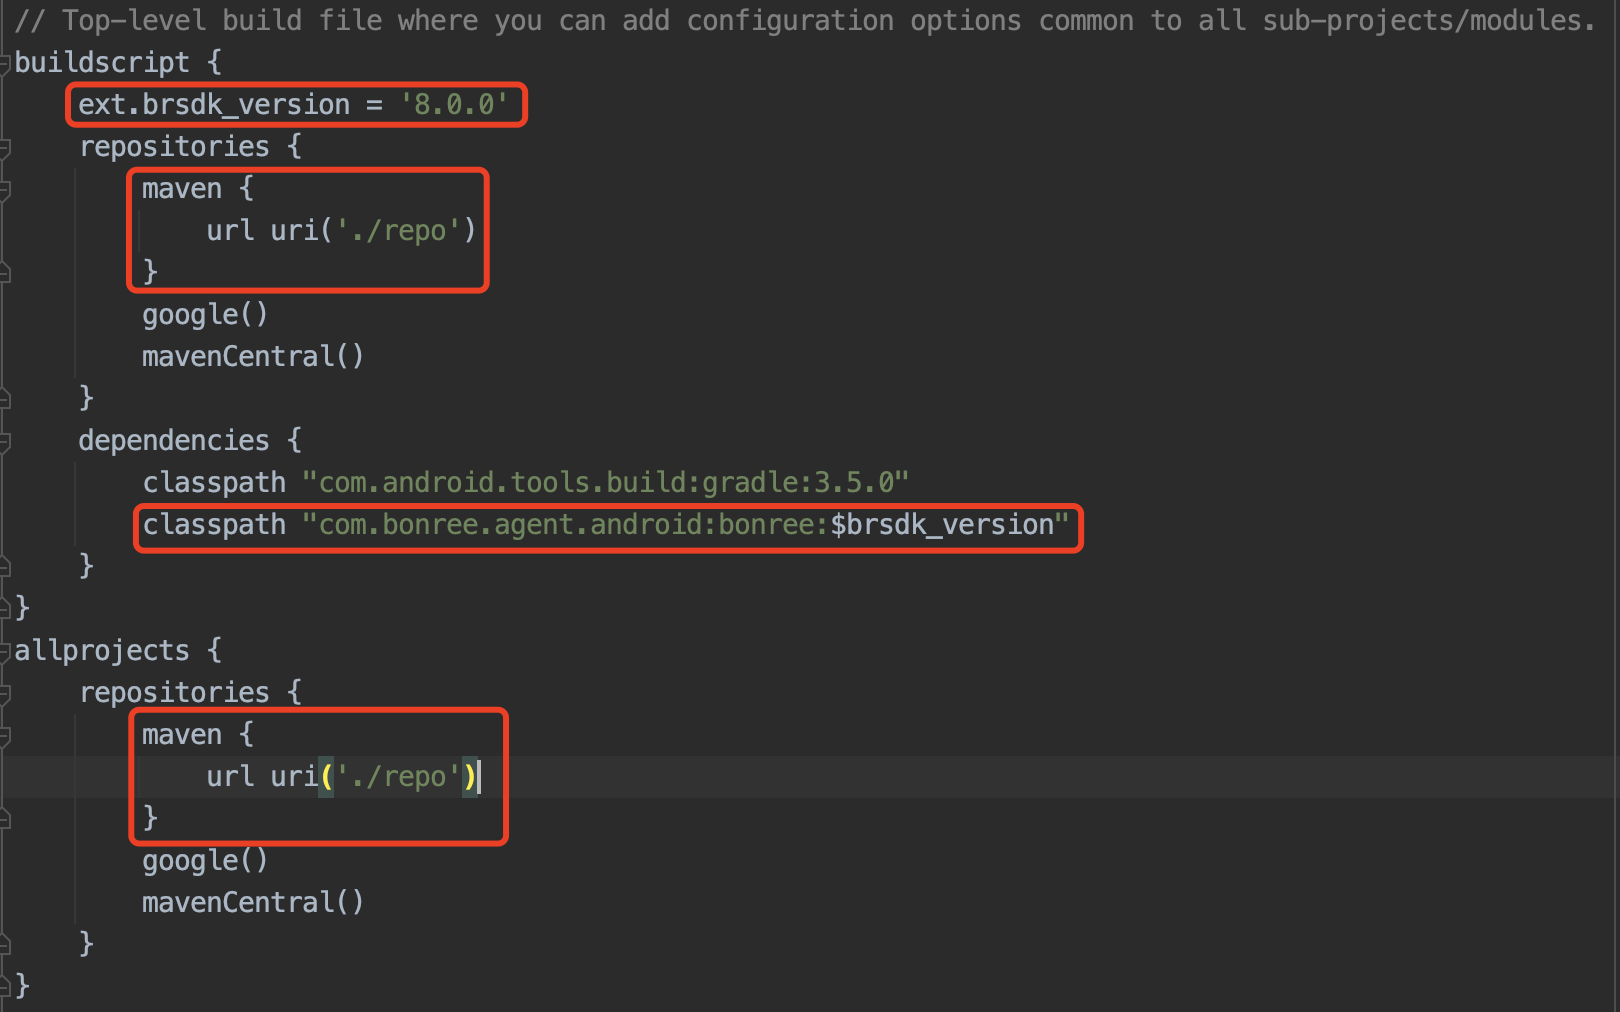
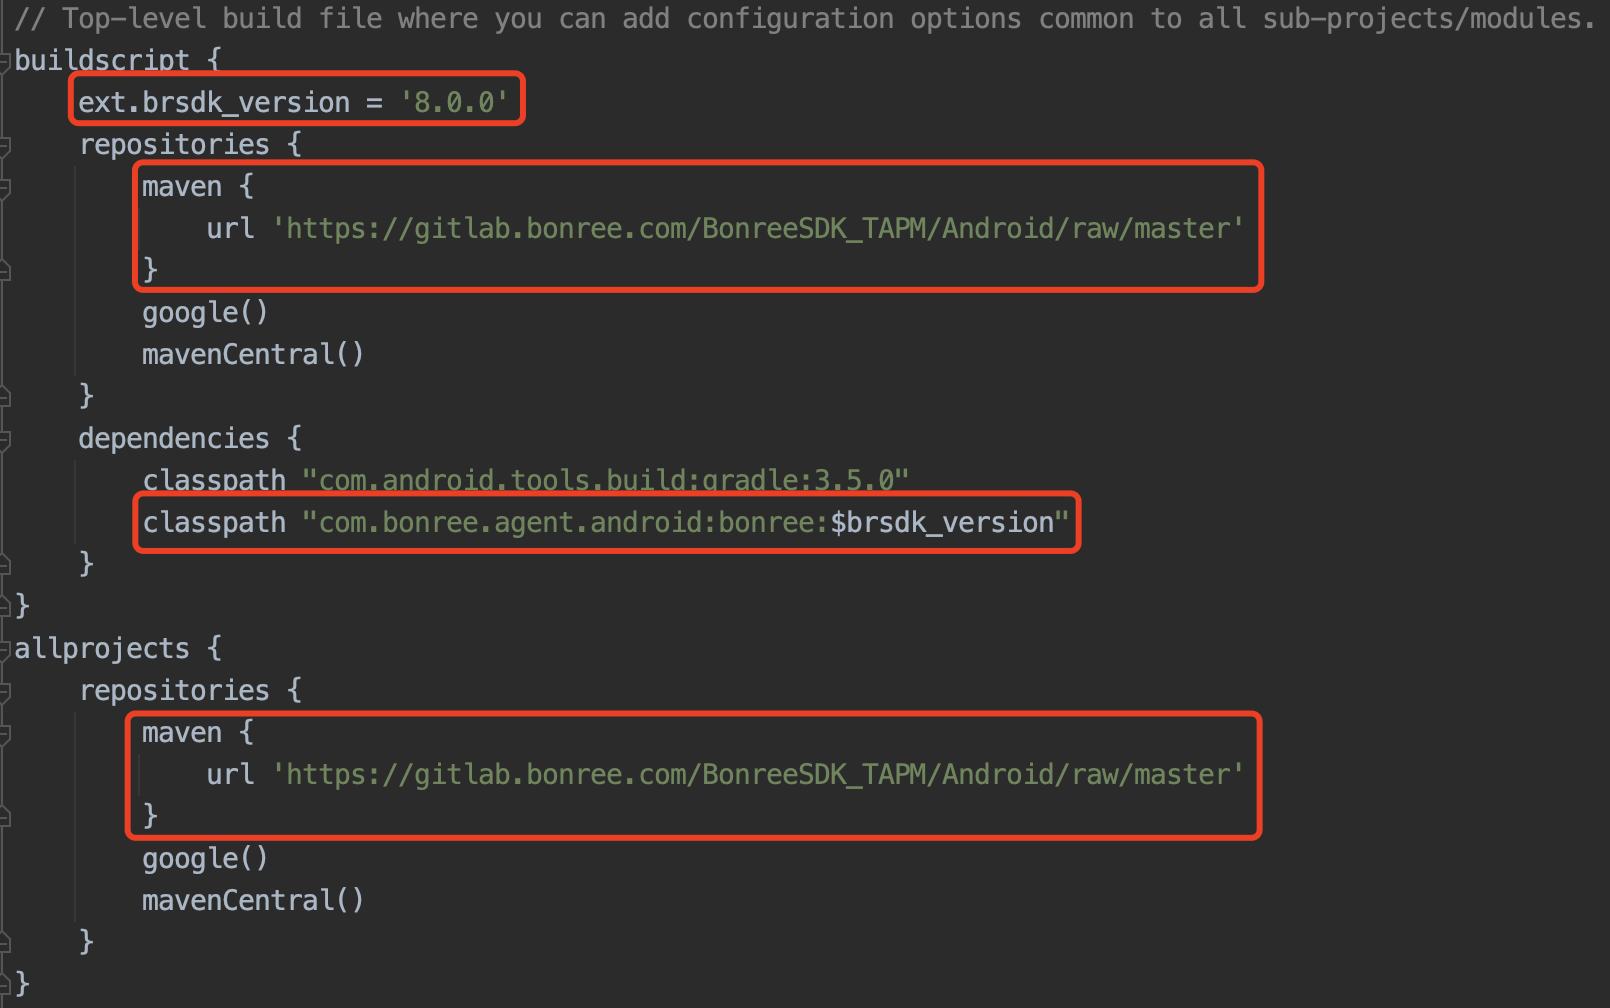
ext.brsdk_version = '8.0.0' // The value of ext.brsdk_version is the SDK version number, usually found at the end of the downloaded zip file name or in the Download Center.
maven { url uri('./repo') }
classpath "com.bonree.agent.android:bonree:$brsdk_version"
The Bonree component needs to be configured for all Projects. Please ensure that you have completely followed the above steps to add the classpath "com.bonree.agent.android:bonree:$brsdk_version" configuration in the project-level build.gradle of all projects!
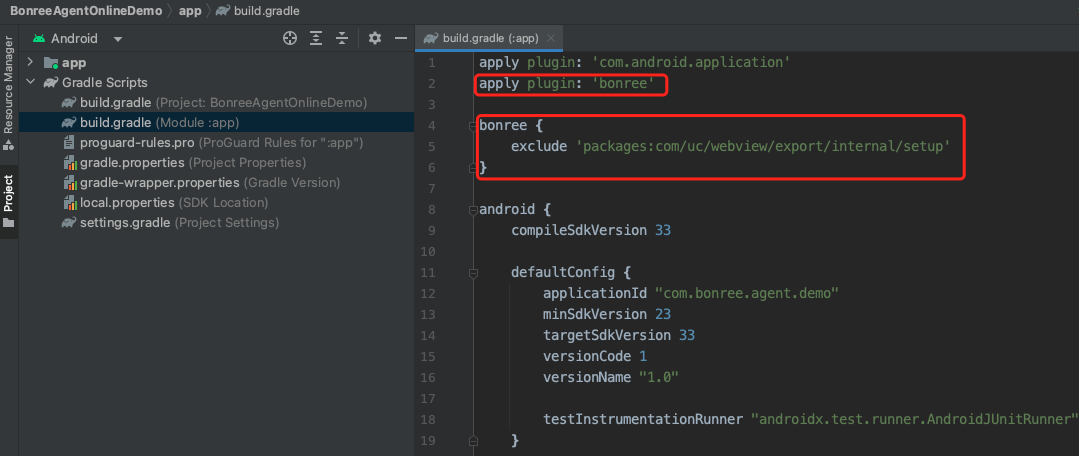
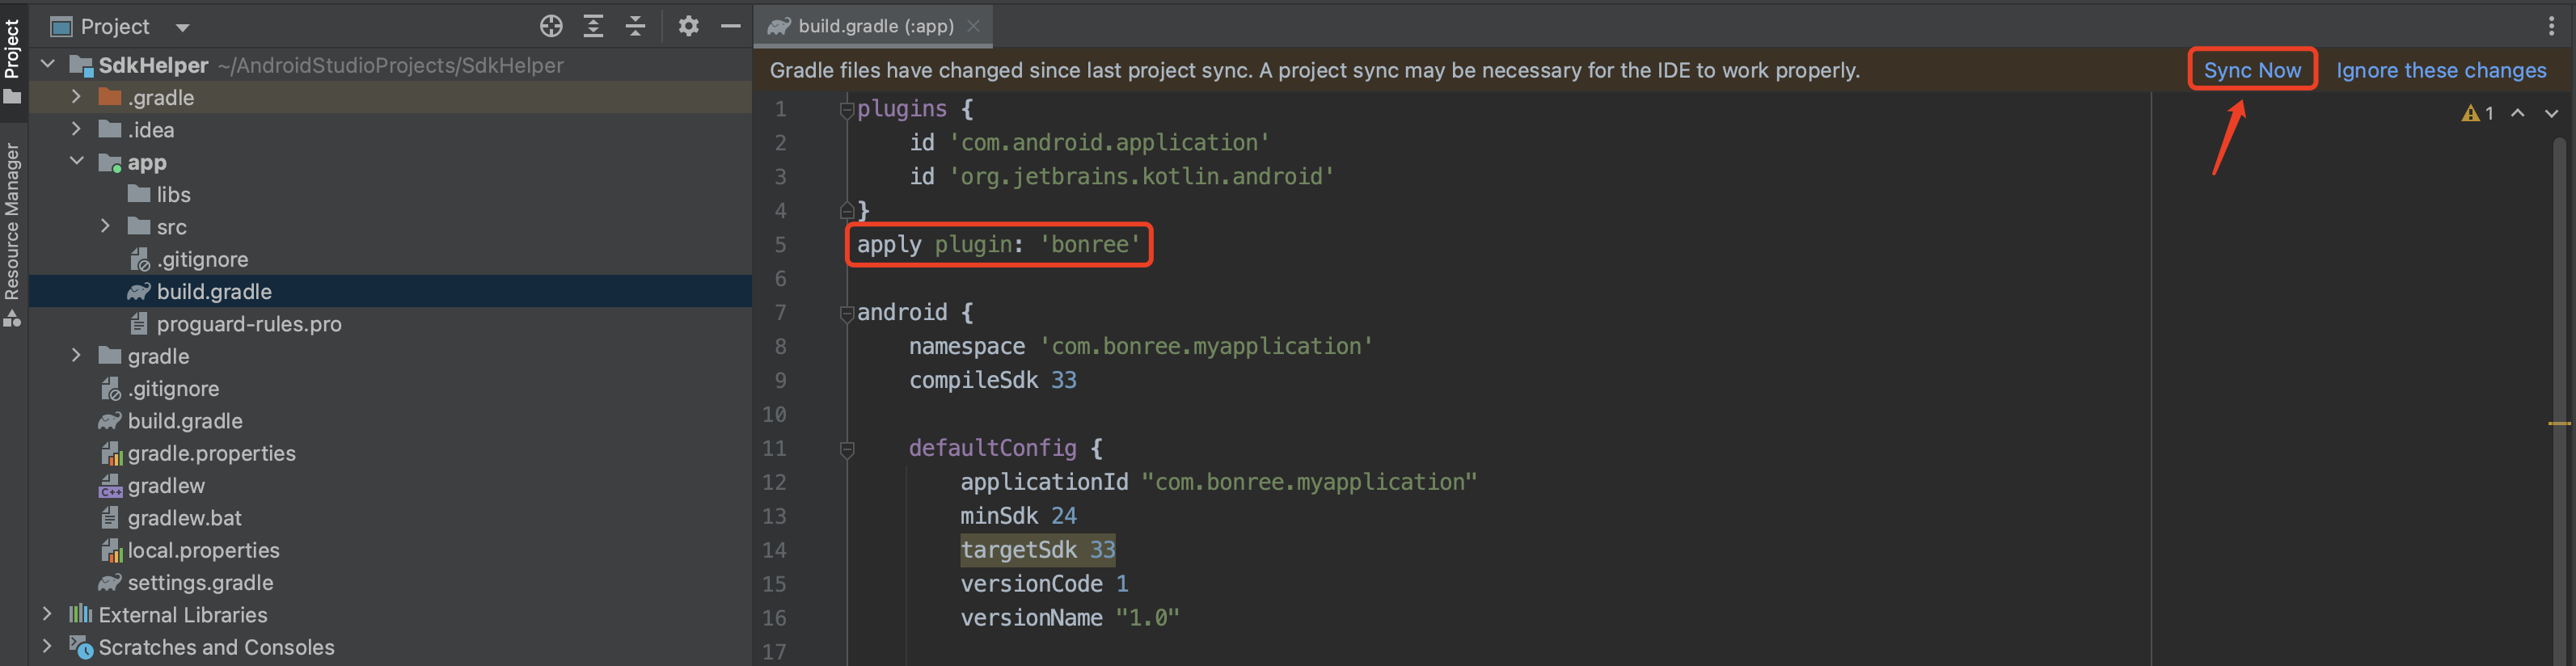
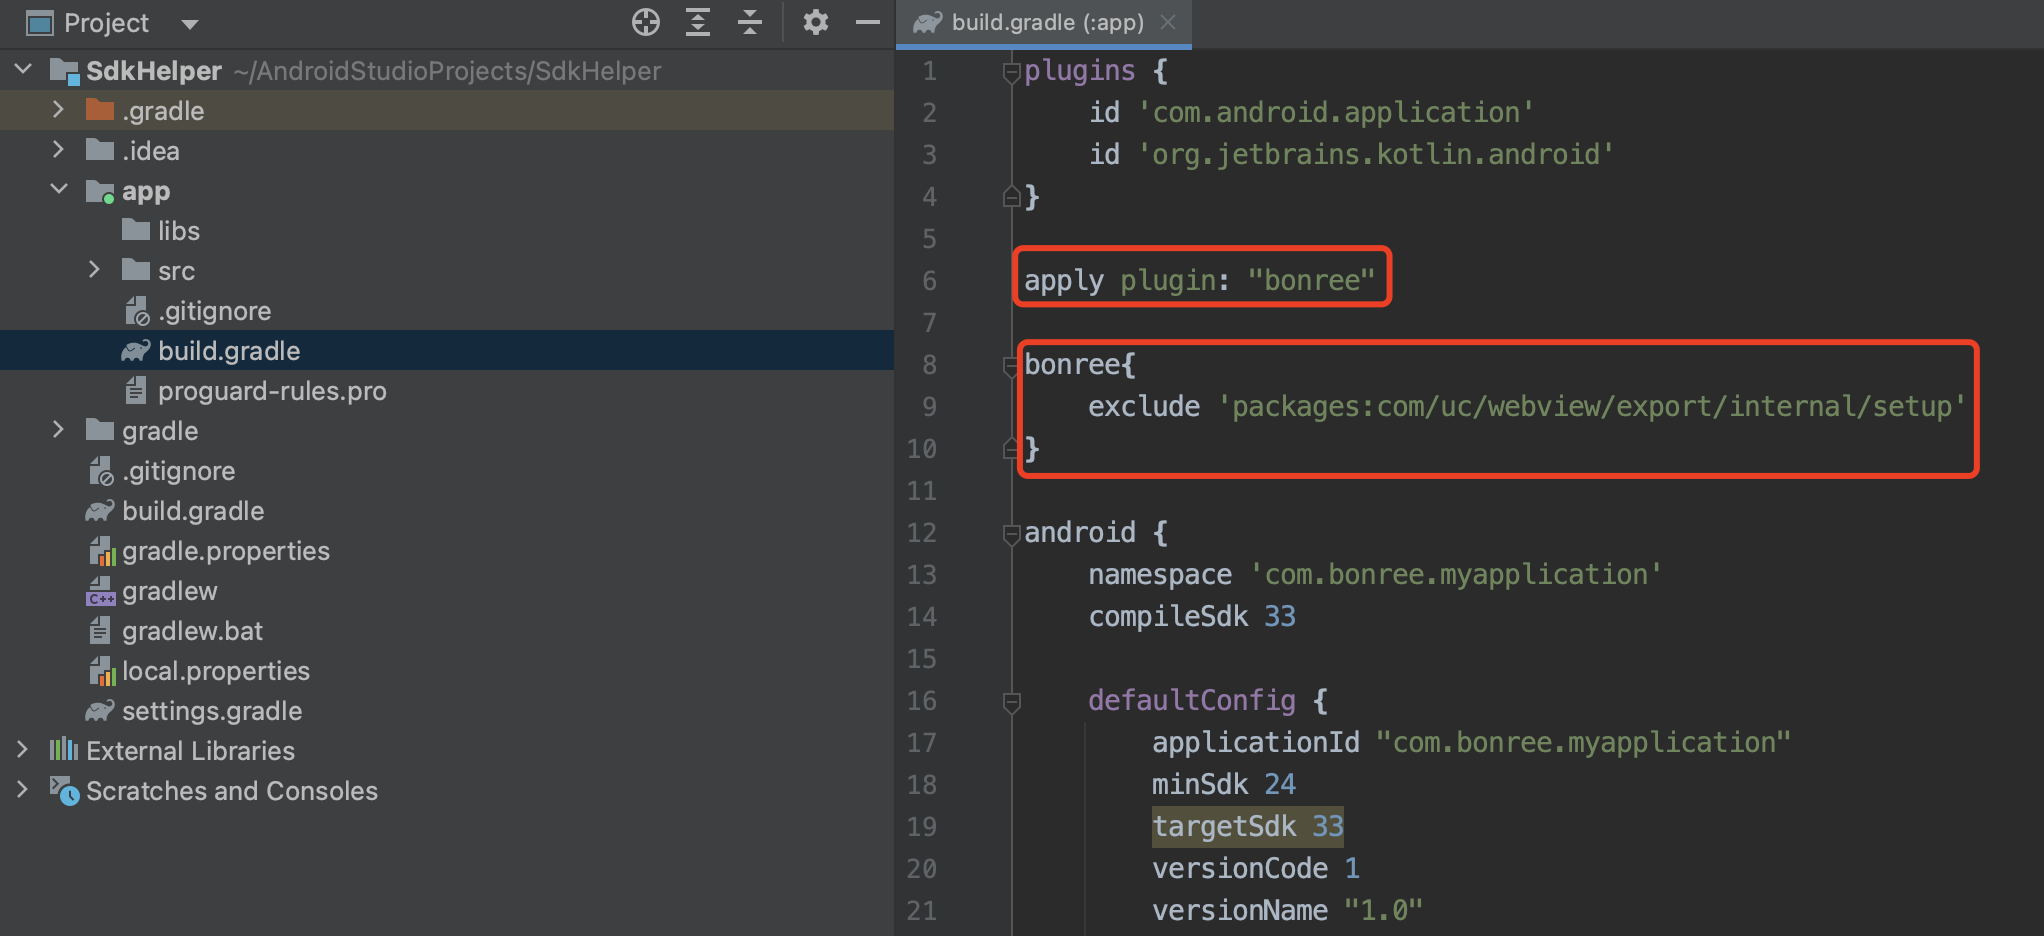
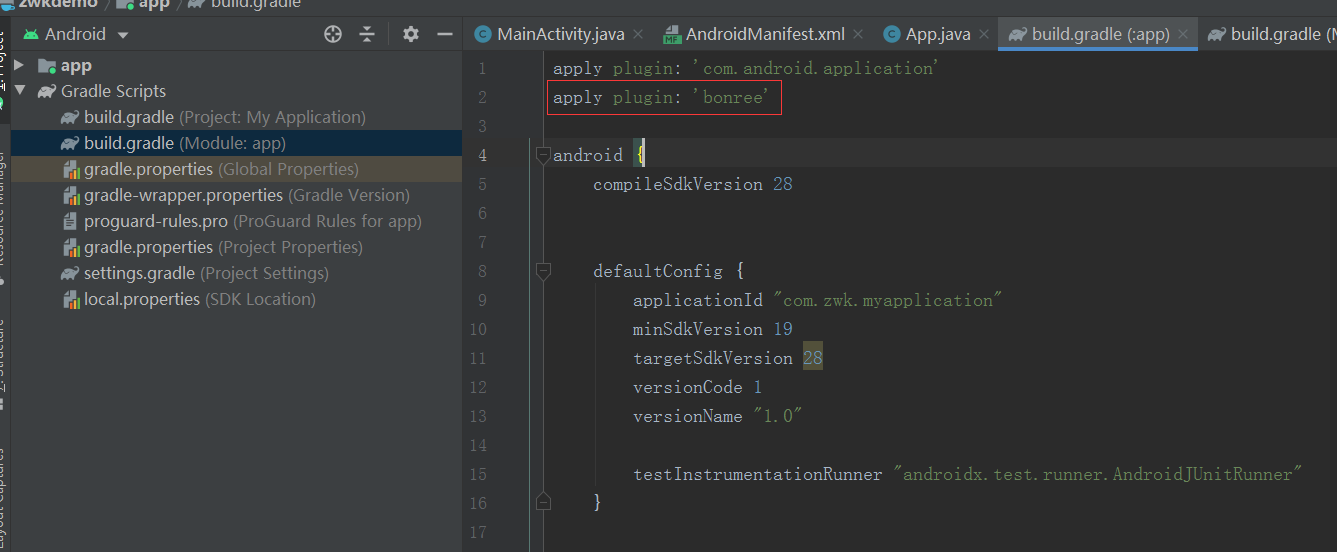
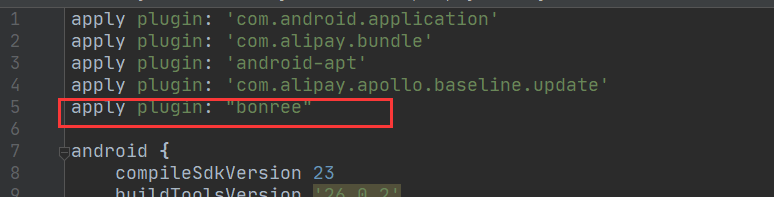
Open the build.gradle file of the main module and add the following two configurations:
apply plugin: "bonree"
bonree{
  exclude 'packages:com/uc/webview/export/internal/setup'
}
2.2 For Gradle Version 7.0 and Above
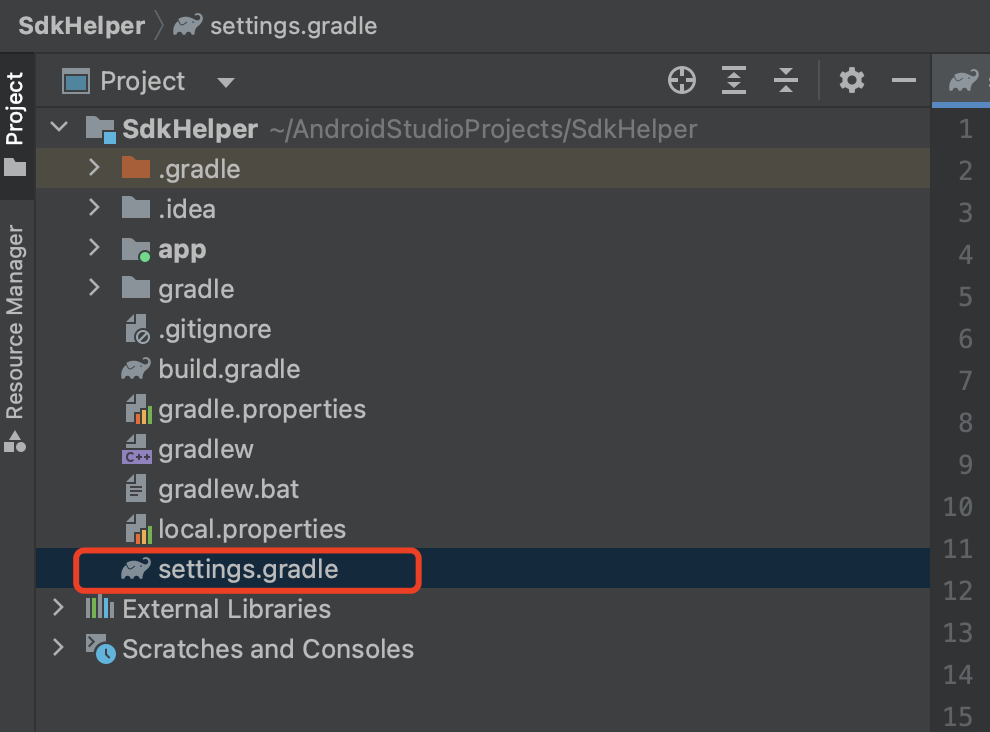
Open the settings.gradle file in the Project root directory:
Add the following configuration content (highlighted in the red box) to the settings.gradle file, and click the Sync Now button:
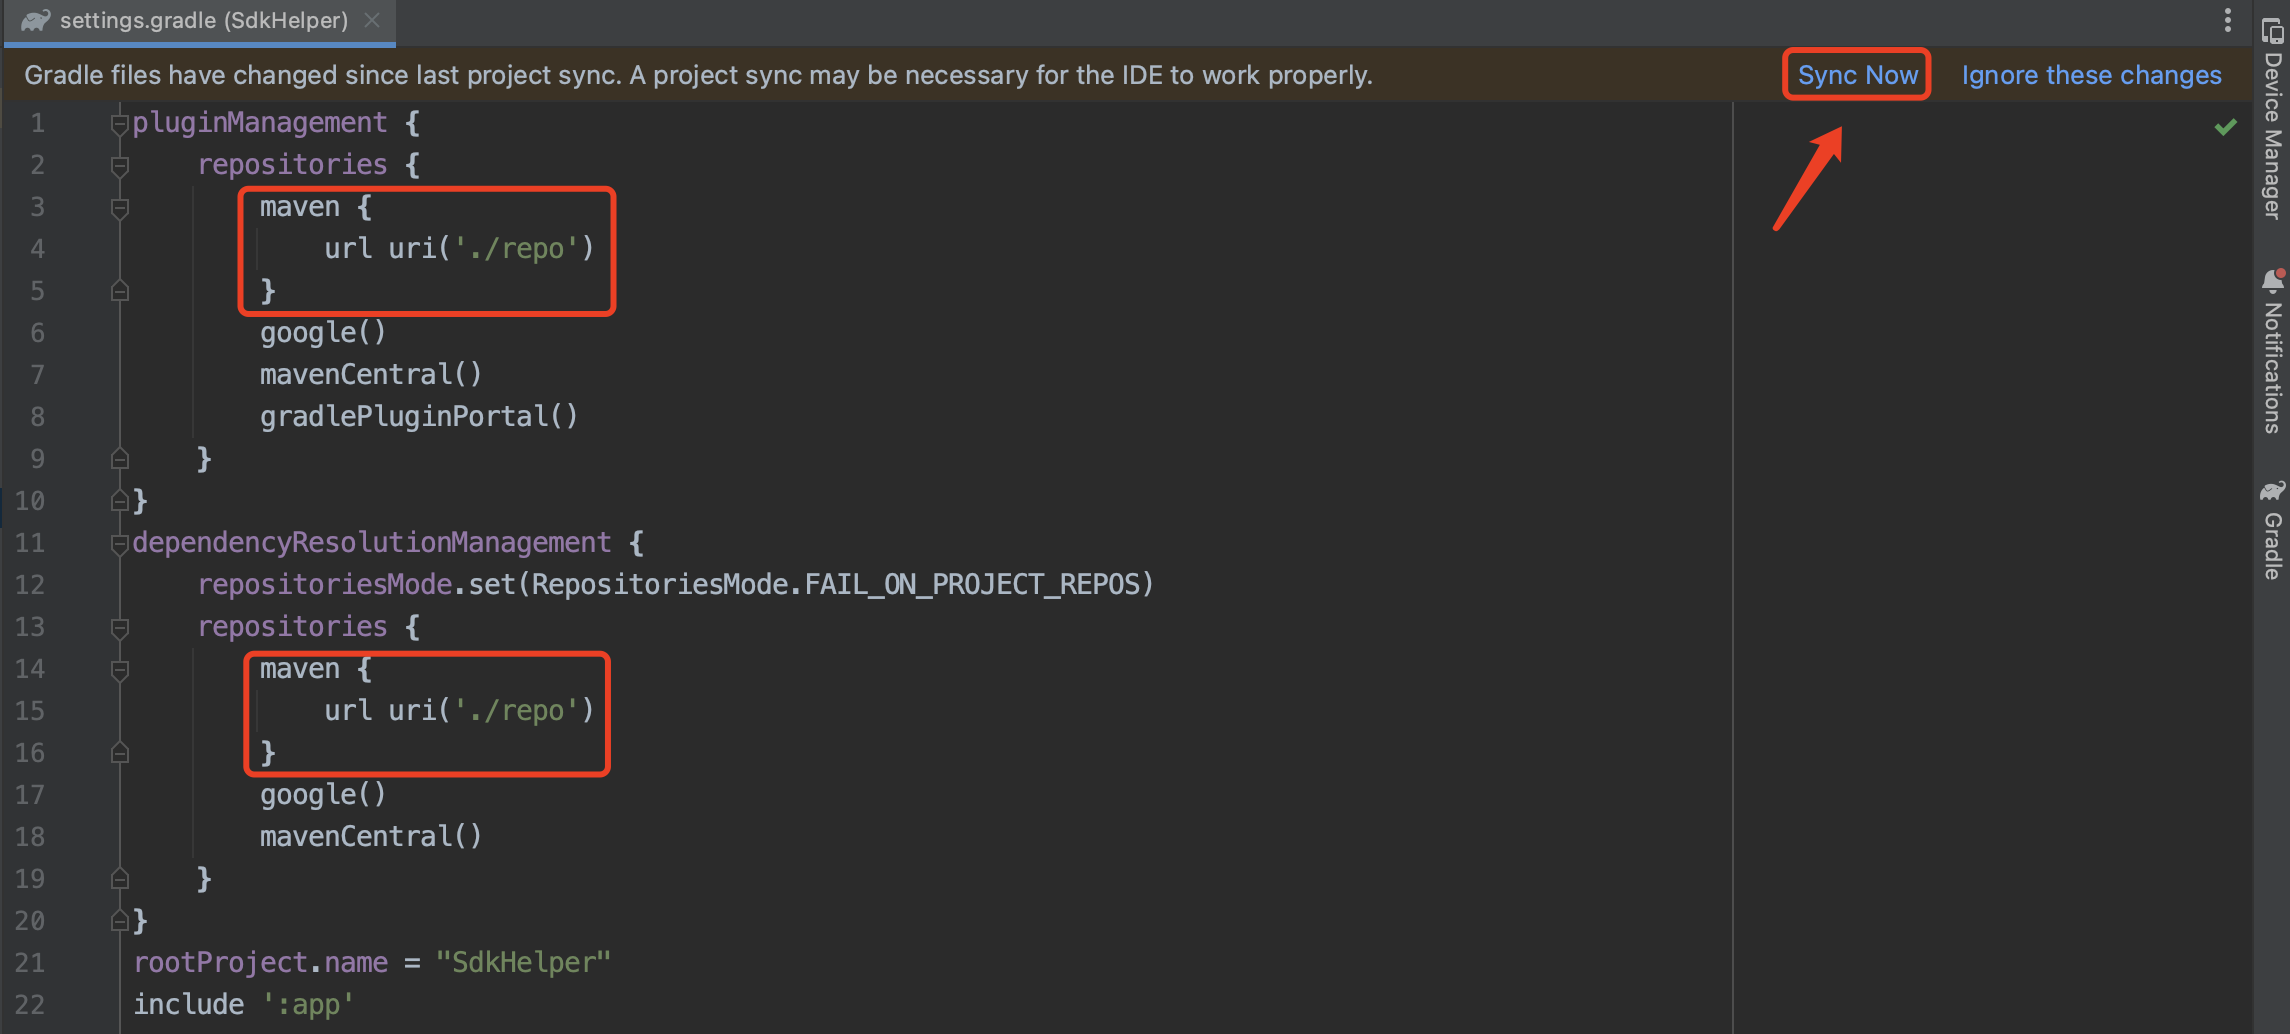
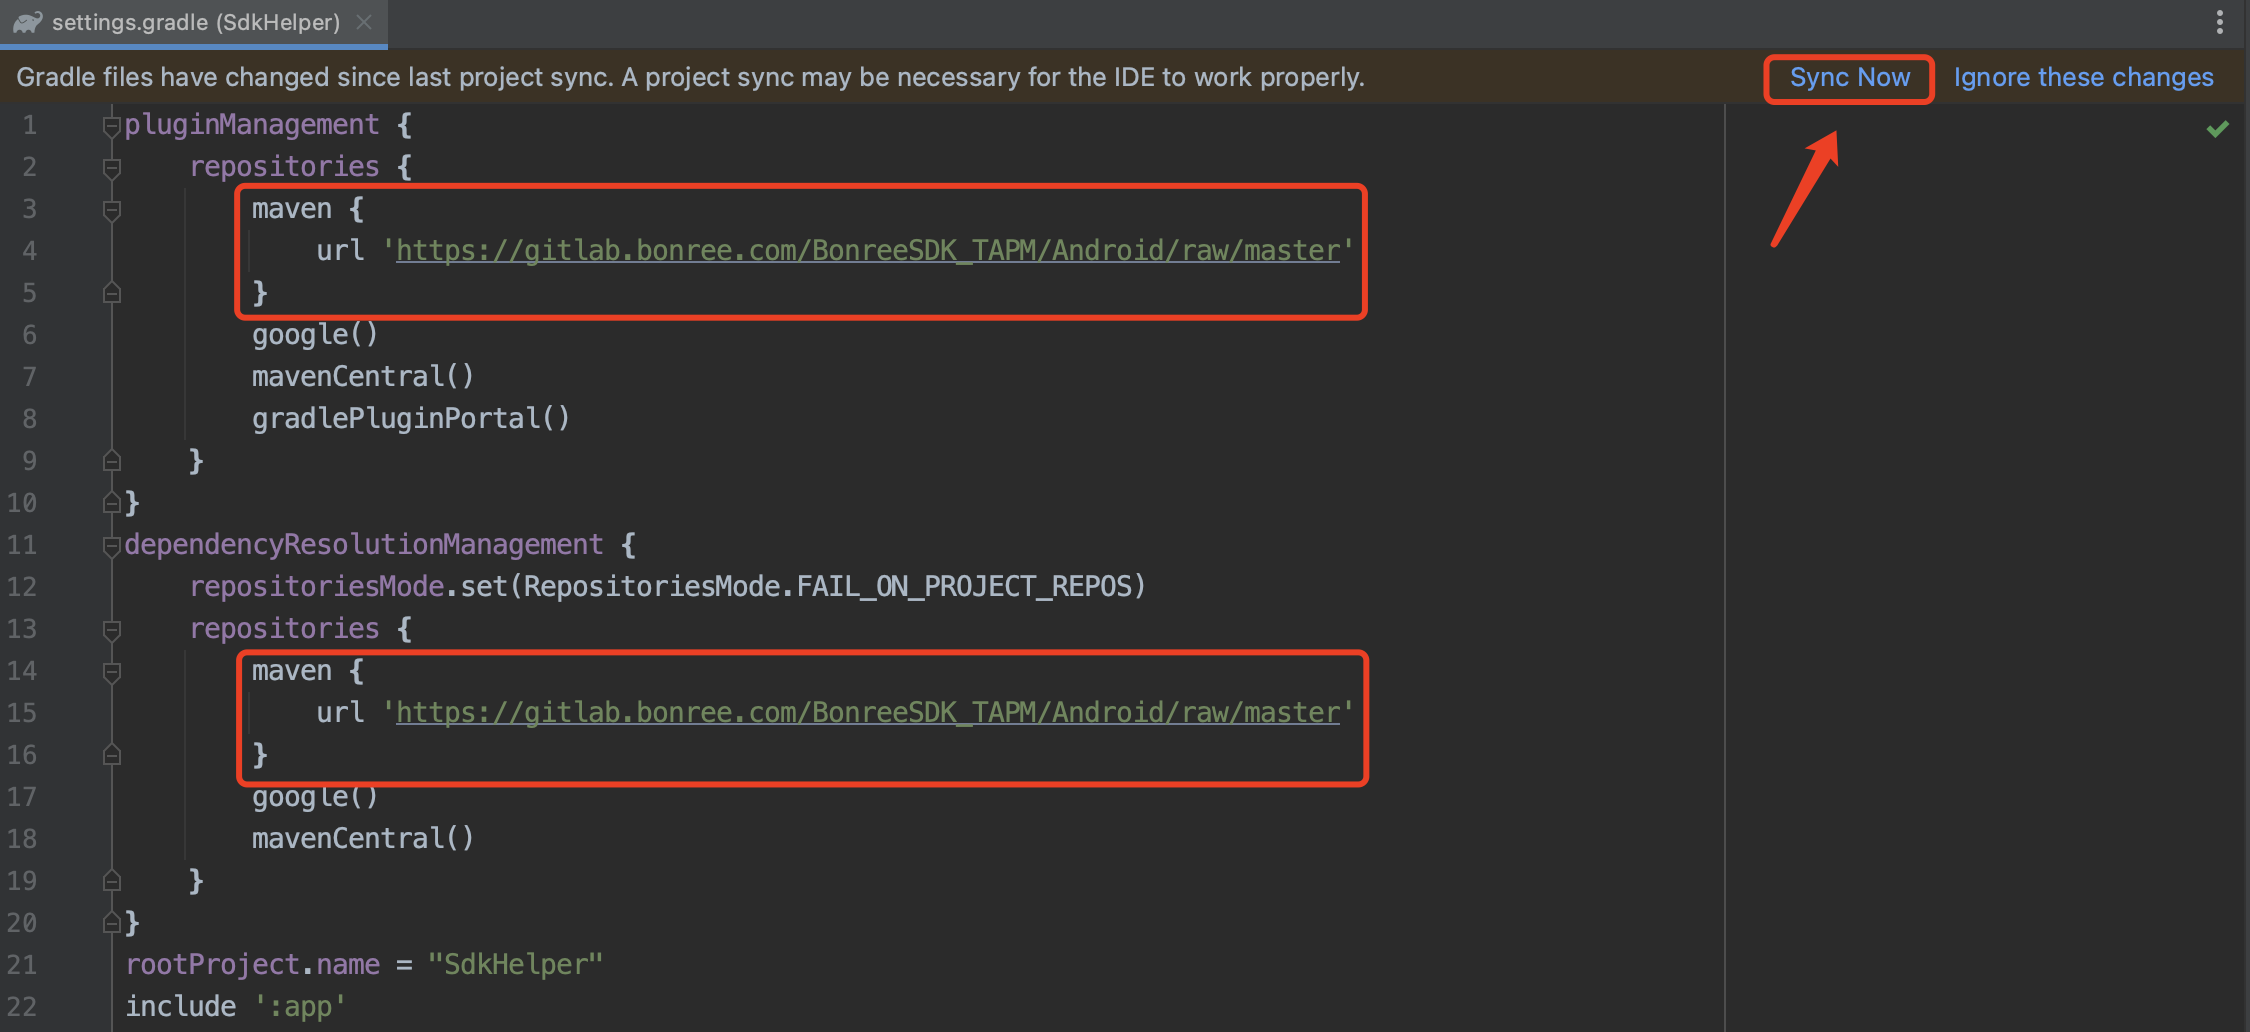
maven { url uri('./repo') }
Open the build.gradle file in the Project root directory:
Add the content highlighted in the red box and click the Sync Now button:
buildscript {
  ext.brsdk_version = '8.0.0'
  dependencies {
      classpath "com.bonree.agent.android:bonree:$brsdk_version"
  }
}
The Bonree component needs to be configured for all Projects. Please ensure that you have completely followed the above steps to add the classpath "com.bonree.agent.android:bonree:$brsdk_version" configuration in the project-level build.gradle of all projects!
Open the build.gradle file in the main Module directory, add the following configuration in the dependencies block, and click the Sync Now button:

implementation files('libs/com.bonree.sdk.jar')
Also, apply the Bonree plugin at the top of this file and click the Sync Now button:
Open the build.gradle file of the main module and add the following two configurations:
apply plugin: "bonree"
bonree{
  exclude 'packages:com/uc/webview/export/internal/setup'
}
Remote
1. Configure Gradle
The mPaaS development framework may contain multiple project modules. The jar package and .so libraries can be flexibly placed in any module within a project according to the project architecture, as long as the compiled APK contains the code from com.bonree.sdk.jar and all .so libraries.
1.1 Gradle 7.0 以下版本
Open the build.gradle file in the module-level directory:
Add the following three configuration scripts (highlighted in red boxes) to the build.gradle file, and click the Try Again button:
ext.brsdk_version = '8.0.0' // The value of ext.brsdk_version is the SDK version number. Specific version numbers can be found in the Download Center.
maven {
  url 'https://gitlab.bonree.com/BonreeSDK_TAPM/Android/raw/master'
}
classpath "com.bonree.agent.android:bonree:$brsdk_version"
Open the build.gradle file in the module-level directory:

Add the following code in the dependencies block:
implementation "com.bonree.agent.android:agent-lib:$brsdk_version"

The Bonree component needs to be configured for all Projects. Please ensure that you have completely followed Step 2 to add the classpath "com.bonree.agent.android:bonree:$brsdk_version" configuration in the project-level build.gradle of all projects!
Open the build.gradle file of the main module level directory and add the following two configurations:
apply plugin: "bonree"
bonree{
  exclude 'packages:com/uc/webview/export/internal/setup'
}
1.2 Gradle 7.0 及以上版本
Open the settings.gradle file in the Project root directory:
Add the following configuration content (highlighted in the red box) to the settings.gradle file, and click the Sync Now button:
maven {
  url 'https://gitlab.bonree.com/BonreeSDK_TAPM/Android/raw/master'
}
Open the build.gradle file in the Project root directory:
Add the content highlighted in the red box and click the Sync Now button:
buildscript {
  ext.brsdk_version = '8.0.0'
  dependencies {
      classpath "com.bonree.agent.android:bonree:$brsdk_version"
  }
}
Open the build.gradle file in the main Module directory, add the following configuration in the dependencies block, and click the Sync Now button:
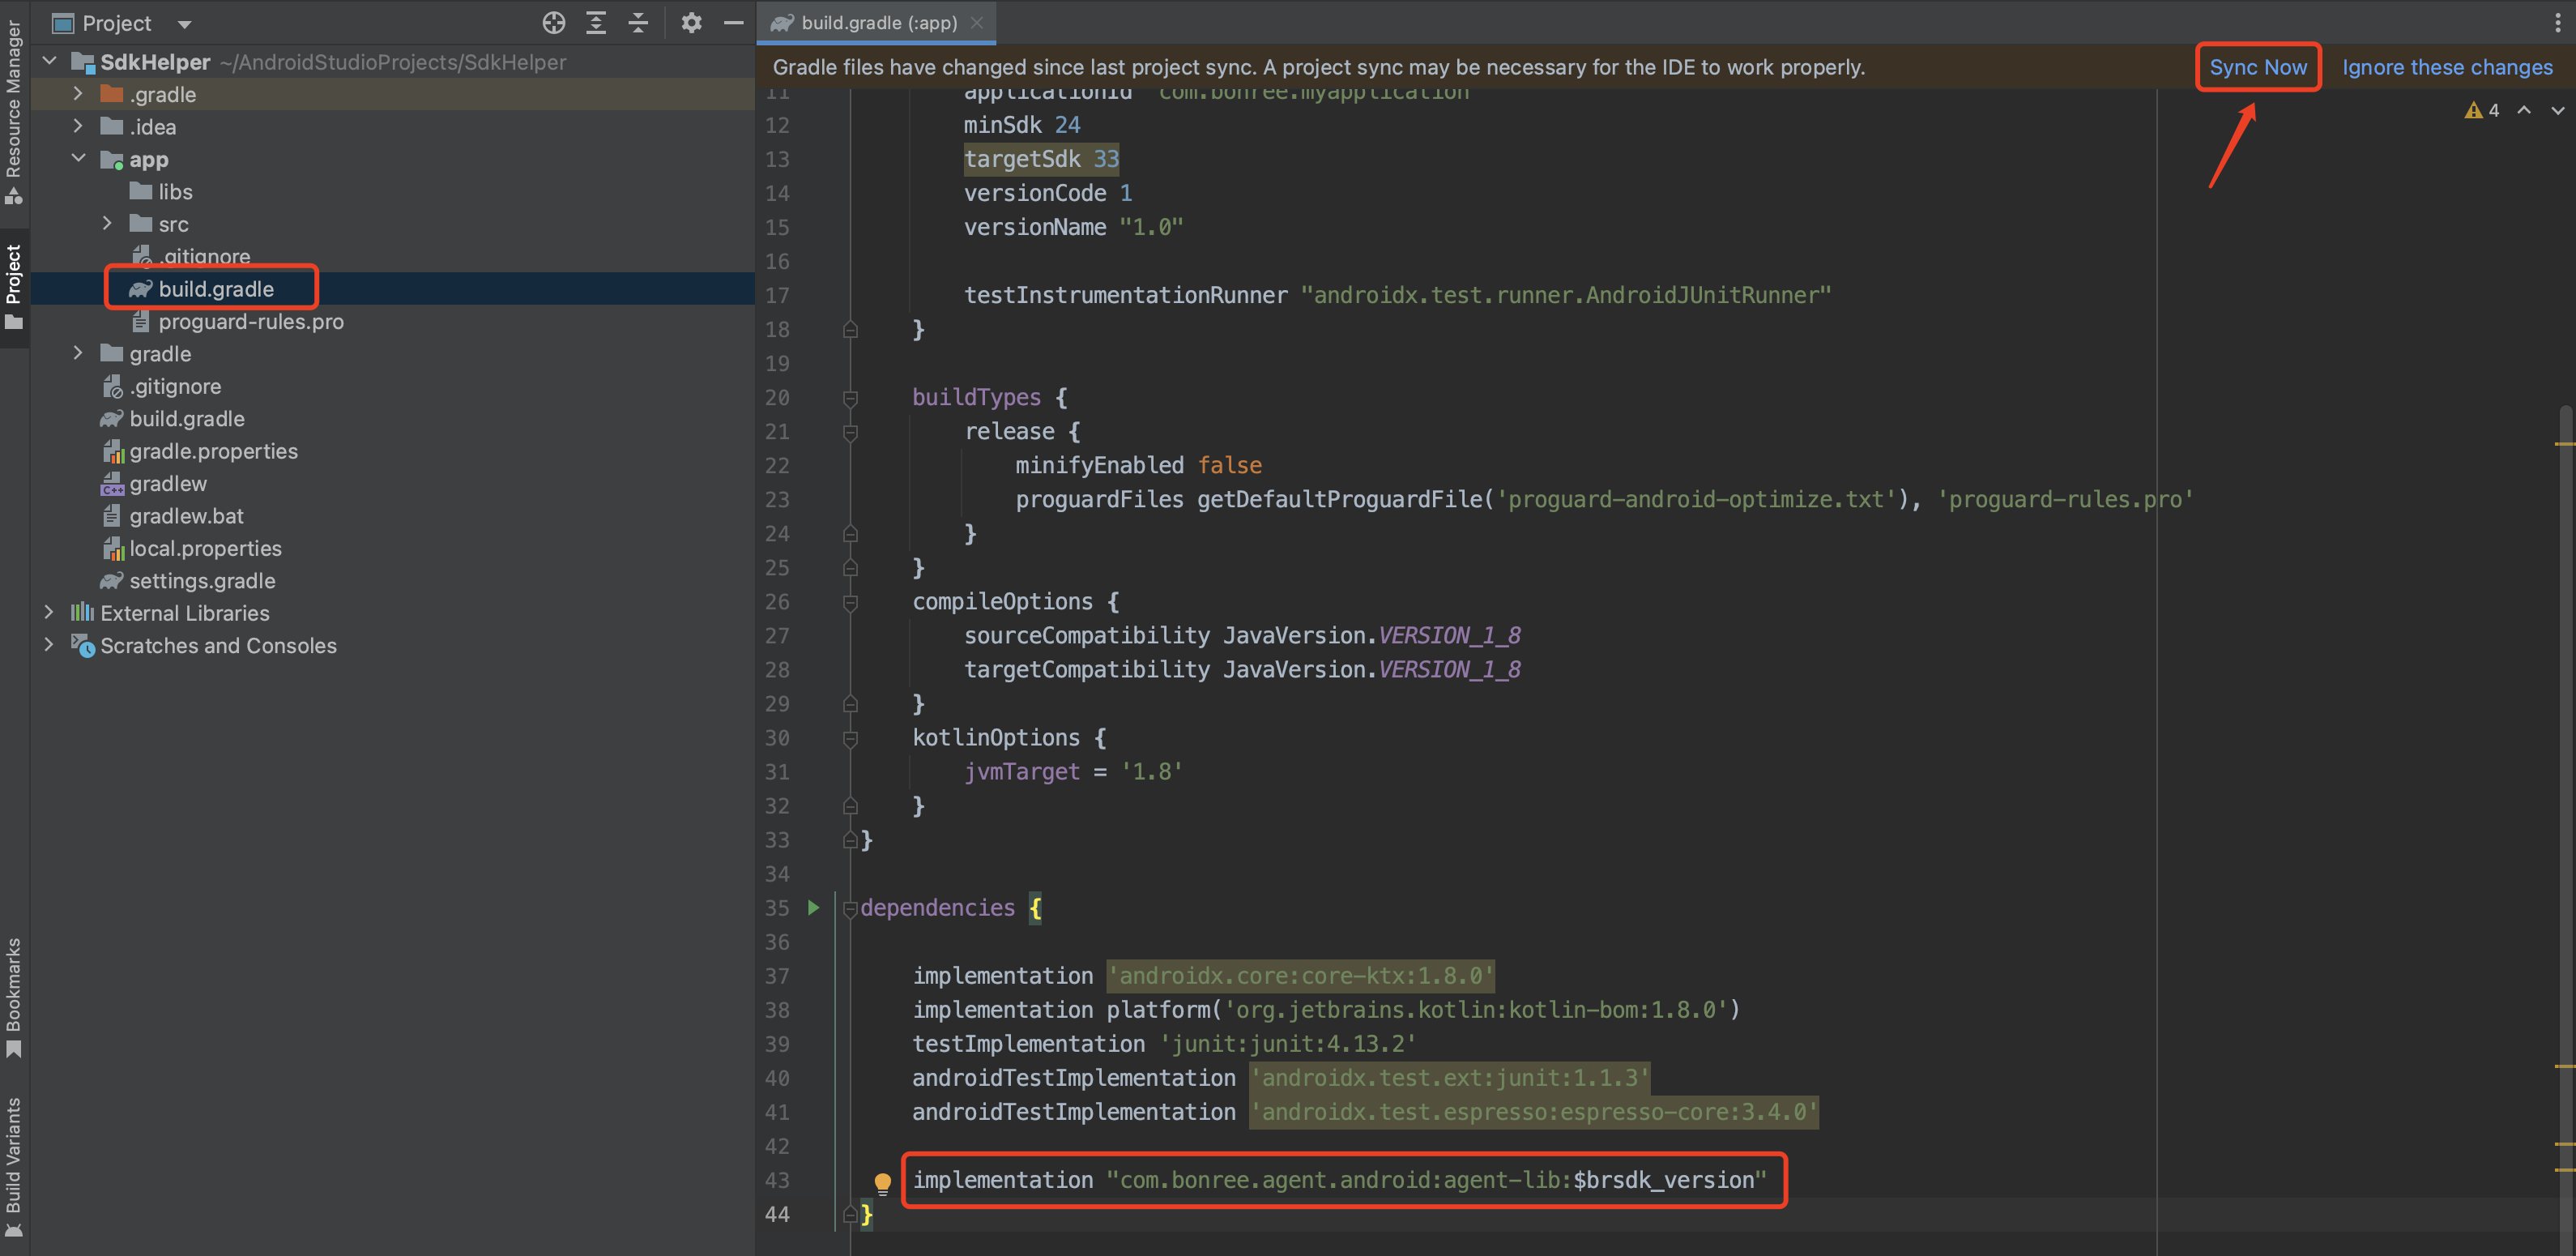
implementation "com.bonree.agent.android:agent-lib:$brsdk_version"
Also, apply the Bonree plugin at the top of this file and click the Sync Now button:
The Bonree component needs to be configured for all Projects. Please ensure that you have completely followed Step 2 to add the classpath "com.bonree.agent.android:bonree:$brsdk_version" configuration in the project-level build.gradle of all projects!
Open the build.gradle file of the main module level directory and add the following two configurations:
apply plugin: "bonree"
bonree{
  exclude 'packages:com/uc/webview/export/internal/setup'
}
SDK Integration - Portal Method
Local
1. Prepare Bonree SDK Environment
Unzip BonreeSDK_TDEM_Android.v${VERSION_NAME}.zip and store it locally (e.g., E:);Copy the contents of the jniLibs directory to overwrite the jniLibs directory in your packaging module level that stores .so dynamic libraries (if there is no jniLibs directory in your project, please create one);
Copy the repo folder to the root directory of all Projects, at the same level as the module directory;
Copy com.bonree.sdk.jar to the libs directory at the module level;
Note: On Mac, it is best to place the unzipped folder path under /Users/xxxx/. Placing it in a system directory may cause unexpected issues due to permissions.
2. Import Agent Package and .so Libraries
The mPaaS development framework may contain multiple project modules. The jar package and .so libraries can be flexibly placed in any module within a project according to the project architecture, as long as the compiled APK contains the code from com.bonree.sdk.jar and all .so libraries.
Open the build.gradle file in the module-level directory:
Add the following code in the dependencies block:
implementation files('libs/com.bonree.sdk.jar')
3. Configure Bonree Component
Open the build.gradle file in the root directory of all Project levels:
Add the following three configuration scripts (highlighted in red boxes) to the build.gradle file, and click the Sync Now button:
ext.brsdk_version = '8.0.0' // The value of ext.brsdk_version is the SDK version number, usually found at the end of the downloaded zip file name or in the Download Center.
maven { url uri('./repo') }
classpath "com.bonree.agent.android:bonree:$brsdk_version"
The Bonree component needs to be configured for all Projects. Please ensure that you have completely followed the above steps to add the classpath "com.bonree.agent.android:bonree:$brsdk_version" configuration in the project-level build.gradle of all projects!
3.1 Bundle Project Configuration
Open the build.gradle file in the module-level directory. For bundle projects, simply apply the Bonree plugin at the top of the file:
apply plugin: 'bonree'
3.2 Portal Project Configuration
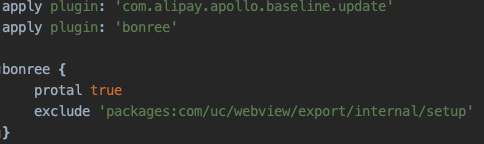
Open the build.gradle file of the main module in the Portal project and add the following two configurations:
apply plugin: "bonree"
bonree{
  protal true
  exclude 'packages:com/uc/webview/export/internal/setup'
}
Remote
1. Import Agent Package and .so Libraries
The mPaaS development framework may contain multiple project modules. The jar package and .so libraries can be flexibly placed in any module within a project according to the project architecture, as long as the compiled APK contains the code from com.bonree.sdk.jar and all .so libraries.
Open the build.gradle file in the module-level directory:
Add the following three configuration scripts (highlighted in red boxes) to the build.gradle file, and click the Try Again button:
ext.brsdk_version = '8.0.0' // The value of ext.brsdk_version is the SDK version number. Specific version numbers can be found in the Download Center.
maven {
  url 'https://gitlab.bonree.com/BonreeSDK_TAPM/Android/raw/master'
}
classpath "com.bonree.agent.android:bonree:$brsdk_version"
Open the build.gradle file in the module-level directory:
Add the following code in the dependencies block:
implementation "com.bonree.agent.android:agent-lib:$brsdk_version"
2. Configure Bonree Component
The Bonree component needs to be configured for all Projects. Please ensure that you have completely followed Step 2 to add the classpath "com.bonree.agent.android:bonree:$brsdk_version" configuration in the project-level build.gradle of all projects!
2.1 Bundle Project Configuration
Open the build.gradle file in the module-level directory. For bundle projects, simply apply the Bonree plugin at the top of the file:
apply plugin: 'bonree'
2.2 Portal Project Configuration
Open the build.gradle file of the main module in the Portal project and add the following two configurations:
apply plugin: "bonree"

bonree{
  protal true
  exclude 'packages:com/uc/webview/export/internal/setup'
}
SDK Setup
1. Configure Permission Information
Check the application's AndroidManifest.xml configuration file and make sure the following permissions are included whenever possible:
// For details, see the permissions section in the Privacy Policy.
// Required permissions:
<uses-permission android:name="android.permission.INTERNET" />
<uses-permission android:name="android.permission.ACCESS_NETWORK_STATE" />
// Optional permissions:
<uses-permission android:name="android.permission.BLUETOOTH" />
<uses-permission android:name="android.permission.ACCESS_FINE_LOCATION" />
<uses-permission android:name="android.permission.READ_PHONE_STATE" />
2. Configure Obfuscation Settings
If your application uses ProGuard obfuscation, add the following configuration:
#ProGuard configurations for Bonree-Agent
-keep class com.bonree.**{*;}
-keep class okhttp3.** { *; }
-keep class okio.**{*;}

-dontwarn com.bonree.**
-dontwarn okhttp3.**
-dontwarn okio.**
#End Bonree-Agent
If your ProGuard configuration file does not include the -dontoptimize configuration, be sure to add the following:
-optimizations !code/simplification/*,!field/*,!class/merging/*,!method/propagation/*,!class/unboxing/enum,!code/allocation/variable
3. Initialize SDK
<#Config Address#> and <#AppID#> can be obtained from the platform. For the method to obtain them, please refer to How to Query AppID and Config Address?. If you have any questions, please contact technical support.
Add the following code in the onCreate function of your custom Application:
Bonree.withAppID("<#AppID#>")
            .withConfigAddress("<#Config Address#>")
            .withUsemPaas(true)
            .withCustomBusinessHeaders("Operation-Type")
            .start(getApplicationContext());
Example usage:
import android.app.Application;
import com.bonree.sdk.agent.Bonree;
public class App extends LauncherApplication {

    @Override
    protected void attachBaseContext(Context base) {
        super.attachBaseContext(base);
        Bonree.recordLaunchTime(this, base);
    }

    @Override
    public void onCreate() {
        super.onCreate();
        Bonree.withAppID("<#AppID#>")
                .withConfigAddress("<#Config Address#>")
                .withUsemPaas(true)
                .withCustomBusinessHeaders("Operation-Type")
                .start(getApplicationContext());
    }
}
4. mPaaS Startup Performance Data Collection
In the mPaaS framework, you need to manually call the Bonree.recordLaunchTime(Application application, Context context); function to notify the SDK of the application startup event. The Application parameter can be null, but the Context parameter cannot be null. Please write this code in the first callback function executed at the application layer when the APP starts. There are currently two calling methods, with method one being recommended:
4.1 Method 1: Custom Application Set in Manifest
Call in the attachBaseContext function.

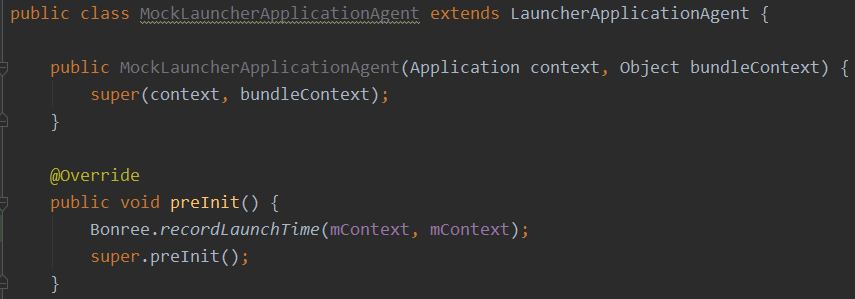
4.2 Method 2: Inheriting LauncherApplicationAgent
Call in the preInit function or directly in the constructor.
5. Integration Verification
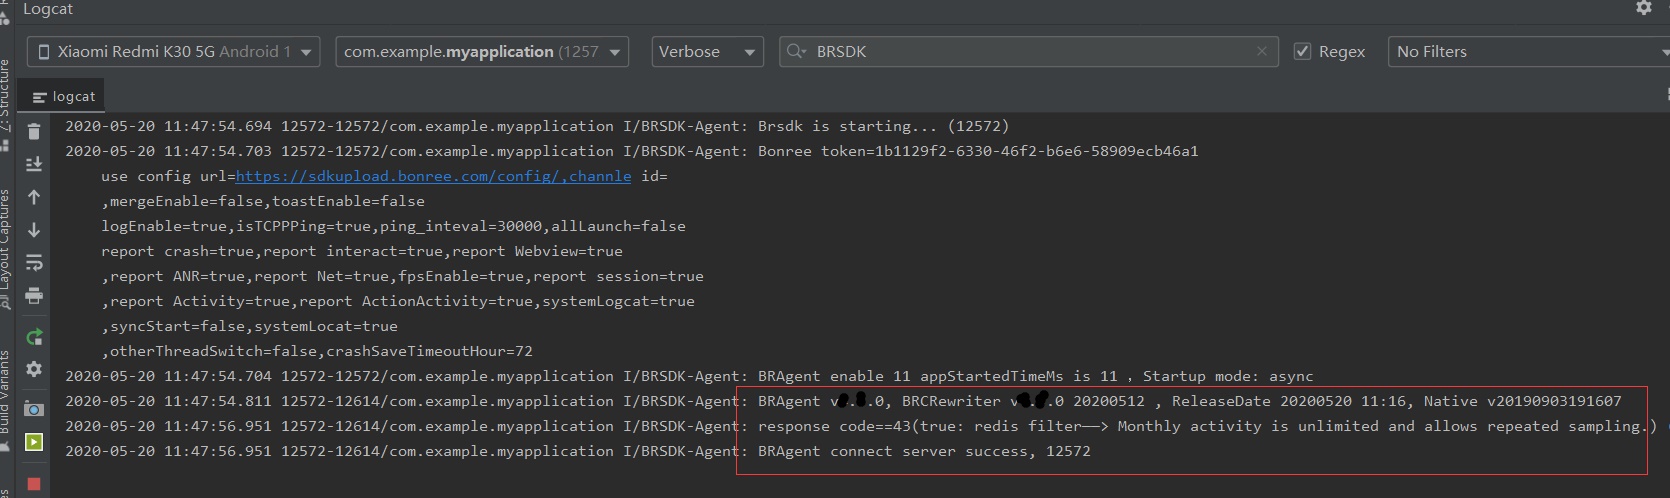
Start the integrated APK and check the logcat logs. Search for the keyword "brsdk" (or filter by the BRSDK-Agent tag). The following logs indicate successful integration and data collection has started:
Brsdk is starting (Note: BRAgent integration successful)
BRAgent enable (Note: BRAgent startup successful)
BRAgent connect server success (Note: BRAgent data configuration successful)
BRAgent v*** (Note: *** represents the BRAgent version corresponding to the current zip file name)
Log Agent Integration
Local Integration
1. Prepare Bonree SDK Environment
Copy the downloaded log SDK file com.bonree.log.jar to the libs directory at the module level of your project (the screenshot example uses a Demo project as an example). As shown in the figure:

2. Sync Gradle
Open the build.gradle file in the module-level directory, add the following code in the dependencies block, and click the Sync Now button.
implementation files('libs/com.bonree.log.jar')

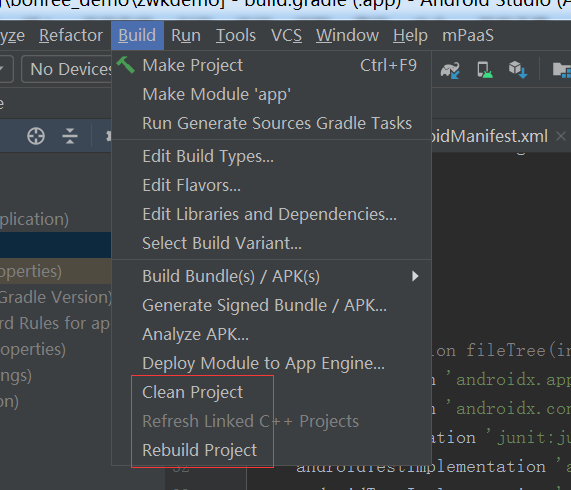
3. Rebuild & Clean the Project
Rebuild & Clean the project to ensure the Bonree configuration takes effect.
4. Configure Permission Information
Check the application's AndroidManifest.xml configuration file to ensure the following permissions are included:
<uses-permission android:name="android.permission.INTERNET" />
<uses-permission android:name="android.permission.WRITE_EXTERNAL_STORAGE" />
<uses-permission android:name="android.permission.READ_EXTERNAL_STORAGE" />
5. Configure Obfuscation Settings
# ProGuard configurations for Bonree-Log
-keep class com.bonree.** { *; }
-keep class bonree.** { *; }
-dontwarn com.bonree.**
-dontwarn bonree.**
# End Bonree-Log
Remote Dependency
1. Integration Version
Check the Download Center for the latest version number of Bonree Log SDK to determine the version you want to integrate.
2. Sync Gradle
Open the build.gradle file in the module-level directory, add the following code in the dependencies block, and click the Sync Now button.
implementation 'com.bonree.log:log:1.0.0'
3. Rebuild & Clean Project
Rebuild & Clean the project to ensure the Bonree configuration takes effect.