Integration Guide
SDK
1. Automatic Instrumentation
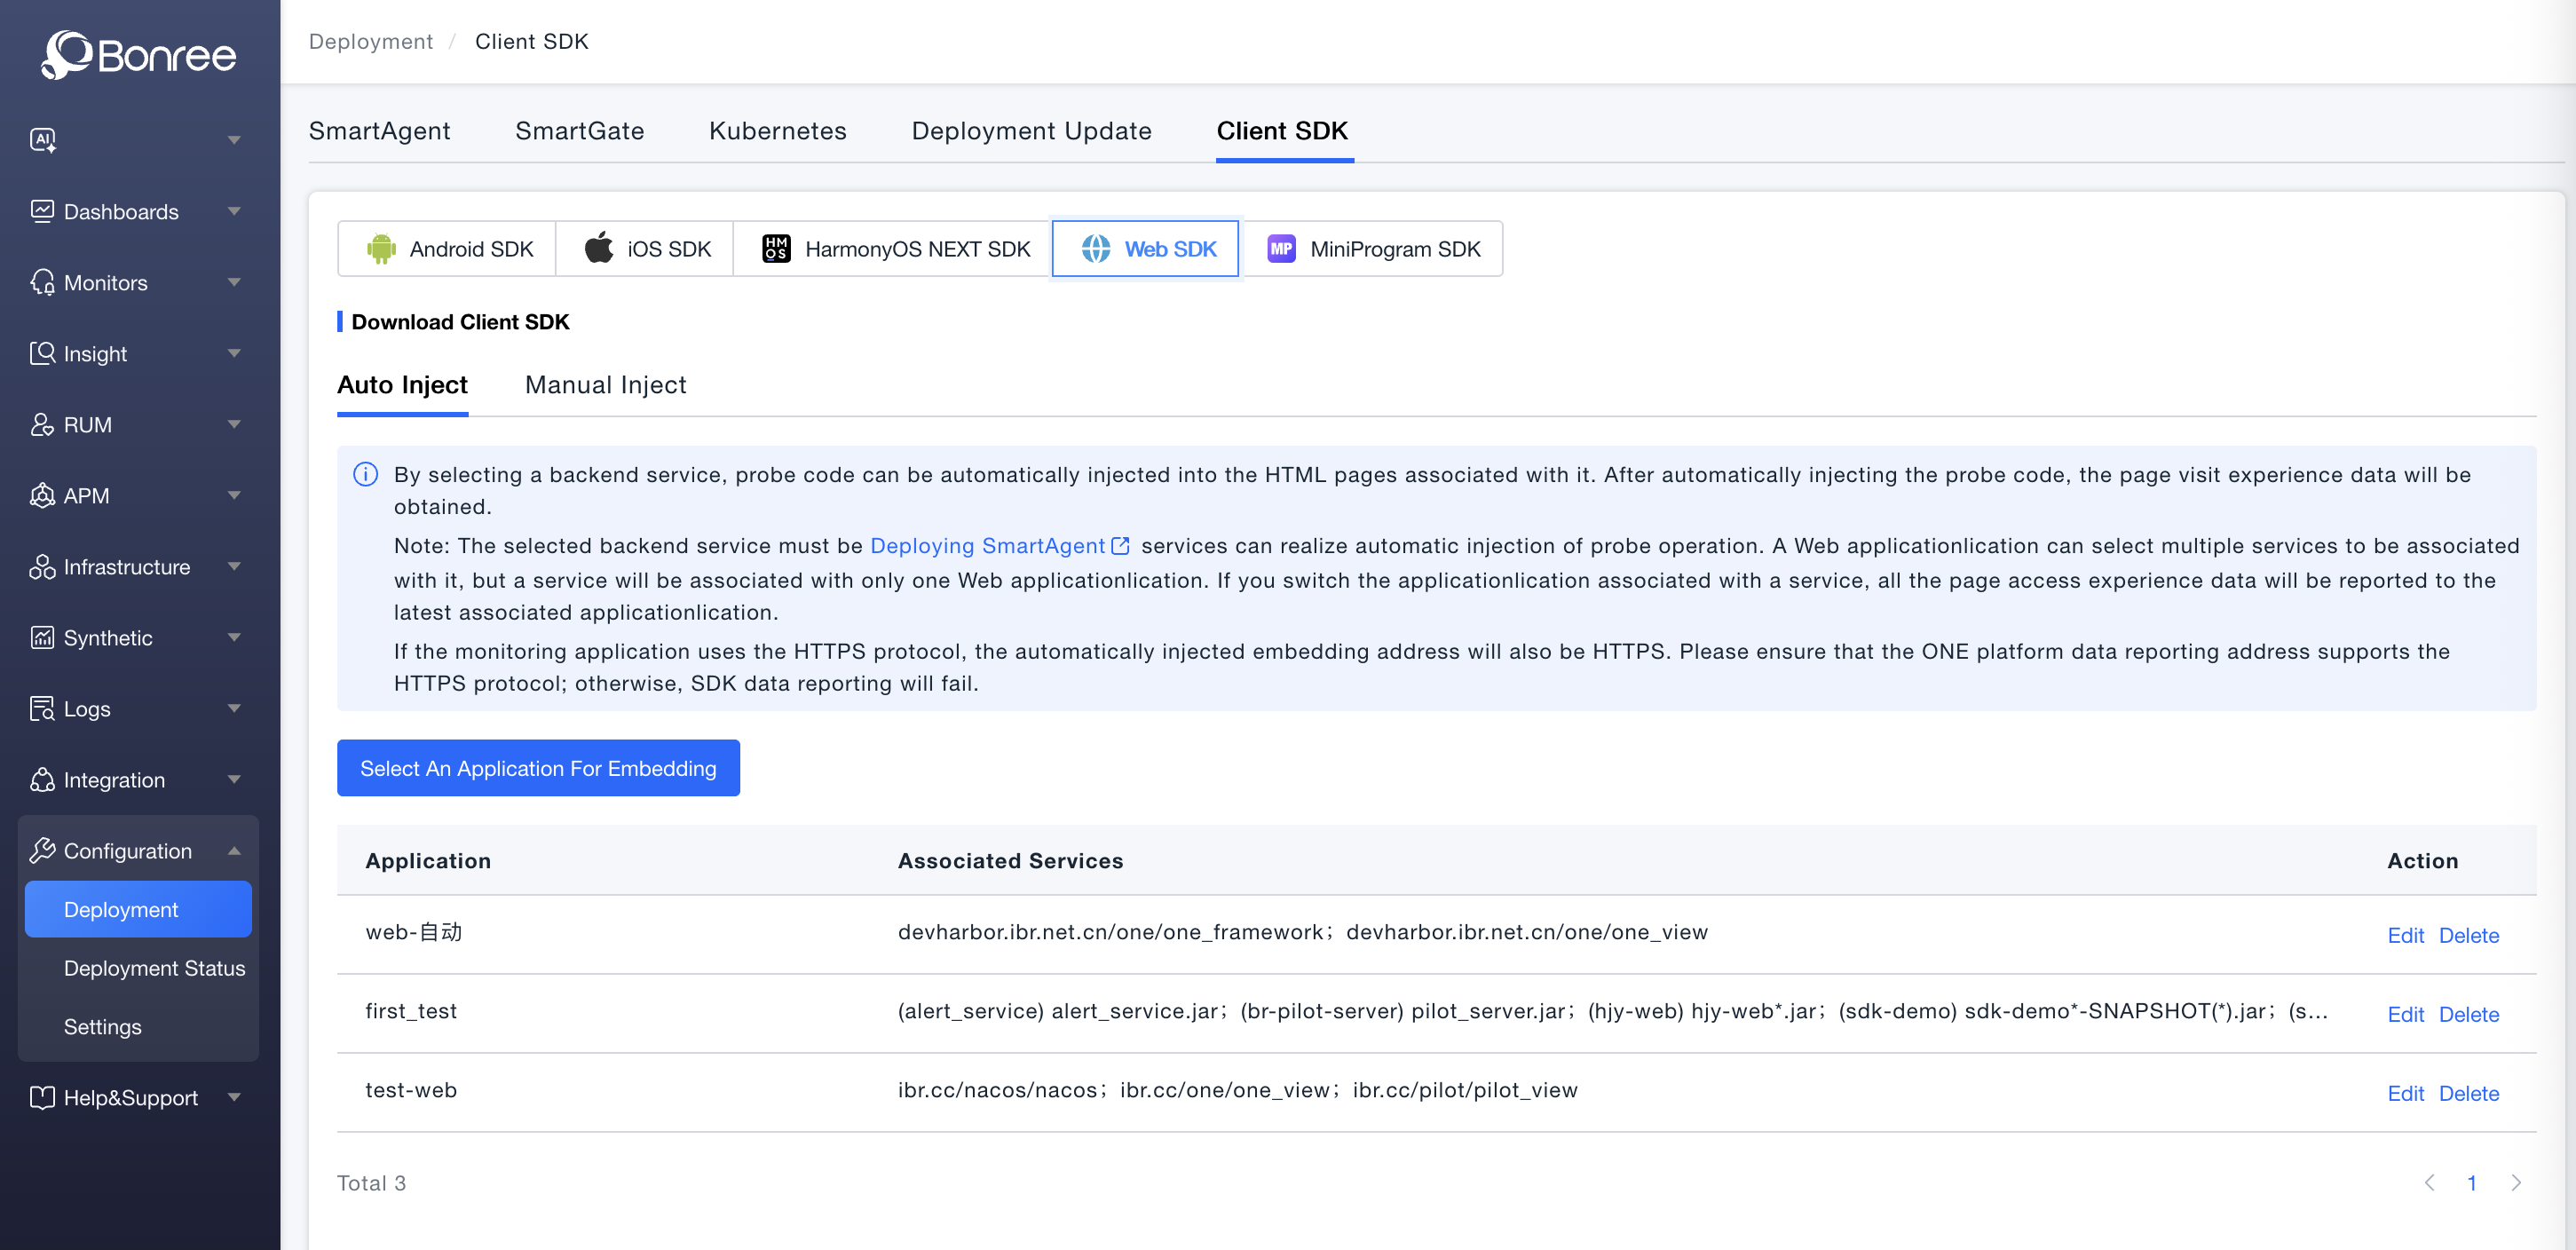
- Log in to the platform, select
Deployment Configuration - Deployment Centerfrom the left menu, chooseWeb SDKunder theClient SDKtab, and clickSelect an application for embeddingin theAuto Injectiontab below:
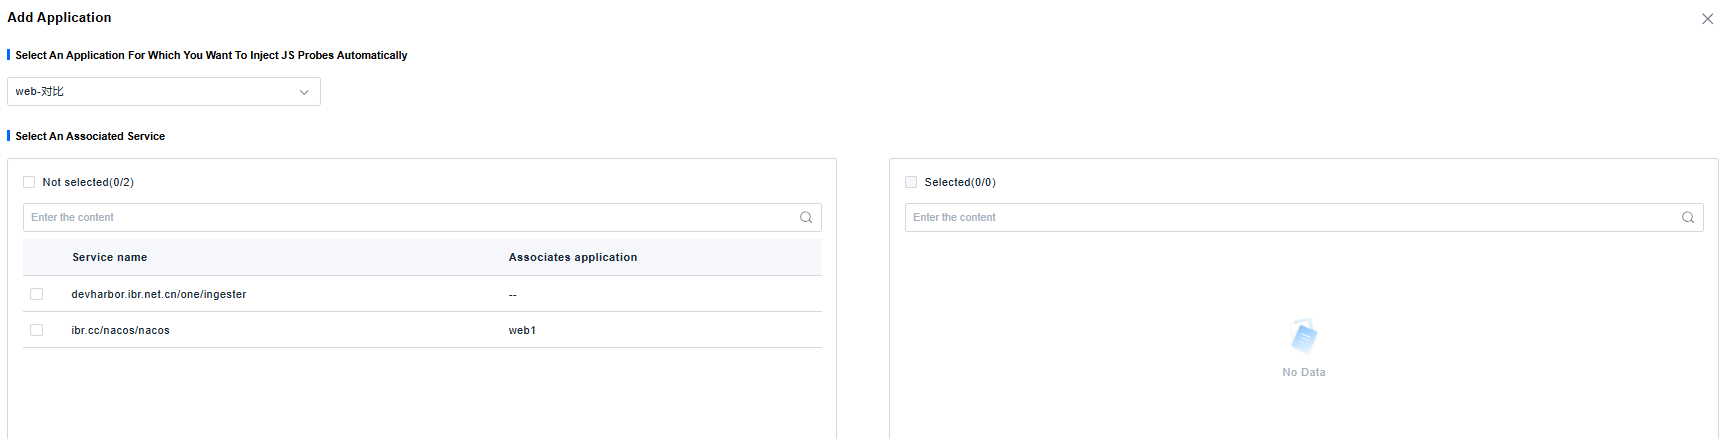
- After selecting the previously created Web application, move the services that need agent injection to the right side and click Save:
- After refreshing the service page, if you see the agent's JS file in the page elements and upload data reporting in the network, it indicates successful agent injection.
2. Manual Instrumentation
Note: The following instrumentation methods require agent version 2.0.0 or higher.
Manual instrumentation for the Web JS agent supports two methods: Proxy Instrumentation and Script Tag Instrumentation. Choose one of these two methods.
Regardless of the method used, first obtain the JS agent tag configuration from the One platform:
- In the platform (platform Rum version 2.4.2.0 or higher), select Configuration > Deployment > Client SDK > Web SDK > Manual Injection.
- Select the target application and click "Copy Command", as shown below:
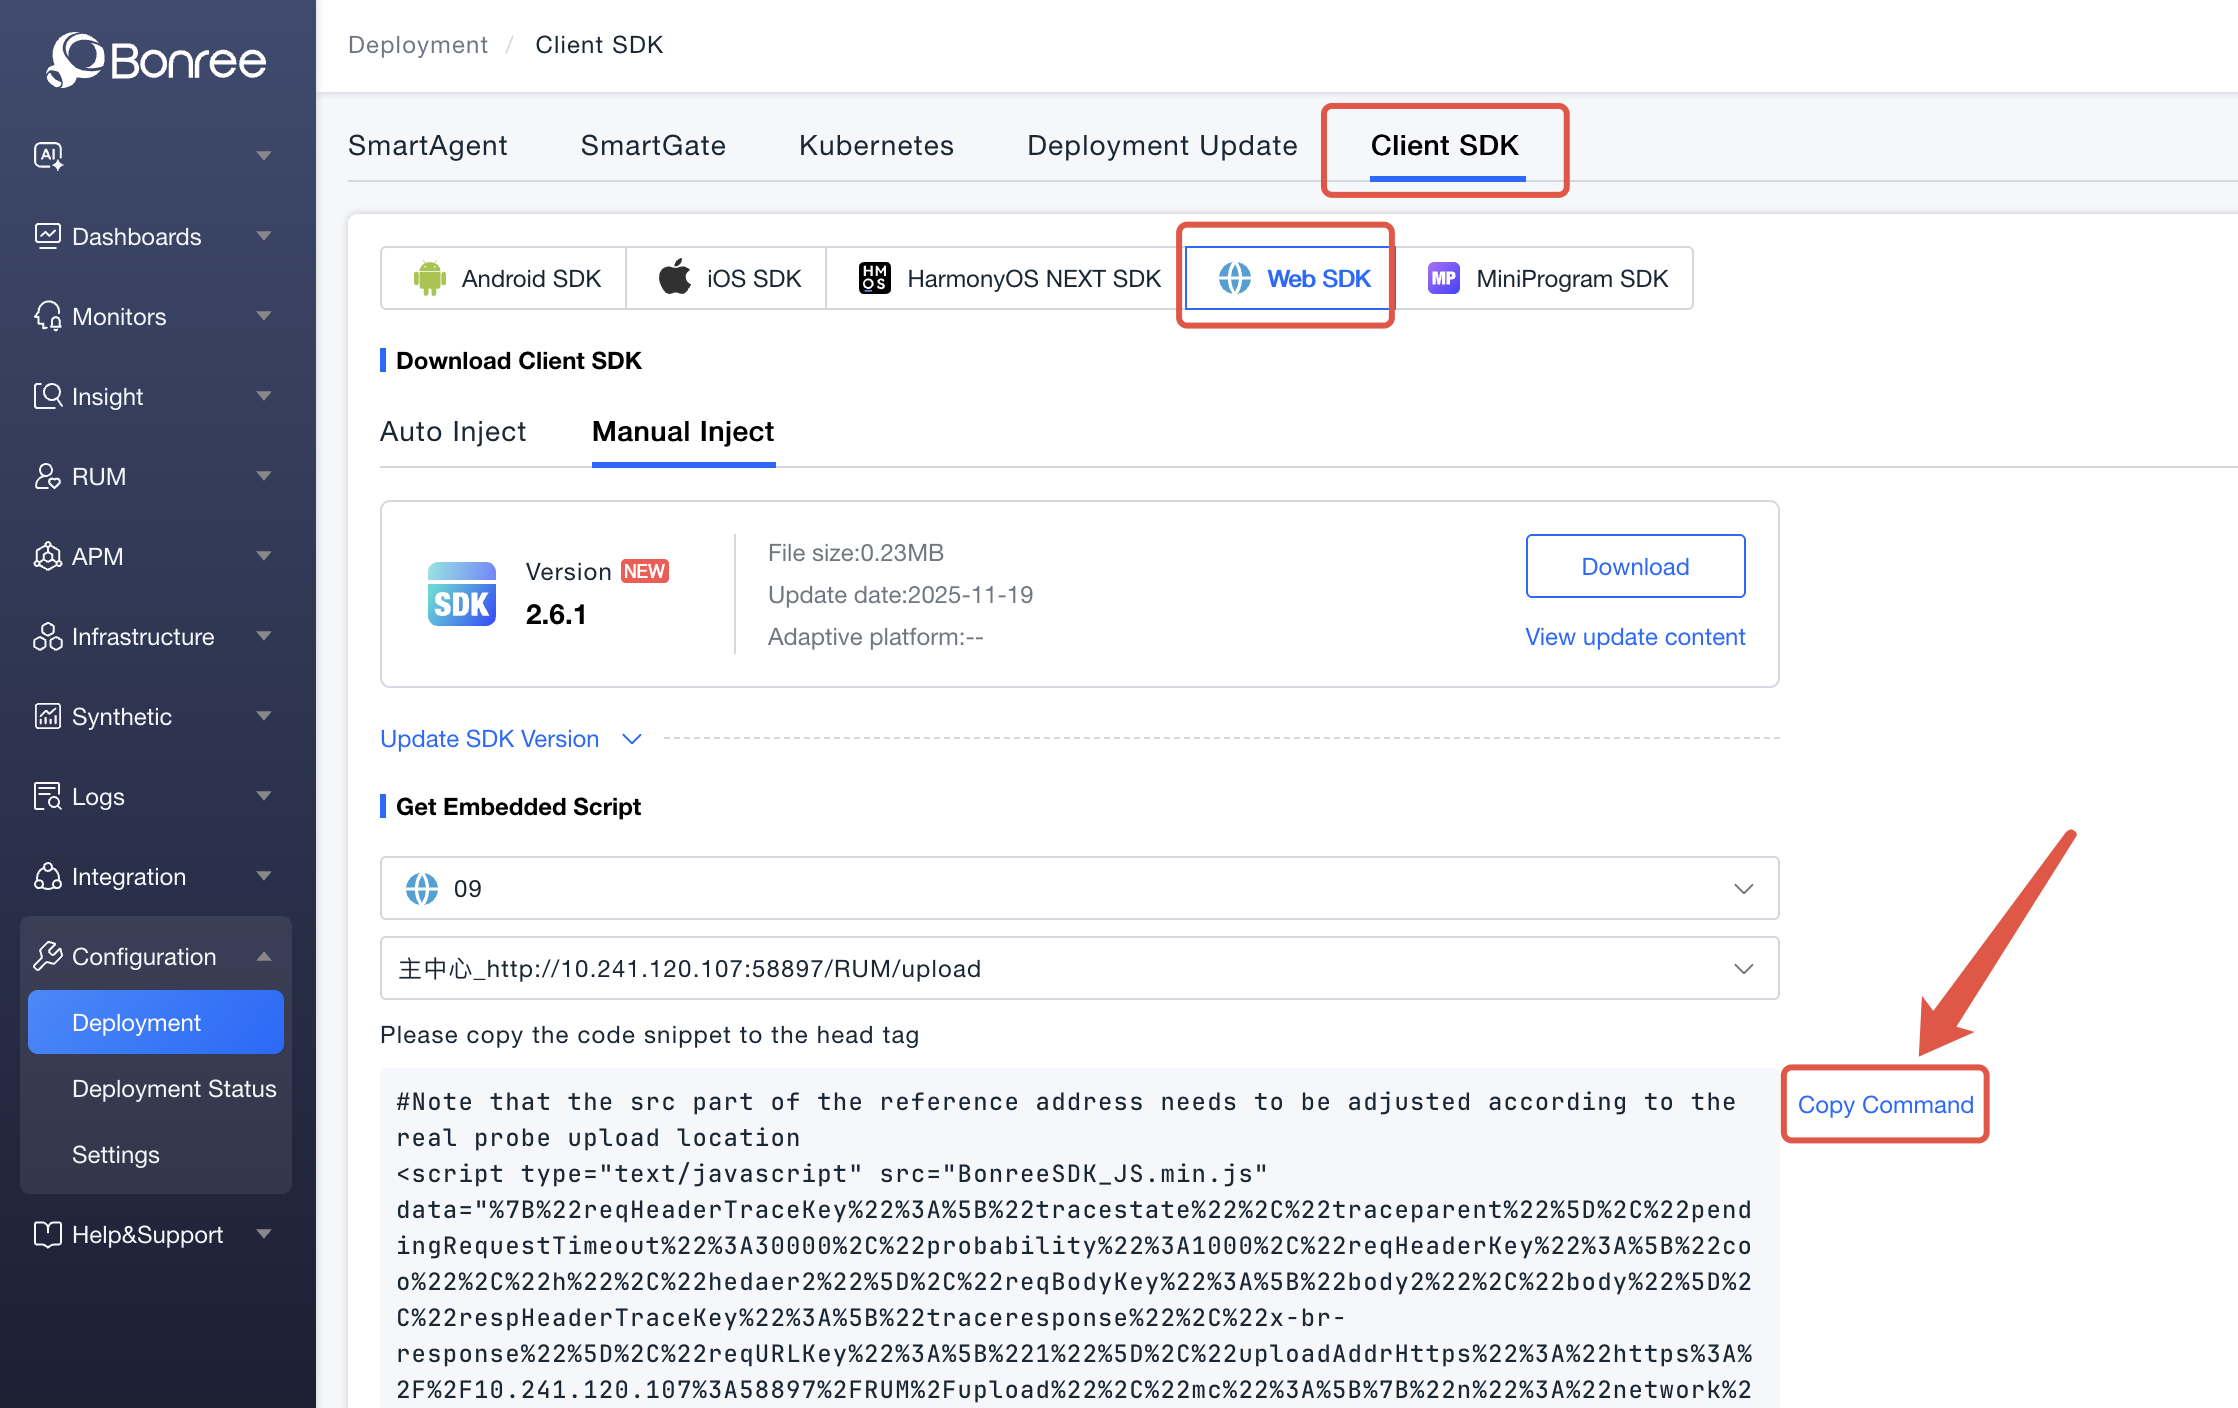
- Paste it into any text editor, modify the resource path after
src, and configure it according to the actual relative path or CDN address.
Proxy Instrumentation
Unzip the obtained agent package BonreeSDK_TDEM_JS.v${VERSION_NAME}.zip and store it locally. Copy the BonreeSDK_JS.min.js file from the unzipped files and deploy this file in an accessible environment, such as the static resource directory of Nginx or Apache, or via CDN deployment.
1. Nginx Configuration
Use the ngx_http_sub_module module for replacement. For the installation and configuration documentation of the ngx_http_sub_module module, please refer to the Official Documentation.
Example:
location / {
    sub_filter '<head>' '<head><script type="text/javascript" src="BonreeSDK_JS.min.js"></script>';
    sub_filter_once on;
}
The <script> tag content here is the tag content prepared in Step 1. Please configure it according to the actual situation. Do not directly copy the example from the documentation.
2. Apache Configuration
To perform content replacement using Apache as the web container, you need to use the mod_substitute and mod_filter modules.
Example using Apache 2.4:
<Location />
    AddOutputFilterByType SUBSTITUTE text/html
    Substitute "s|<head>|<head><script type="text/javascript" src="BonreeSDK_JS.min.js"></script>|in"
</Location>
The <script> tag content here is the tag content prepared in Step 1. Please configure it according to the actual situation. Do not directly copy the example from the documentation.
3. Special Note:
If your HTML uses a <meta> tag to specify the encoding, the agent script tag should be placed immediately after the last <meta> tag.
Nginx Example:
location / {
    sub_filter '<meta content="text/html;charset=utf-8">' '<meta content="text/html;charset=utf-8"><script type="text/javascript" src="BonreeSDK_JS.min.js"></script>';
    sub_filter_once on;
}
Apache Example:
<Location />
    AddOutputFilterByType SUBSTITUTE text/html
    Substitute "s|<meta content=\"text/html;charset=utf-8\">|<meta content=\"text/html;charset=utf-8\"><script type="text/javascript" src="BonreeSDK_JS.min.js"></script>|in"
</Location>
Note: The
<script>tag content above is the tag content prepared in the initial steps of manual instrumentation. Please configure it according to the actual situation. Do not directly copy the example from the documentation.
H5 Page Script Tag Instrumentation
-
Unzip the obtained agent package
BonreeSDK_TDEM_JS.v${VERSION_NAME}.zipand store it locally. Copy theBonreeSDK_JS.min.jsfile from the unzipped files and place it in thejsfolder under the project root directory. -
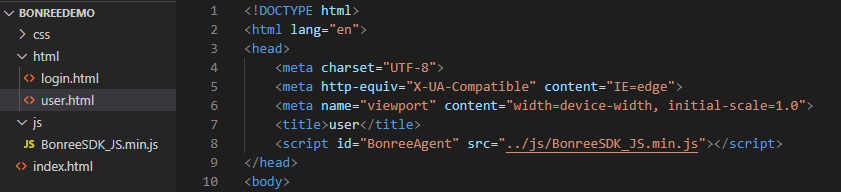
Introduce the
scripttag in theheadof theindex.htmlfile in the project root directory.
<script id="BonreeAgent" src="./js/BonreeSDK_JS.min.js"></script>
Note: The
scripttag introducing the agent must be wrapped within theheadtag.
- If the project has multiple HTML pages, each HTML page needs to introduce the agent using a
scripttag (e.g., introducing the agent in theuser.htmlfile under thehtmlfolder).
The example above only shows the form and position of the tag introduction in HTML. For the agent startup and configuration, please refer to the descriptions below.
- The agent can be started either via the Script tag directly or via JS code. Choose one method. The Script tag direct startup is recommended.
1. Script Tag Direct Startup
- Directly use the tag content prepared in the initial steps of manual instrumentation for introduction (taking embedding the agent in the project's root
index.htmlfile as an example).
<script
  type="text/javascript"
  src="./js/BonreeSDK_JS.min.js"
  data="%7B%22reqHeaderTraceKey%22%3A%5B%22tracestate%22%2C%22traceparent%22%5D%2C%22uploadAddrHttps%22%3A%22https%3A%2F%2Foneupload.bonree.com%2FRUM%2Fupload%22%2C%22mc%22%3A%5B%7B%22n%22%3A%22network%22%2C%22cs%22%3A%7B%22fc%22%3A0%7D%7D%5D%2C%22appId%22%3A%221234567890a9406babde338c565e7b2a%22%2C%22uploadAddrHttp%22%3A%22http%3A%2F%2Foneupload.bonree.com%2FRUM%2Fupload%22%2C%22respHeaderTraceKey%22%3A%5B%22traceresponse%22%2C%22x-br-response%22%5D%2C%22brss%22%3Afalse%7D"
  id="BonreeAgent"
></script>
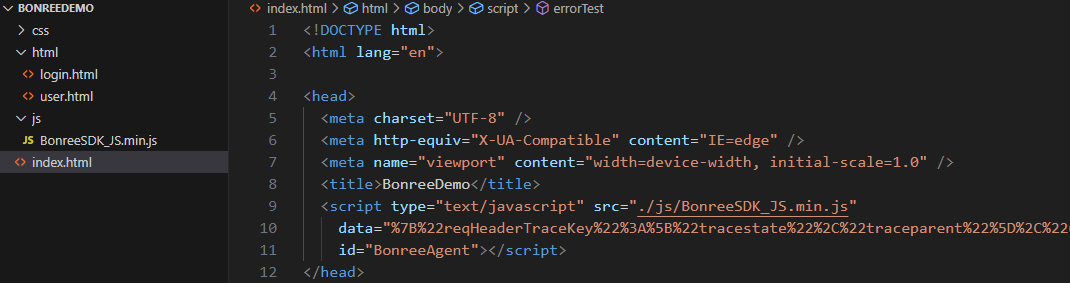
Note: Please configure according to the actual situation. Do not directly copy the example from the documentation.
2. Code Startup
- To start via code, add another
scripttag within thehead, call the agent startup interface for configuration and startup. The configuration data is in thedataattribute of the tag prepared in the initial steps of manual instrumentation. Copy it, perform URL decode, and place it into the parameters. The startup code is as follows:
<script src="./js/BonreeSDK_JS.min.js"></script>
<script>
  window.BonreeAgent &&
    window.BonreeAgent.BonreeStart({
      reqHeaderTraceKey: ["tracestate", "traceparent"],
      uploadAddrHttps: "https://oneupload.bonree.com/RUM/upload",
      mc: [
        {
          n: "network",
          cs: {
            fc: 0,
          },
        },
      ],
      appId: "1234567890a9406babde338c565e7b2a",
      uploadAddrHttp: "http://oneupload.bonree.com/RUM/upload",
      respHeaderTraceKey: ["traceresponse", "x-br-response"],
      brss: false,
    });
</script>
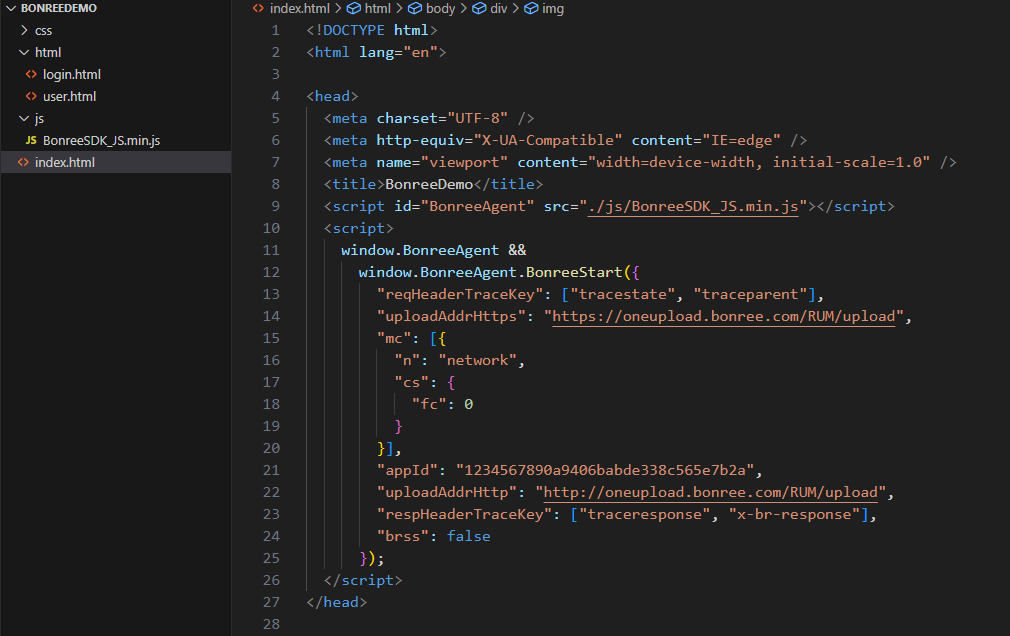
Note: Please configure according to the actual situation. Do not directly copy the example from the documentation.
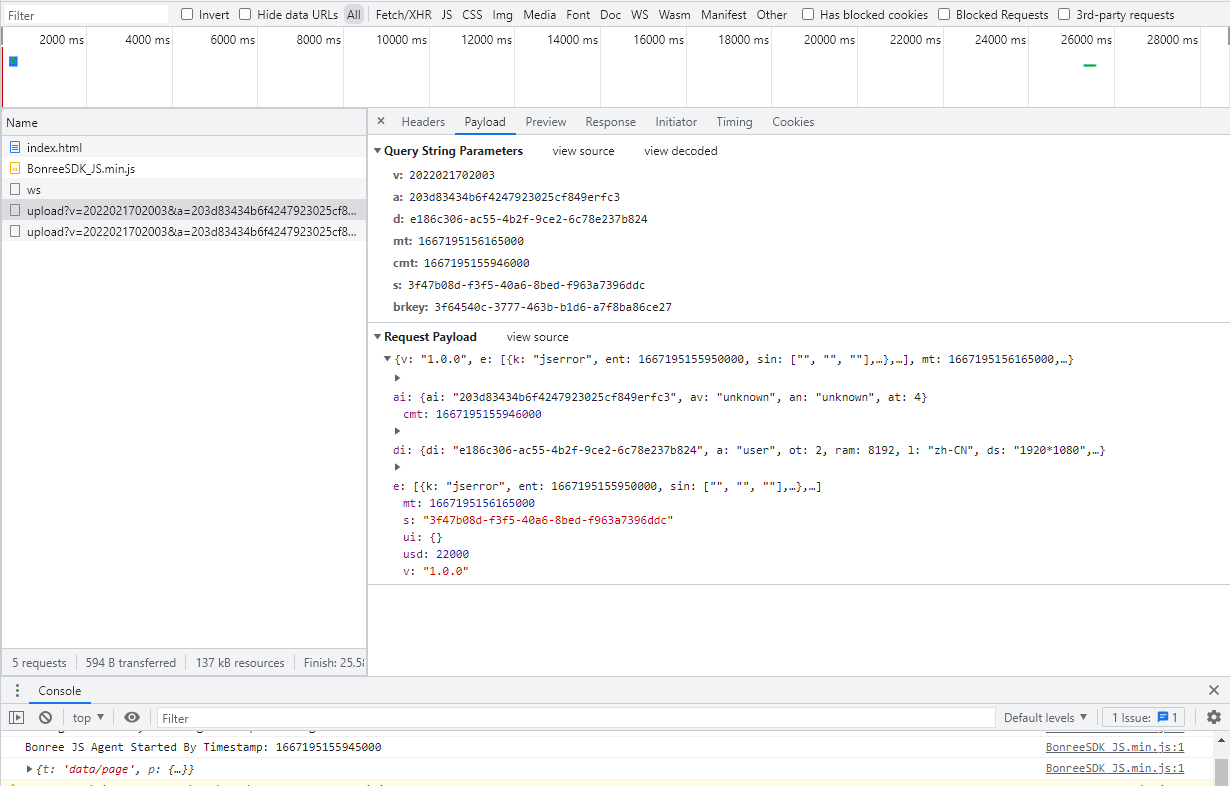
After starting the project, run the application in a browser. Check the Network tab in the browser's developer tools. If there are upload requests (as shown below), it indicates successful agent instrumentation.
NPM Package Integration
Integrate the frontend monitoring SDK via the bonree-agent npm package, supporting ES Module imports for modern frontend frameworks like Vue, React, and Angular.
Installation
Install via npm, yarn, or pnpm:
# npm
npm install bonree-agent

# yarn
yarn add bonree-agent

# pnpm
pnpm add bonree-agent
Initialization
Initialize the SDK in the project entry file (typically main.js / main.ts / App.vue):
import { BonreeStart } from "bonree-agent";

// Initialize the SDK
BonreeStart({
  appId: "your-app-id", // App ID from Bonree platform
  appName: "Your App Name", // Application name
  appVersion: "1.0.0", // Application version
  uploadAddrHttps: "https://oneupload.bonree.com/RUM/upload",
  uploadAddrHttp: "http://oneupload.bonree.com/RUM/upload",
});
Note: Replace
appIdwith the actual App ID obtained from the Bonree platform. Do not directly copy the example from the documentation.
Complete Example
// main.js / main.ts
import { BonreeStart } from "bonree-agent";

// Initialize the SDK
BonreeStart({
  appId: "your-app-id",
  appName: "Demo Application",
  appVersion: "1.0.0",
  uploadAddrHttps: "https://oneupload.bonree.com/RUM/upload",
  uploadAddrHttp: "http://oneupload.bonree.com/RUM/upload",
  // Session configuration
  sessionConfig: {
    inactivityTime: 1800000, // Switch session after 30 minutes of inactivity
    maxSessionTime: 3600000, // Maximum session time 1 hour
  },
});
Log
BonreeLog is used to collect log data in browsers, automatically collecting and reporting network errors, JavaScript errors, console log outputs, and custom log data.
1. NPM Automatic Instrumentation
- Installation
npm install bonree-log-jsagent --save
- Import
import { BRLogStart } from "bonree-log-jsagent";
- Initial Configuration
AppID and LogUpload Address can be obtained from the platform or by contacting technical support.
BRLogStart({
    appID: "<#AppID#>",
    uploadAddrHttp: "http://<#LogUpload Address#>",
    uploadAddrHttps: "https://<#LogUpload Address#>"
});
- Usage in Code
window.BRLog && window.BRLog.logger.info("this is a log from web");
2. Manual Instrumentation via Script Tag in H5 Pages
-
Unzip the obtained Log-SDK package
BonreeLog_TDEM_JS.zipand store it locally. Copy theBonreeLog_JS.min.jsfile from the extracted files and place it in thejsfolder under your project root directory. -
Add a script tag inside the head tag of the
index.htmlfile in your project root directory to import the Log-SDK.
<script id="BonreeLog" src="./js/BonreeLog_JS.min.js"></script>
Note: The script tag importing the Log-SDK must be wrapped within the head tag.
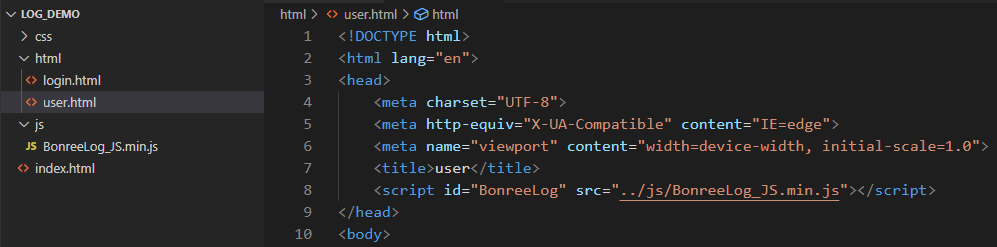
- If your project contains multiple HTML pages, each HTML page must import the Log-SDK using a script tag (e.g., importing the Log-SDK in the
user.htmlfile located in thehtmlfolder).
- The Log-SDK can be started in two ways: via script tag or via JavaScript code.
AppID and LogUpload Address can be obtained from the platform or by contacting technical support.
-
Direct Startup via Script Tag
- Set the script tag's id to
BonreeLogand include thedataparameter. If the parameter contains special characters, the entiredataparameter value string must be URL-encoded (example below shows embedding the Log-SDK in the project's rootindex.htmlfile).
<script
  id="BonreeLog"
  src="./js/BonreeLog_JS.min.js"
  data='{"appID":"<#AppID#>",
         "uploadAddrHttp": "http://<#LogUpload Address#>",
         "uploadAddrHttps": "https://<#LogUpload Address#>"}'
></script>- Example
<!DOCTYPE html>
<html lang="en">

<head>
    <meta charset="UTF-8">
    <meta http-equiv="X-UA-Compatible" content="IE=edge">
    <meta name="viewport" content="width=device-width, initial-scale=1.0">
    <title>home</title>
    <script
      id="BonreeLog"
      src="./js/BonreeLog_JS.min.js"
      data='{"appID":"<#AppID#>",
             "uploadAddrHttp": "http://<#LogUpload Address#>",
             "uploadAddrHttps": "https://<#LogUpload Address#>"}'
    ></script>
</head>

<body>
    ...
</body>
</html> - Set the script tag's id to
-
Code Startup
- To start via code, add an additional script tag inside the head tag. Call the Log-SDK startup interface to configure and start it. The startup code is as follows:
<script src="./js/BonreeLog_JS.min.js"></script>
<script>
    window.BRLog && window.BRLog.start({
        appID: "<#AppID#>",
        uploadAddrHttp: "http://<#LogUpload Address#>",
        uploadAddrHttps: "https://<#LogUpload Address#>"
    });
</script>- Example
<!DOCTYPE html>
<html lang="en">

<head>
    <meta charset="UTF-8">
    <meta http-equiv="X-UA-Compatible" content="IE=edge">
    <meta name="viewport" content="width=device-width, initial-scale=1.0">
    <title>home</title>
    <script src="./js/BonreeLog_JS.min.js"></script>
    <script>
        window.BRLog && window.BRLog.start({
            appID: "<#AppID#>",
            uploadAddrHttp: "http://<#LogUpload Address#>",
            uploadAddrHttps: "https://<#LogUpload Address#>"
        });
    </script>
</head>

<body>
    ...
</body>
</html>