Notification Target
Notification Target is used to centrally manage the destination channels for alert delivery, supporting four types: WeCom Bot, Feishu Bot, DingTalk Bot, and Webhook. Once created, a notification target can be referenced directly in notification policies, avoiding the need to re-enter the same channel information in multiple alert rules.
This page is only used to maintain IM bot and Webhook group/system notification channels. To maintain individual recipients' email, mobile number, WeCom ID, and other personal information, please go to Recipient Management.
Getting Started
Step 1: Open the Creation Page
Go to Settings Center → Notification Target, click Create, and enter the new notification target page.
Step 2: Fill in Basic Information
- Select the Notification Type: WeCom Bot / Feishu Bot / DingTalk Bot / Webhook
- Fill in the Notification Target Name (required, up to 50 characters)
- Fill in the Webhook URL (required)
Step 3: Complete the Type-Specific Configuration and Save
- Fill in the configuration specific to the selected type (for Webhook: request headers, success criteria, etc.)
- Confirm the Enable/Disable Status (Enabled by default)
- Click Send Test to verify connectivity, then click Save once confirmed
Feature Description
Notification Target List
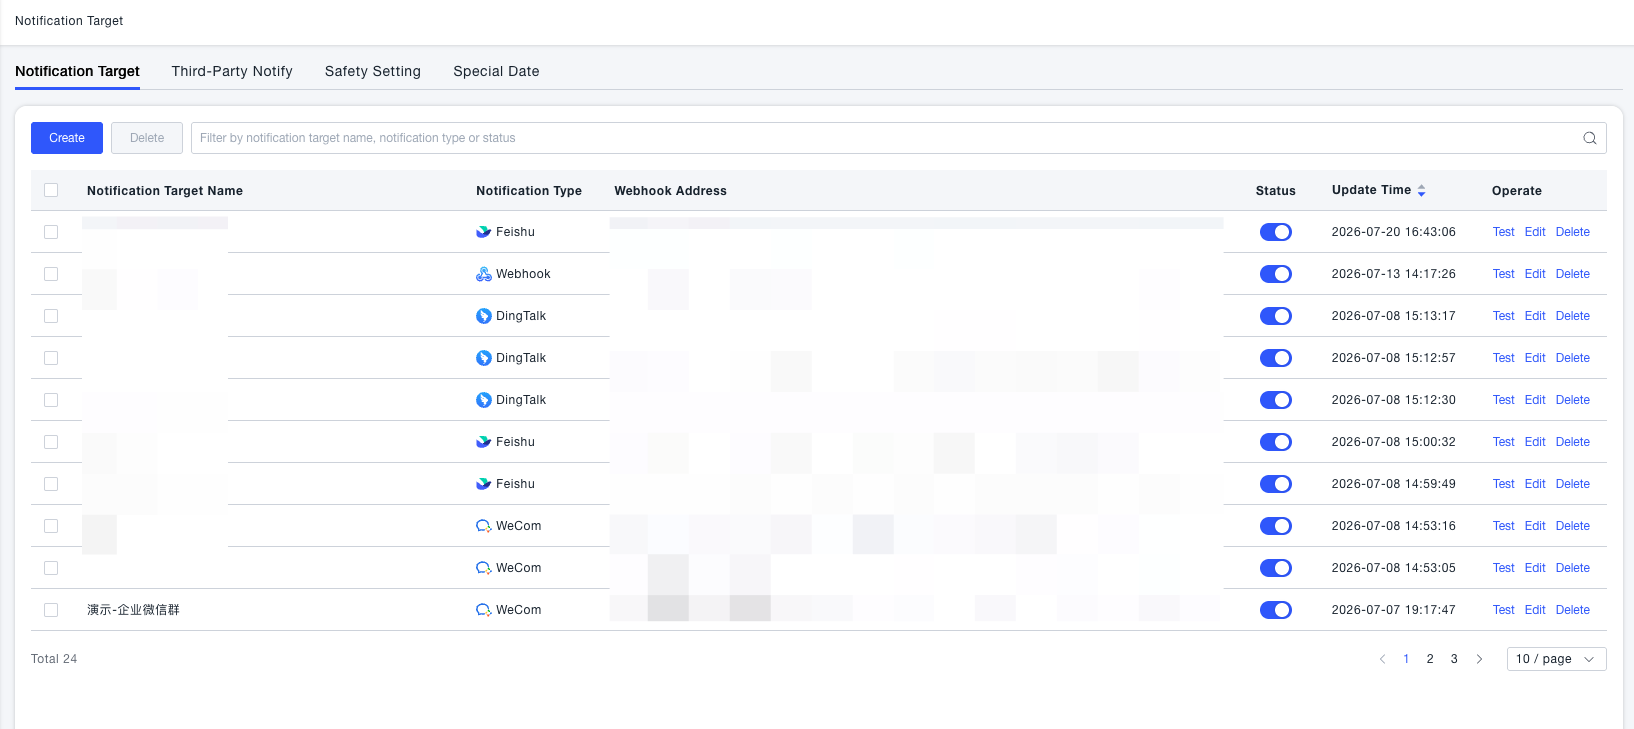
The list displays all notification targets under the current account, and supports searching/filtering by name, type, and enable/disable status. Overly long Webhook URLs are automatically truncated; hover to view the full address.
| Action | Description |
|---|---|
| Test | Opens a test-content input dialog; after entering content and sending, the send result (success / failure) and response body summary are shown in real time |
| Edit | Modify the notification target's name, address, and type-specific configuration |
| Delete | Permanently deletes the notification target; requires confirmation, with the prompt "Associated notifications will no longer be deliverable through this channel, and this action cannot be undone" |
| Enable/Disable Status | Click the status toggle in the list to switch enabled/disabled directly, without opening the edit dialog; when disabled, associated alert rules skip this channel, and it resumes automatically once re-enabled |
Creating a Notification Target
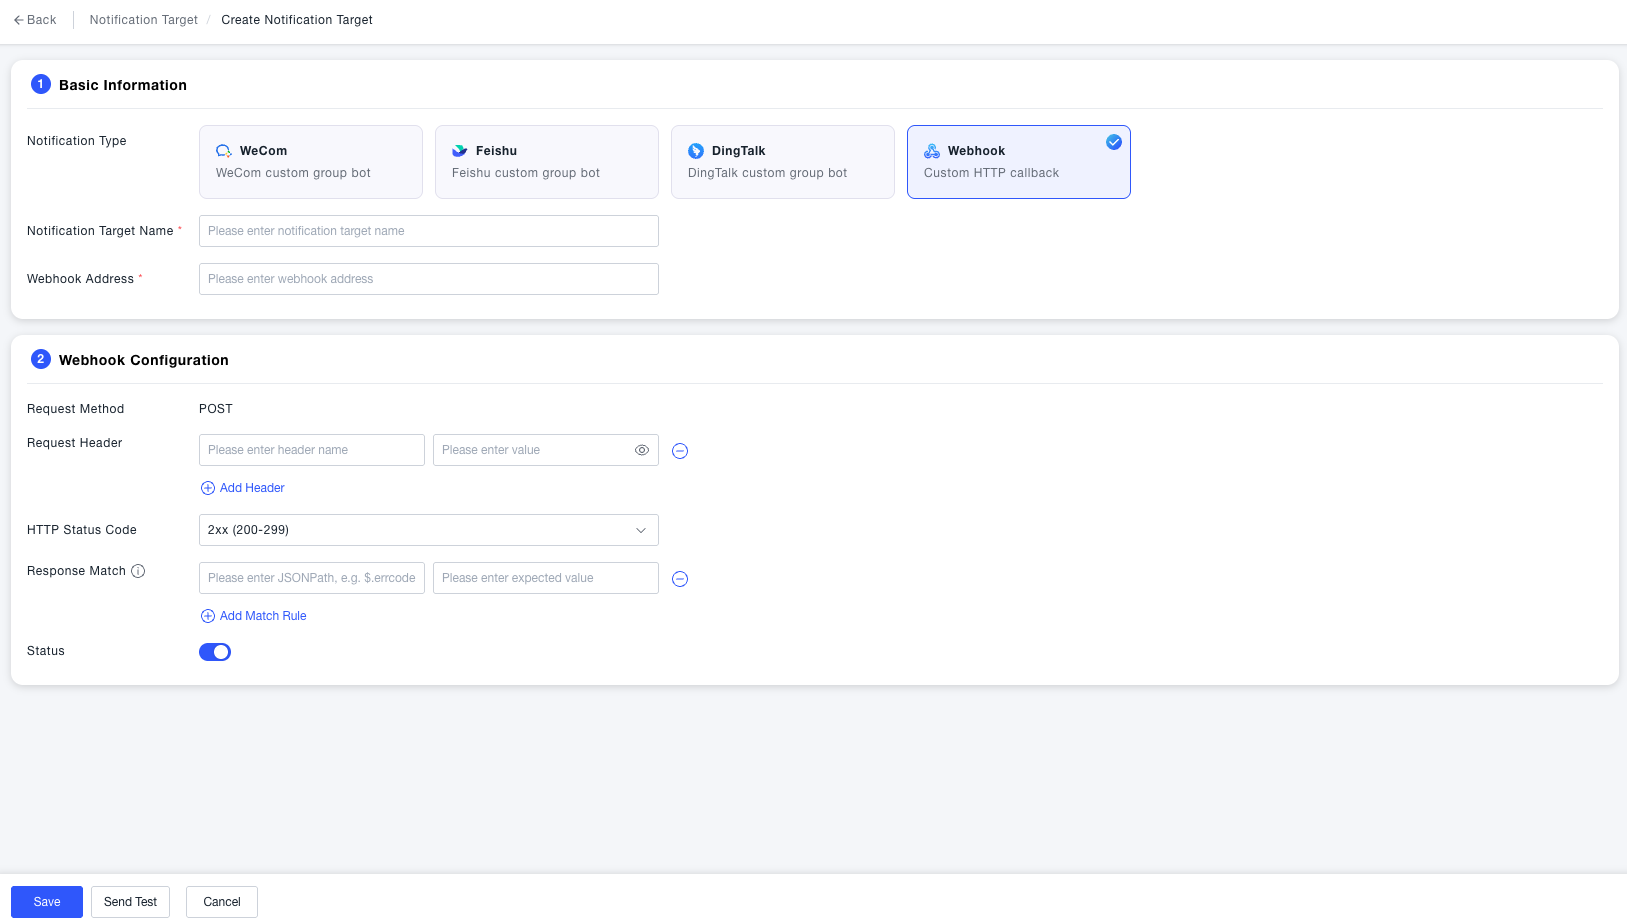
Basic Information
| Field | Required | Description |
|---|---|---|
| Notification Type | Yes | Supports four types:WeCom Bot, Feishu Bot, DingTalk Bot, Webhook. Once selected, the type cannot be changed; create a new one instead if you need to switch types |
| Notification Target Name | Yes | The display name of the notification target, referenced in alert rules and notification policies; up to 50 characters |
| Webhook URL | Yes | The destination URL for pushed messages; the format differs by platform and can be obtained from the corresponding bot's admin console |
Type-Specific Configuration
WeCom Bot
| Field | Required | Description |
|---|---|---|
| Message Type | Yes | SupportsText message and Markdown message |
Feishu Bot
| Field | Required | Description |
|---|---|---|
| Signature Secret | No | Required when the Feishu bot has "Signature Verification" enabled; masked input, supports temporarily revealing via the eye icon, limited to 100 characters |
| Message Type | Yes | SupportsPlain text, Rich text, Card message |
DingTalk Bot
| Field | Required | Description |
|---|---|---|
| Message Type | Yes | SupportsText message, Markdown message, Card message (actionCard) |
| Security Setting | No | SelectingSigning Secret expands a masked input field; must start with SEC, supports revealing via the eye icon, limited to 100 characters |
DingTalk bot security settings here only support None and Signing Secret. "Custom Keywords" and "IP Allowlist" must be configured on the DingTalk side and are not entered here.
Webhook
| Field | Required | Description |
|---|---|---|
| Request Method | Fixed | Fixed toPOST, cannot be changed |
| Request Headers | No | ClickAdd Header to add custom headers one by one, up to 10; Key limited to 64 characters, Value limited to 1024 characters. Value has an eye icon to toggle showing/hiding the original text; in edit mode it defaults to •••••••• |
| HTTP Status Code | Yes | One of the success-criteria rules; supports2xx (default, 200–299), 200 only, and Custom (manually enter allowed status codes, comma-separated, e.g. 200,201,204) |
| Response Body Matching | No | ClickAdd Match Rule to configure a JSONPath expression and expected value; multiple rules can be added, combined with AND logic, up to 10 rules |
A correct HTTP status code alone does not guarantee business-level success. Add a response body matching rule to a Webhook (e.g., JSONPath $.errcode, expected value 0) to detect business-level errors returned by the target system, avoiding false positives on send success.
Test Send
In the test dialog's input box, fill in the test content (required, up to 200 characters), then click send to view the test result:
- Result area: Success (green) / Failure (red), showing "[Notification Target Name] test message sent successfully / failed"
- Response Body Summary: The raw response body shown in a monospace font, scrollable when it exceeds the display height
The success criteria logic is: the HTTP status code matches the rule AND all response body matching rules are satisfied; both conditions must hold for the send to be marked as successful.
Common Scenarios
Scenario: Centrally manage multiple WeCom group bots Create separate WeCom Bot notification targets for the "Core Service Alert Group" and "Infrastructure Alert Group," selecting Markdown as the message type. Reference the corresponding notification targets directly in notification policies afterward — updating a Webhook URL only requires a single change on the Notification Target page, with no need to edit every alert rule.
Scenario: Integrate with an external system and detect business-level failures
Select Webhook as the type, and pass authentication information via a request header (e.g., Authorization: Bearer ${token}). In the success criteria, set the HTTP status code to 2xx, and add a response body matching rule of $.code = 0. Even if the API returns 200, if the response body's code is not 0, the send is judged as failed.
Scenario: DingTalk bot signature verification
Select DingTalk Bot as the type, choose Signing Secret for the security setting, and fill in a secret starting with SEC. After saving, pushed messages will automatically carry the signature, preventing messages from being blocked when the DingTalk group has signature verification enabled.
Notes
Before deleting or disabling a notification target, confirm that no alert rules or notification policies still reference it. When disabled, associated deliveries are silently skipped rather than throwing an error, which is easy to overlook.
Deleting a notification target is irreversible. After deletion, any notification policy that depends on it will no longer be able to deliver notifications through that channel — proceed with caution.